
1. Киришүү
Thank you for choosing the Grundig RRCD 4305 Freaxx 50 CD/MP3 Cassette Radio. This manual provides essential information for the safe and efficient operation of your device. Please read it thoroughly before use and retain it for future reference.
2. Коопсуздук нускамалары
- Кубат булагы: электр менен жабдууну камсыз кылуу voltage matches the rating indicated on the unit.
- Вентиляция: Желдетүүчү тешиктерди жаппаңыз. Аба агымынын жакшы айланышы үчүн түзмөктүн айланасында жетиштүү орун калтырыңыз.
- Суу жана ным: Do not expose the unit to rain, moisture, or dripping/splashing liquids. Keep away from water sources.
- Жылуулук: Түзмөктү радиаторлор, жылыткычтар, мештер же башка жылуулук чыгаруучу шаймандар сыяктуу жылуулук булактарына жакын койбоңуз.
- Тазалоо: Disconnect the unit from the power source before cleaning. Use a soft, dry cloth.
- Тейлөө: Агрегатты өзүңүз тейлөөгө аракет кылбаңыз. Бардык тейлөөлөрдү квалификациялуу тейлөө кызматкерлерине тапшырыңыз.
- Батареялар: Follow proper polarity when inserting batteries. Do not mix old and new batteries or different types of batteries. Remove batteries if the unit is not used for extended periods.
3. Продукт бүтүп калдыview
Familiarize yourself with the main components and controls of your Grundig RRCD 4305 Freaxx 50.
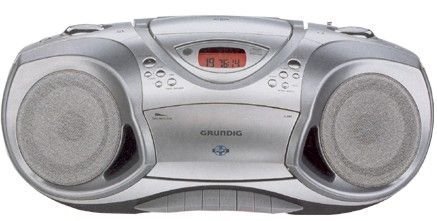
Сүрөт 1: Алдыңкы view of the Grundig RRCD 4305 Freaxx 50, showing the CD compartment, cassette deck, and control buttons.
Башкаруу каражаттары жана көрсөткүчтөр:
- Кубат баскычы: Агрегатты күйгүзөт же өчүрөт.
- Үндү көзөмөлдөө: Аудио чыгаруу деңгээлин тууралайт.
- Функция тандагыч: Switches between CD, Radio, Cassette, and AUX modes.
- Tuning Knob (Radio): Радио жыштыгын тууралайт.
- Band Selector (Radio): Selects AM/FM radio bands.
- CD/MP3 Controls: Play/Pause, Stop, Skip Forward/Backward, Folder Up/Down.
- Кассеталык башкаруу элементтери: Play, Stop/Eject, Fast Forward, Rewind, Record.
- Дисплей: Учурдагы режимди, трек номерин же радио жыштыгын көрсөтөт.
4. Орнотуу
4.1 Пакеттен чыгаруу
- Агрегатты таңгагынан кылдаттык менен чыгарыңыз.
- Check for any damage that may have occurred during transit. If damaged, do not operate the unit and contact your dealer.
- Таңгактоочу материалдарды келечекте ташуу же сактоо үчүн сактаңыз.
4.2 Кубат туташтыруу
The unit can be powered by AC mains or batteries.
AC кубаттуулугу:
- Connect the supplied AC power cord to the AC IN socket on the rear of the unit.
- Электр шнурунун экинчи учун стандарттуу розеткага сайыңыз.
Батарея кубаттуулугу:
- Аппараттын астындагы батарея бөлүкчөсүнүн капкагын ачыңыз.
- Insert the required number of 'C' size batteries (not supplied), ensuring correct polarity (+/-).
- Батарея уясынын капкагын бекем жабыңыз.
4.3 Антенна
- For FM reception, extend the telescopic antenna fully. Adjust its position for optimal signal reception.
- For AM reception, the unit uses a built-in ferrite bar antenna. Rotate the entire unit for best AM reception.
5. Иштөө нускамалары
5.1 Негизги операция
- басыңыз КҮЧ аппаратты иштетүү үчүн баскыч.
- тууралаңыз VOLUME каалаган угуу деңгээлине чейин башкаруу.
- басыңыз КҮЧ аппаратты өчүрүү үчүн кайра баскычын басыңыз.
5.2 Радио менен иштөө
- коюңуз ФУНКЦИЯ ТАНДАГЫ to 'RADIO'.
- баскычын колдонуп, каалаган диапазонду (AM же FM) тандаңыз. БАНД SELECTOR которуу.
- айлантыңыз TUNING knob to find your desired radio station.
- Оптималдуу кабыл алуу үчүн антеннаны тууралаңыз.
5.3 CD/MP3 ойнотуу
- коюңуз ФУНКЦИЯ ТАНДАГЫ to 'CD'.
- Open the CD compartment cover by pressing the 'OPEN' button.
- Place a CD or MP3 disc onto the spindle with the label side facing up.
- Close the CD compartment cover. The unit will read the disc.
- басыңыз ОЙНОО/ТЫНЫТТЫРУ ойнотууну баштоо үчүн
- колдонуу АЛДЫГА/АРТКАГА ӨТКӨРҮҮ тректер арасында өтүү үчүн баскычтар.
- For MP3 discs, use the ПАПКАНЫ ӨЙДӨ/ТӨМӨН buttons to navigate between folders.
- басыңыз ТОКТОТ ойнотууну токтотуу үчүн баскыч.
5.4 Кассетаны ойнотуу жана жазуу
Ойнотуу:
- коюңуз ФУНКЦИЯ ТАНДАГЫ to 'TAPE'.
- басыңыз ТОКТОТУУ/ЧЫГАРУУ кассеталык бөлүмдү ачуу үчүн баскыч.
- Ачык четин өйдө каратып кассетаны салыңыз.
- Кассеталык бөлүмдү жабыңыз.
- басыңыз ОЙНОО ойнотууну баштоо үчүн
- Колдонуу ТЕЗ АЛГА or КАЙРА АЙРУУ лента аркылуу тез жылдыруу үчүн баскычтар.
- Басыңыз ТОКТОТУУ/ЧЫГАРУУ to stop playback and open the compartment.
Recording (from Radio/CD/AUX):
- Insert a blank cassette tape into the compartment.
- Select the desired source (RADIO, CD, or AUX) using the ФУНКЦИЯ ТАНДАГЫ.
- Start playback on the source (e.g., play a CD, tune a radio station).
- басыңыз ЖАЗУУ button (usually red) and the ОЙНОО button simultaneously on the cassette deck. Recording will begin.
- басыңыз ТОКТОТУУ/ЧЫГАРУУ жаздырууну аяктоо үчүн баскычты басыңыз.
5.5 Көмөкчү киргизүү (AUX)
- Connect an external audio device (e.g., smartphone, MP3 player) to the AUX IN jack using a 3.5mm audio cable (not supplied).
- коюңуз ФУНКЦИЯ ТАНДАГЫ to 'AUX'.
- Control playback from your external device. The unit will output the audio.
6. Техникалык тейлөө
6.1 Агрегатты тазалоо
- Тазалоодон мурун аны дайыма электр розеткасынан сууруп алыңыз.
- Сырткы беттерди сүртүү үчүн жумшак, кургак чүпүрөктү колдонуңуз.
- Абразивдүү тазалагычтарды, момдорду же эриткичтерди колдонбоңуз, анткени алар финишке зыян келтириши мүмкүн.
6.2 CD объективине кам көрүү
- Do not touch the CD lens.
- If the lens is dirty, use a commercially available CD lens cleaner.
6.3 Cassette Deck Care
- Тасма баштарын, капстанды жана кысуучу роликти мезгил-мезгили менен изопропил спиртине бир аз нымдалган кебез менен тазалап туруңуз.
- Demagnetize the tape heads regularly with a tape head demagnetizer to prevent sound degradation.
6.4 Батареяны алмаштыруу
- When battery power is low, the unit's performance may degrade. Replace all batteries with new ones.
- Refer to section 4.2 for battery insertion instructions.
- Колдонулган батарейкаларды жергиликтүү эрежелерге ылайык таштаңыз.
7. Кыйынчылыктарды
| Көйгөй | Мүмкүн себеп | Чечим |
|---|---|---|
| Күч жок | AC шнуру туташтырылган эмес; Батареялар түгөндү же туура эмес киргизилген. | Check AC cord connection; Replace batteries, ensuring correct polarity. |
| Үн жок | Үнү өтө төмөн; Туура эмес функция тандалды; Кулакчындар туташтырылган. | Increase volume; Select correct function (CD/Radio/Tape/AUX); Disconnect headphones. |
| CD/MP3 disc skips or does not play | Disc dirty or scratched; Disc inserted incorrectly; Lens dirty. | Clean or replace disc; Reinsert disc correctly; Clean CD lens. |
| Радио кабыл алуу начар | Antenna not extended/adjusted; Weak signal. | FM антеннасын узартып жана тууралаңыз; AM кабыл алуу үчүн түзмөктү айландырыңыз; түзмөктү башка жерге жылдырып көрүңүз. |
| Cassette playback distorted | Tape heads dirty or demagnetized; Worn tape. | Тасма баштарын тазалап, магнитин кетириңиз; Башка лентаны колдонуп көрүңүз. |
8. Техникалык шарттар
- Электр камсыздоо: AC 230V ~ 50Hz or DC 9V (6 x 'C' size batteries)
- Радио жыштык:
- FM: 87.5 - 108 MHz
- AM: 522 - 1620 kHz
- CD ойноткуч: Supports CD-R/RW, MP3 playback
- Кассеталык палуба: Stereo playback and recording
- Аудио киргизүү: 3.5 мм AUX-IN уячасы
- Чыгуу күчү: [Specific wattage, if known, otherwise omit or state 'Typical']
- Өлчөмдөрү (W x Y x D): [Specific dimensions, if known, otherwise omit]
- Салмагы: [Specific weight, if known, otherwise omit]
Specifications are subject to change without notice for continuous product improvement.
9. Кепилдик жана колдоо
Grundig products are manufactured to high quality standards and are warranted against manufacturing defects. For detailed warranty information, please refer to the warranty card included with your purchase or visit the official Grundig website. For technical support or service inquiries, please contact your local Grundig service center or authorized dealer.
Көбүрөөк маалымат жана колдоо таба аласыз Grundig Brand Store.