
1. Киришүү
This manual provides detailed instructions for the proper installation, operation, and maintenance of your Lanzar VIBE211 Vibe 360 Watt 2 Channel Mosfet Ampкөтөргүч. Сураныч, орнотууга же иштетүүгө аракет кылуудан мурун бул колдонмону кылдат окуп чыгыңыз ampоптималдуу иштөөнү жана коопсуздукту камсыз кылуу үчүн көтөргүч.
2. Коопсуздук маалыматы
Орнотуу жана эксплуатациялоо учурунда ар дайым төмөнкү коопсуздук чараларын сактаңыз:
- Disconnect the vehicle's negative battery terminal before any wiring connections are made.
- Зымдардын бузулушуна же кыска туташууларга жол бербөө үчүн бардык зымдар туура жолго коюлганын жана бекемделгенин текшериңиз.
- Орнотуу бөлүмүндө көрсөтүлгөндөй, электр жана жерге туташтыруу үчүн тиешелүү өлчөөчү зымдарды колдонуңуз.
- монтаждоо ampкөтөргүчтү жетиштүү желдетүүнү камсыз кылган жана нымдуулуктан жана ашыкча ысыктан корголгон жерге бекем орнотуңуз.
- иштетпеңиз amplifier if it is damaged or malfunctioning. Refer to the troubleshooting section or seek professional assistance.
3. Продукт бүтүп калдыview
The Lanzar VIBE211 is a 2-channel Mosfet amplifier designed for car audio systems. It features a bridgeable design, allowing for flexible configuration, and incorporates a regulated Mosfet power supply for stable performance. Key features include variable high/low pass crossover controls and a remote subwoofer bass control.
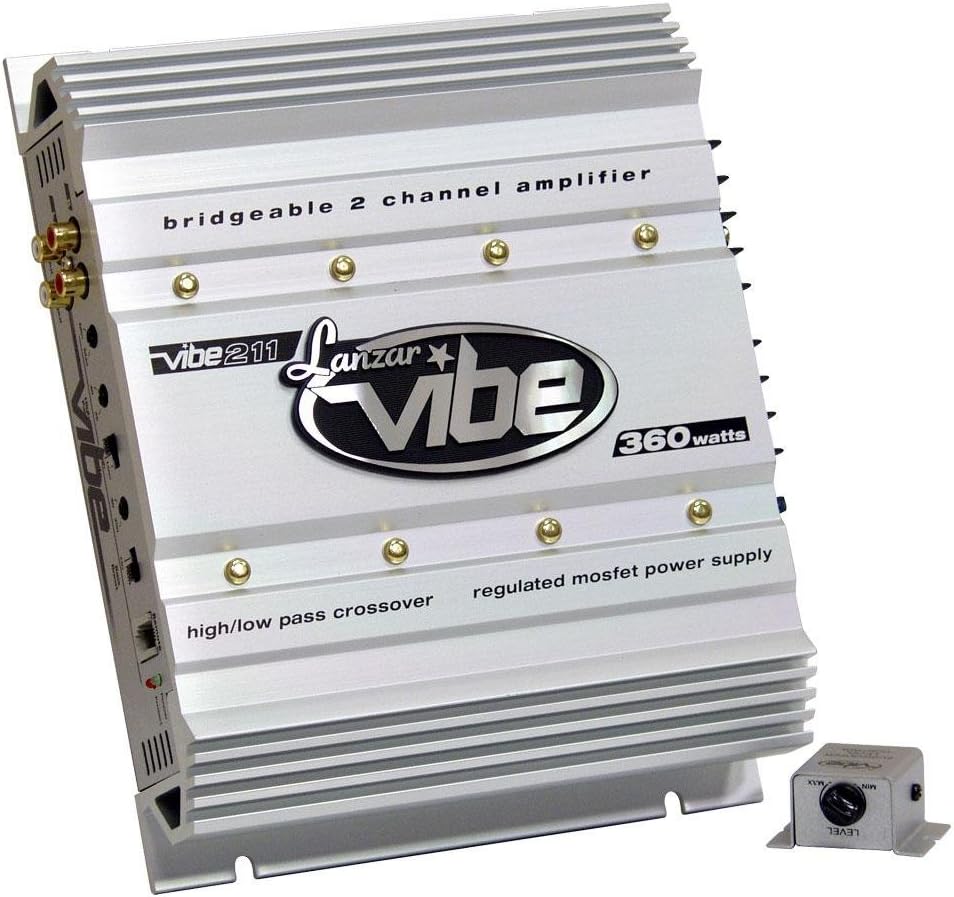
Бурчтуу view of the silver Lanzar VIBE211 Vibe 360 Watt 2 Channel Mosfet Ampкөтөргүч, көрсөтүүчүasing its finned heatsink design, RCA inputs, and control panel. The amplifier features text indicating 'bridgeable 2 channel amplifier', 'vibe 211', 'Lanzar vibe', '360 watts', 'high/low pass crossover', and 'regulated mosfet power supply'. A small, separate remote bass level control unit is visible in the foreground.
4. Орнотуу жана орнотуу
4.1 Орнотуу Ampөмүрлүү
Choose a secure mounting location that provides adequate air circulation around the amplifier's heatsink. Avoid mounting in direct sunlight or areas prone to moisture. Use the provided mounting hardware to secure the ampкөтөргүчтү катуу бетке бекем бекитиңиз.
4.2 Зымдарды туташтыруу
Кыска туташуулардын алдын алуу үчүн бардык туташуулардын бекем жана жакшы изоляцияланганын текшериңиз.
- Кубат (B+): Connect a heavy-gauge wire (e.g., 8 AWG or larger) directly from the positive terminal of the vehicle's battery to the amplifier's B+ terminal. Install an appropriate fuse (15A) within 18 inches of the battery.
- Жер (GND): Connect a heavy-gauge wire of the same size as the power wire from the amplifier's GND terminal to a clean, unpainted metal surface of the vehicle chassis. Ensure a good electrical connection.
- Алыстан (REM): Connect a smaller gauge wire (e.g., 18 AWG) from the ampкөтөргүчтүн REM терминалын башкы блоктун алыстан күйгүзүү чыгышына туташтырыңыз. Бул зым ampстерео телефонуңуз менен көтөргүчтү күйгүзүп жана өчүрүңүз.
- RCA киргизүү: Connect the RCA audio cables from your head unit's pre-amp чыгарат amplifier's Gold RCA Inputs. The amplifier includes Line Outs for Left and Right Channels for daisy-chaining to other ampаман калгандар.
- Speaker Outputs: Динамиктерди туташтырыңыз amplifier's speaker terminals. Observe correct polarity (+ to + and - to -). The amplifier is 2 Ohm stereo stable and bridgeable at 4 Ohms.
- Remote Subwoofer Bass Control: Connect the remote bass control unit to the designated port on the amplifier. Mount the control unit in an accessible location for easy adjustment.
5. Иштөө нускамалары
5.1 Баштапкы кубаттуулук
After all connections are made, reconnect the vehicle's negative battery terminal. Turn on your head unit. The amplifier features Soft Turn On/Off circuitry to prevent pops and clicks. Power Protection LED Indicators will illuminate to show operational status.
5.2 Adjusting Input Level Controls
The amplifier has Variable Input Level Controls. Start with the amplifier's input level set to minimum. Play a familiar piece of music through your head unit at about 75% of its maximum volume. Slowly increase the amplifier's input level until you hear slight distortion, then back it off slightly. This ensures the amplifier receives an optimal signal without clipping.
5.3 Кроссовер орнотуулары
The amplifier features Variable High Low Pass Crossover Controls. These allow you to filter specific frequencies to your speakers or subwoofers.
- Жогорку өтүүчү чыпка (HPF): Used for full-range speakers to prevent low frequencies from reaching them, improving clarity.
- Төмөн өтүү чыпкасы (LPF): Used for subwoofers to allow only low frequencies to pass, enhancing bass response.
Adjust these controls to match the frequency response characteristics of your speakers and subwoofers.
5.4 Bass Boost Circuit
The built-in Bass Boost Circuit allows for an increase in bass output at specific frequencies. Use this feature sparingly and adjust to your preference, avoiding excessive boosting that could lead to distortion or speaker damage.
5.5 Көпүрө режиминде иштөө
The amplifier can be bridged at 4 Ohms to combine the power of both channels into a single, higher-power output, typically for driving a subwoofer. Refer to the wiring diagram for specific instructions on bridging the ampөмүрлүү.
6. Техникалык тейлөө
The Lanzar VIBE211 amplifier requires minimal maintenance. Periodically inspect the wiring connections for tightness and corrosion. Keep the amplifier's heatsink clean and free of dust or debris to ensure proper cooling. Use a soft, dry cloth for cleaning the exterior.
7. Кыйынчылыктарды
Эгер сиз менен көйгөйлөр пайда болсо amplifier, кесипкөй кызматка кайрылаардан мурун төмөнкү таблицага кайрылыңыз:
| Көйгөй | Мүмкүн себеп | Чечим |
|---|---|---|
| Кубат жок / Үн жок | Сактагыч күйүп кеткен; Кубат/жерге туташтыруу/алыстан туташтыруу зымы бошоп калган; Башкы блок бузук. | Check and replace fuse; Verify all power, ground, and remote connections; Test head unit functionality. |
| Distorted Sound | Input level too high; Speaker impedance too low; Damaged speakers. | Adjust input level; Verify speaker impedance (2 Ohm stereo stable, 4 Ohm bridged); Inspect speakers for damage. |
| Amplifier Goes into Protection Mode | Ысытып кетүү; Динамик зымдарындагы кыска туташуу; Үндүн төмөндүгүtage. | Ensure adequate ventilation; Check speaker wires for shorts; Verify battery voltage жана заряддоо системасы. |
| Сабвуферден басс жок | LPF not enabled or set too high; Phase issue; Remote bass control set to minimum. | Adjust LPF setting; Check subwoofer phase; Increase remote bass control level. |
8. Техникалык шарттар
Technical specifications for the Lanzar VIBE211 ampөмүр берүүчү:
- Power Output (RMS @ 4 Ohms): 2 x 90 Watt
- Power Output (Max @ 4 Ohms): 2 x 180 Watt
- Power Output (Max Bridged @ 4 Ohms): 1 x 360 Watt
- Power Output (RMS @ 2 Ohms): 2 x 150 Watt
- Ampжашоочу түрү: 2 Channel Mosfet
- Frequency Response: 15 Hz - 35 kHz
- Сигнал-ызы-чуу катышы (S/N): 90 дБ
- Fuse рейтинги: 15А
- Өлчөмдөрү (Г x Y x L): 10.25 дюйм x 2 дюйм x 8 дюйм
- Киргизүү деңгээлин көзөмөлдөө: Variable
- Crossover Controls: Variable High/Low Pass
- Туруктуулук: 2 Ohm Stereo Stable, Bridgeable at 4 Ohms
- Коргоо схемасы: Advanced Power Protection LED Indicators
- Кошумча функциялар: Remote Subwoofer Bass Control, Electronic Crossover Network, Bass Boost Circuit, Soft Turn On/Off
9. Кепилдик жана колдоо
9.1 Кепилдик маалыматы
The Lanzar VIBE211 ampкөтөргүч а менен келет 1-ЖЫЛ limited warranty from the date of purchase. This warranty covers defects in materials and workmanship under normal use. Please retain your proof of purchase for warranty claims. The warranty does not cover damage caused by improper installation, accident, misuse, abuse, negligence, or unauthorized modification.
9.2 Кардарларды колдоо
For technical assistance, troubleshooting beyond this manual, or warranty service, please contact Lanzar customer support. Refer to the official Lanzar webучурдагы байланыш маалыматы үчүн сайт же продуктунун таңгагы.