1. Киришүү
This manual provides detailed instructions for the installation, operation, and maintenance of your PICO 5503PT Ignition Switch. Designed for universal fit, this switch offers Accessory-Off-Ignition-Start functionality, crucial for various automotive applications. Please read this manual thoroughly before installation and use to ensure proper function and safety.
2. Коопсуздук маалыматы
ЭСКЕРТҮҮ: This product contains chemicals known to the State of California to cause cancer and birth defects or other reproductive harm. Always wear appropriate personal protective equipment (PPE) when handling and installing this product.
- Always disconnect the vehicle's battery before performing any electrical work to prevent electrical shock or short circuits.
- Ensure all wiring connections are secure and properly insulated to prevent arcing or fire hazards.
- Эгерде сиз орнотуунун кандайдыр бир кадамдары боюнча күмөн санасаңыз, квалификациялуу автоунаа технигине кайрылыңыз.
- Do not exceed the specified current and voltage ratings (30 Ampс, 12 вольт).
- Keep keys away from children.
3. Продукт бүтүп калдыview
The PICO 5503PT Ignition Switch is a robust, 4-position switch designed for reliable performance. It includes two keys for operation.
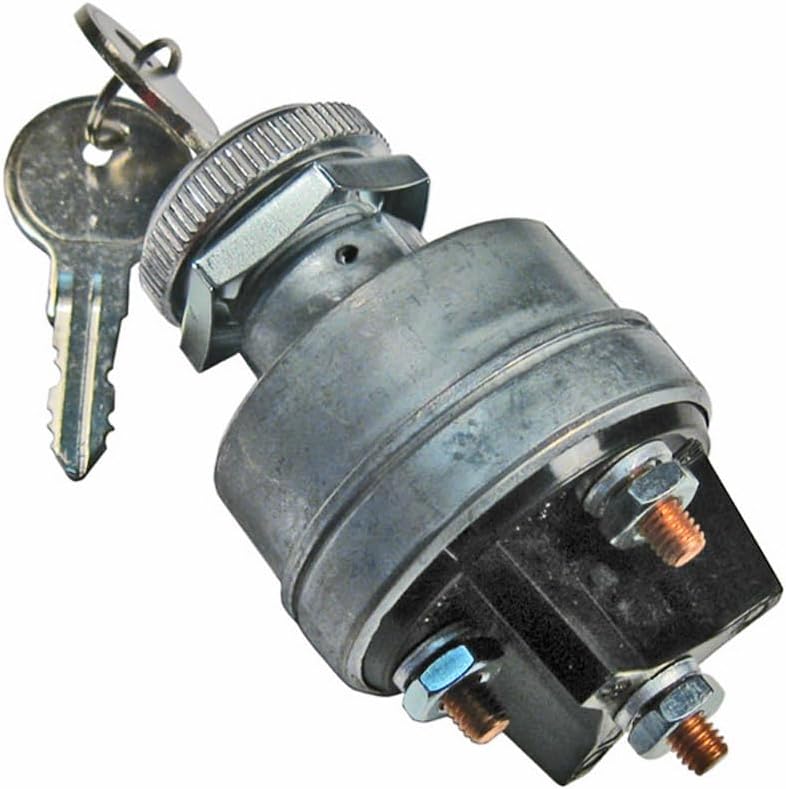
1-сүрөт: PICO 5503PT Ignition Switch. This image shows the main body of the ignition switch, made of metal, with a threaded shaft for mounting. Two keys are inserted into the keyhole. At the base, a black plastic housing contains three screw terminals with copper posts and nuts for electrical connections.
Негизги өзгөчөлүктөрү:
- 4-Position Operation: Accessory, Off, Ignition, Start.
- Universal Fit: Compatible with a wide range of automotive applications.
- Туруктуу курулуш: Features brass or bronze contact material and an IP54 rating for protection.
- Includes 2 Keys: For convenience and security.
4. Техникалык шарттар
| Спецификация | Нарк |
|---|---|
| Модел | 5503PT |
| Иштөө режими | Accessory-Off-Ignition-Start |
| Учурдагы рейтинг | 30 Amps |
| Operating Voltage | 12 вольт |
| Туташтыргыч түрү | Бурамалар |
| Терминал түрү | Бурама |
| Өлчөмдөрү (L x W x Y) | 2 x 2 x 4 дюйм |
| Монтаж түрү | Панел орнотуу |
| Актуатор түрү | Жандыруу ачкычы |
| Байланыш материалы | Brass Or Bronze |
| Эл аралык коргоо рейтинги | IP54 |
| Позициялардын саны | 4 |
| Түс | Silver |
| Элемент Салмагы | 6.1 унция |
5. Орнотуу жана орнотуу
5.1 Керектүү куралдар:
- Wrench set (for terminal nuts and mounting nut)
- Зым кыргычтар/кримперлер
- Электр лентасы же жылуулукту кичирейтүүчү түтүк
- Мультиметр (кошумча, туташууларды текшерүү үчүн)
- Drill with appropriate hole saw (if creating a new mounting hole)
5.2 Орнотуу кадамдары:
- Батареяны ажыратыңыз: Before starting, disconnect the negative terminal of your vehicle's battery to prevent accidental short circuits.
- Монтаждоо ордун даярдоо: Identify a suitable panel for mounting the ignition switch. If replacing an existing switch, remove the old one. If installing new, drill a hole of appropriate diameter for the switch's threaded shaft.
- Которгучту орнотуу: Insert the threaded shaft of the PICO 5503PT switch through the mounting hole. Secure it in place using the provided nut on the back of the panel. Ensure it is tightened firmly but do not overtighten.
- Терминалдарды аныктоо: The switch typically has three or more terminals. While specific labeling may vary, common configurations are:
- BAT/B: Battery (Constant 12V power input)
- ACC/A: Accessory (Power for accessories like radio, wipers)
- IGN/I: Ignition (Power for engine ignition system, fuel pump, etc.)
- SOL/S: Start/Solenoid (Momentary power to starter solenoid)
Refer to your vehicle's wiring diagram for precise terminal identification if available.
- Зым байланыштары: Connect the appropriate wires from your vehicle's harness to the corresponding screw terminals on the switch. Strip approximately 1/4 inch of insulation from each wire, insert it under the screw terminal, and tighten securely. Ensure no stray wire strands are present that could cause a short circuit.
- Изоляция байланыштары: After all wires are connected, ensure all exposed terminals and connections are properly insulated using electrical tape or heat shrink tubing.
- Батареяны кайра туташтыруу: Унаанын аккумуляторунун терс терминалын кайра туташтырыңыз.
- Сыноо функциясы: Insert a key and test all switch positions (Accessory, Off, Ignition, Start) to ensure proper operation of all connected systems.
6. Иштөө нускамалары
The PICO 5503PT Ignition Switch features four distinct positions, controlled by inserting and turning the key.
- Ачкычты киргизүү: Берилген ачкычтардын бирин от алдыруу которгучуна салыңыз.
- ӨЧҮРҮҮ абалы: This is the default position when the key is inserted or removed. All electrical systems are off, and the engine is not running.
- ACCESSORY (ACC) Position: Turn the key one click clockwise from OFF. This position provides power to non-essential accessories such as the radio, power windows, or auxiliary outlets, without engaging the ignition system.
- IGNITION (ON) Position: Turn the key two clicks clockwise from OFF (or one click from ACC). This position powers the vehicle's ignition system, fuel pump, and other essential engine components. All warning lights on the dashboard should illuminate. This is the position for normal engine operation.
- СТАРТ позициясы: From the IGNITION position, turn the key further clockwise against spring tension. This momentarily engages the starter motor to crank the engine. Release the key once the engine starts; it will spring back to the IGNITION (ON) position. Do not hold the key in the START position for more than 10 seconds to prevent damage to the starter motor.
- Ачкычты алып салуу: The key can only be removed when the switch is in the OFF position.
7. Техникалык тейлөө
- Үзгүлтүксүз текшерүү: Periodically inspect the switch and its wiring connections for any signs of wear, corrosion, or loose connections.
- Тазалоо: Keep the exterior of the switch clean and free from dirt, dust, and moisture. Use a dry, soft cloth for cleaning. Do not use harsh chemicals or abrasive cleaners.
- Негизги кам көрүү: Avoid forcing the key into the switch or using excessive force to turn it. If the key becomes difficult to turn, a small amount of graphite lubricant can be applied to the keyway.
- Курчап турган чөйрөнү коргоо: The IP54 rating provides protection against dust ingress and splashing water. However, avoid direct exposure to high-pressure water jets or prolonged submersion.
8. Кыйынчылыктарды
| Көйгөй | Мүмкүн себеп | Чечим |
|---|---|---|
| Engine does not crank when key is turned to START. | Dead battery, loose battery terminals, faulty starter motor, incorrect wiring to START terminal, faulty switch. | Check battery charge and connections. Verify starter motor function. Inspect wiring to the 'S' terminal. If all else fails, the switch may be faulty. |
| Accessories do not power on in ACC position. | Blown fuse, incorrect wiring to ACC terminal, faulty switch. | Check relevant fuses in the vehicle's fuse box. Verify wiring to the 'A' terminal. |
| Engine runs but dashboard lights/accessories flicker or cut out. | Loose wiring connections, intermittent fault in switch. | Inspect all wiring connections for tightness and corrosion. If problem persists, the switch may need replacement. |
| Ачкычты буруп же алып салуу кыйын. | Debris in keyway, worn key, internal switch mechanism issue. | Try lubricating the keyway with graphite. Check for bent or damaged keys. If problem persists, switch may be damaged. |
9. Кепилдик жана колдоо
PICO products are manufactured to high standards. For specific warranty information, please refer to the documentation provided at the time of purchase or visit the official PICO website. For technical support or inquiries, please contact PICO customer service through their official channels.
PICO Contact Information:
- Webсайт: www.pico.com
- Кардарларды тейлөө: караңыз webбайланыш номерлери же электрондук почта аркылуу колдоо алуу үчүн сайт.