
LANZAR MAXP1200
Lanzar Max Pro 1800 Watt Mono Block Amplifier Колдонмо
Model: MAXP1200
1. Киришүү
Сатып алганыңыз үчүн рахматasing the Lanzar Max Pro 1800 Watt Mono Block Amplifier, Model MAXP1200. This manual provides essential information for the proper installation, operation, and maintenance of your amplifier. To ensure optimal performance and safety, please read this manual thoroughly before attempting to install or operate the unit. Keep this manual for future reference.
2. Коопсуздук маалыматы
Жараат же зыянга учурабаш үчүн ар дайым төмөнкү коопсуздук чараларын сактаңыз ampкөтөргүч жана туташтырылган компоненттер.
- Электр коопсуздугу: Ensure all power connections are made correctly and securely. Disconnect the vehicle's battery before making any power connections to avoid electrical shorts. Use appropriate gauge wiring for power and ground connections as specified in the installation section.
- Вентиляция: орнотуу amplifier in a location that allows for adequate air circulation. Do not cover the amplifier or install it in an enclosed space where heat cannot dissipate. Overheating can lead to amplifier shutdown or damage.
- Кесиптик орнотуу: If you are unsure about any aspect of the installation, it is recommended to seek assistance from a qualified car audio professional.
- Нымдуулуктун таасири: ачыкка чыгарбагыла ampкөтөргүчтү нымдуулукка же сууга тийгизбеңиз. Бул электр тогуна урунууга же түзмөккө зыян келтирүүгө алып келиши мүмкүн.
- Коопсуз орнотуу: монтаждоо amplifier securely to prevent it from becoming a projectile in the event of a sudden stop or accident.
3. Продукт бүтүп калдыview
The Lanzar MAXP1200 is a high-performance mono block amplifier designed to deliver powerful and clear bass to your car audio system. Featuring 1800 watts of peak power, this amplifier is optimized for driving subwoofers.
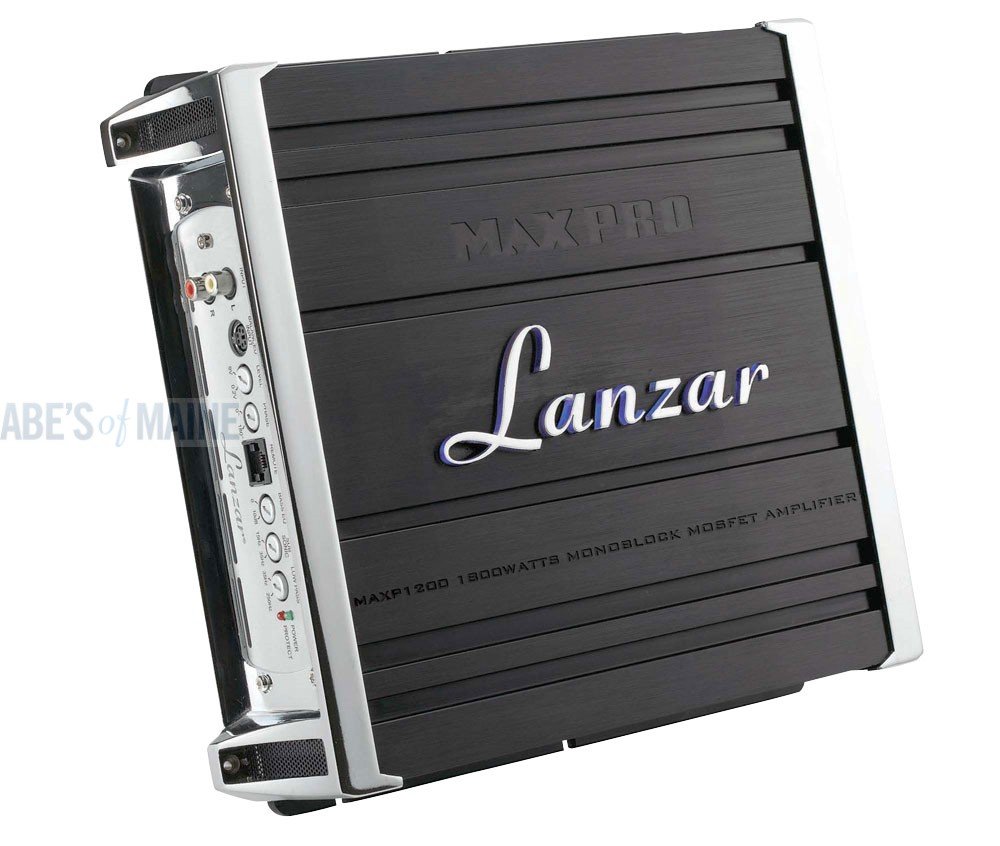
Figure 3.1: Lanzar Max Pro 1800 Watt Mono Block Amplifier (Model MAXP1200). This image shows the amplifier's main body with its black ribbed heatsink design and the silver-colored side panel where the input and control terminals are located. The "Lanzar" logo is prominently displayed on the top surface.
Негизги өзгөчөлүктөрү:
- Mono Block Design for dedicated subwoofer power.
- High Power Output: Up to 1800 Watts.
- MOSFET Power Supply for efficient operation.
- Variable Low Pass Crossover.
- Variable Bass Boost.
- Thermal, Overload, and Short Protection Circuitry.
Компоненттин идентификациясы:
Refer to Figure 3.1 for a visual representation of the amplifier's components.
- RCA киргизүүлөр: For connecting the audio signal from your head unit.
- Көзөмөлдү алуу: Adjusts the input sensitivity to match the output of your head unit.
- Low Pass Filter (LPF) Control: Sets the upper frequency limit for the ampкөтөргүчтүн чыгышы.
- Bass Boost Control: Increases the output level at a specific bass frequency.
- Power/Protect Indicators: LEDs that show the amplifier's operational status.
- Электр терминалдары: Connections for +12V, Ground, and Remote Turn-On.
- Динамик терминалдары: Output connections for your subwoofer(s).
4. Орнотуу жана орнотуу
Туура орнотуу сиздин иштөө жана узак иштөө үчүн абдан маанилүү болуп саналат ampөмүрлүү.
4.1 Орнотууга чейинки текшерүүлөр:
- Ensure the vehicle's electrical system can support the ampкөтөргүчтүн кубаттуулугуна талаптар.
- Disconnect the negative terminal of the vehicle's battery before starting any wiring.
- Gather all necessary tools and wiring accessories (power wire, ground wire, remote wire, RCA cables, speaker wire, fuse holder, fuse).
4.2 Орнотуу Ampөмүр берүүчү:
The amplifier is designed for surface mount installation. Choose a mounting location that is:
- Secure and stable, preventing movement during vehicle operation.
- Well-ventilated, allowing heat to dissipate effectively. Avoid enclosed spaces like under carpets or in tight compartments.
- Түз күн нурунан же жылуулук булактарынан алыс кармаңыз.
- Protected from moisture and excessive dust.
Use appropriate screws to secure the amplifier to the chosen surface. Ensure no existing wiring or fuel lines are damaged during drilling.
4.3 Зымдарды туташтыруу:
- Кубат (+12V) Туташуу: Run a power cable (e.g., 4-gauge or larger) directly from the positive terminal of the vehicle's battery to the amplifier's +12V terminal. Install an in-line fuse holder with an appropriate fuse (refer to specifications for fuse rating) within 18 inches (45 cm) of the battery.
- Жерге туташуу (GND): Электр кабели менен бирдей калибрдеги жерге туташтыруучу кабелди туташтырыңыз amplifier's GND terminal to a clean, unpainted metal surface of the vehicle's chassis. Ensure a solid electrical connection by scraping away any paint or rust. The ground point should be as short as possible, ideally less than 3 feet (1 meter).
- Алыстан (REM) туташуусу: Connect a remote turn-on wire (e.g., 18-gauge) from the ampкөтөргүчтүн REM терминалын башкы блоктун алыскы чыгышына. Бул зым айлантат ampкөтөргүчтү баш бирдигиңиз менен күйгүзүңүз жана өчүрүңүз.
- RCA киргизүү туташуу: RCA кабелдерин мурунтан туташтырыңызamp outputs of your head unit to the RCA inputs on the ampөмүрлүү.
- Динамик чыгаруу туташуу: Сабвуфериңизди(лериңизди) туташтырыңыз amplifier's speaker terminals. Pay close attention to polarity (+ to + and - to -). For multiple subwoofers, ensure proper wiring for the desired impedance load.
5. иштетүү Ampөмүрлүү
5.1 Баштапкы иштетүү:
Once all connections are made and double-checked, reconnect the vehicle's battery. Turn on your head unit. The amplifier's "Power" indicator light should illuminate, indicating it is receiving power and is operational. If the "Protect" light illuminates, refer to the Troubleshooting section.
5.2 Башкаруу элементтерин жөнгө салуу:
- Көзөмөлдү алуу: This is not a volume control. It matches the ampliifier's кириш сезгичтиги чыгаруу voltage of your head unit. Start with the gain set to minimum. Play a familiar track with a strong bass signal at about 75% of your head unit's maximum volume. Slowly increase the ampбурмалоону укканга чейин көтөргүчтүн күчөткүчүн басыңыз, андан кийин бир аз артка чегиниңиз.
- Төмөн өткөрүү чыпкасы (LPF): Adjust this control to filter out frequencies above the desired range for your subwoofer. A common starting point is between 80Hz and 120Hz, depending on your subwoofer and other speakers.
- Бас жогорулатуу: Use this control sparingly. Excessive bass boost can lead to distortion and potential damage to your subwoofer. Start at minimum and increase only if more bass impact is desired, ensuring the sound remains clean.
6. Техникалык тейлөө
Үзгүлтүксүз тейлөө сиздин узак мөөнөттүү жана натыйжалуулугун камсыз кылууга жардам берет ampөмүрлүү.
- Тазалоо: Мезгил-мезгили менен сүртүп туруңуз amplifier's exterior with a soft, dry cloth to remove dust and dirt. Do not use harsh chemicals or abrasive cleaners. Ensure the cooling fins are free of obstructions.
- Туташуу текшерүү: Occasionally inspect all wiring connections (power, ground, remote, RCA, speaker) to ensure they are secure and free from corrosion. Loose connections can cause performance issues or damage.
- Вентиляция: камсыз кылуу amplifier's mounting location remains well-ventilated. Clear any objects that might obstruct airflow around the unit.
7. Кыйынчылыктарды
Эгер сиз менен көйгөйлөр пайда болсо amplifier, consult the following table before contacting technical support.
| Көйгөй | Мүмкүн себеп | Чечим |
|---|---|---|
| Кубат жок (Күч LED өчүк) | Blown fuse; Loose power/ground/remote connection; Faulty wiring. | Текшерүү amplifier fuse and in-line battery fuse. Verify all power, ground, and remote connections are secure and have proper voltage. |
| LED күйгүчтү коргоо | Overheating; Speaker short circuit; Low impedance load; DC offset. | уруксат берүү amplifier to cool down. Check speaker wiring for shorts. Verify speaker impedance matches amplifier's minimum rating. Disconnect RCA inputs to check for DC offset. |
| Үн чыгышы жок | No input signal; Gain set too low; Speaker wires disconnected/shorted; Head unit settings. | Check RCA connections from head unit. Increase gain. Inspect speaker wiring. Ensure head unit's subwoofer output is enabled and volume is up. |
| Distorted Sound | Gain set too high; Improper LPF setting; Poor ground connection; Damaged speaker. | Reduce gain. Adjust LPF. Check ground connection for cleanliness and security. Inspect speaker for damage. |
8. Техникалык шарттар
The following are the general specifications for the Lanzar Max Pro 1800 Watt Mono Block Amplifier (Model MAXP1200):
| Өзгөчөлүк | Деталь |
|---|---|
| Бренд | ЛАНЗАР |
| Модель номери | MAXP1200 |
| Продукциянын өлчөмдөрү (L x W x Y) | 38.1 x 32.2 x 11.1 сантиметр (15 x 12.67 x 4.38 дюйм) |
| Элемент Салмагы | 3.98 кг (8.77 фунт) |
| Монтаж түрү | Surface Mount |
| Өндүрүүчү | Xtensive Car Audio |
| ASIN | B003OUI5VO |
| UPC | 068888899864 |
Эскертүү: Техникалык мүнөздөмөлөр продуктуну жакшыртуу үчүн эскертүүсүз өзгөртүлүшү мүмкүн.
9. Кепилдик жана колдоо
Lanzar products are designed and manufactured to the highest quality standards. For information regarding warranty coverage, terms, and conditions, please refer to the warranty card included with your product or visit the official Lanzar webсайт.
For technical assistance, troubleshooting beyond this manual, or service inquiries, please contact Lanzar customer support. Contact information can typically be found on the product packaging or the official Lanzar website. Please have your model number (MAXP1200) and purchase details ready when contacting support.
Ask a question about this manual
Ask about setup, troubleshooting, compatibility, parts, safety, or missing instructions. Manuals+ will review the question and use this page’s manual context to help answer it.