
1. Киришүү
This manual provides instructions for the installation, operation, and maintenance of your Orbit 27954 Pocket Star 4-Station Plus Indoor Sprinkler Controller. This controller is designed to manage residential 24-volt sprinkler systems, offering dual programming capabilities and a rain delay feature.
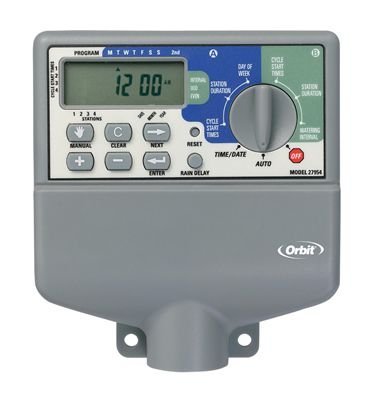
Image 1.1: The Orbit 27954 Pocket Star 4-Station Plus Indoor Sprinkler Controller. This image displays the front panel of the controller, featuring its digital display and control buttons.
2. Коопсуздук маалыматы
Please read all instructions carefully before installation and operation. Failure to follow these instructions may result in property damage or personal injury.
- This controller is designed for indoor use only. Do not install outdoors or in areas exposed to water.
- Ар кандай зымдарды же техникалык тейлөө иштерин жүргүзүүдөн мурун электр менен жабдуунун өчүрүлгөнүн текшериңиз.
- All electrical wiring should comply with local codes and regulations. If you are unsure, consult a qualified electrician.
- Агрегатты өзүңүз оңдоого аракет кылбаңыз. Бардык тейлөөлөрдү квалификациялуу кызматкерлерге тапшырыңыз.
3. Орнотуу
3.1 Пакеттен чыгаруу
Carefully remove the controller from its packaging. Verify that all components are present. Retain packaging for future use or disposal.
3.2 Контроллерди орнотуу
- Choose a suitable indoor location near a standard 120V AC outlet and away from direct sunlight or extreme temperatures.
- Use the provided mounting template (if applicable) or mark the desired screw locations on the wall.
- Install mounting screws into the wall, leaving the screw heads slightly extended.
- Hang the controller onto the screws using the keyhole slots on the back of the unit.
- Secure the controller by tightening the screws.
3.3 Электр зымдары
Маанилүү: Кабелди өткөрүүдөн мурун электрди өчүрүңүз.
- Кубат туташуу: Plug the controller's power cord into a standard 120V AC outlet.
- Клапан зымдары: Connect one wire from each sprinkler valve to a numbered terminal (1, 2, 3, 4) on the controller. Connect the common wire from all valves to the terminal labeled 'C' (Common).
- Сенсордук зымдар (милдеттүү эмес): If using a rain sensor, connect its wires to the designated sensor terminals. Refer to your sensor's manual for specific wiring instructions.
3.4 Баштапкы кубаттуулук
Once all wiring is complete and secure, connect the power cord to the electrical outlet. The controller display should illuminate, indicating it is powered on.
4. Иштөө нускамалары
4.1 Understanding the Display and Buttons
The controller features a digital display and several buttons for navigation and programming. Familiarize yourself with the 'Program', 'Set', 'Arrow' (up/down), and 'Rain Delay' buttons.
4.2 Учурдагы убакытты жана датаны коюу
- Press the 'Set' button repeatedly until 'Set Time' appears on the display.
- Use the 'Arrow' buttons to adjust the hour, then press 'Set' to move to minutes.
- Repeat for minutes, AM/PM, year, month, and day.
4.3 Сугаруу графигин түзүү
The controller supports dual programs (A and B) for flexible scheduling.
- Программаны тандоо: Press the 'Program' button to select Program A or B.
- Баштоо убакыттарын коюу: Press 'Set' until 'Start Time' appears. Use 'Arrow' buttons to set the desired start time for the first cycle. The controller supports multiple start times per program.
- Иштөө убакыттарын коюу: Press 'Set' until 'Run Time' appears. Use 'Arrow' buttons to set the duration (in minutes) for each station (1-4).
- Сугаруу күндөрүн белгилеңиз: Press 'Set' until 'Watering Days' appears. Use 'Arrow' buttons to select specific days of the week, odd/even days, or interval watering.
4.4 Кол менен иштетүү
Станцияны же бардык станцияларды кол менен сугаруу үчүн:
- Press the 'Manual' button (if available, or follow specific manual run instructions in the display menu).
- Select the desired station or 'All Stations'.
- Set the run time using the 'Arrow' buttons.
- The selected station(s) will begin watering immediately.
4.5 Жамгырдын кечиктирүү функциясы
The rain delay feature allows you to pause watering for a set period without losing your programmed schedule.
- Press the 'Rain Delay' button.
- Use the 'Arrow' buttons to select the delay duration (e.g., 24, 48, or 72 hours).
- The controller will pause watering for the selected period and resume the schedule automatically afterward.
5. Техникалык тейлөө
5.1 Тазалоо
Контроллердин сыртын жумшак менен сүртүңүз, гamp кездеме. Абразивдүү тазалагычтарды же эриткичтерди колдонбоңуз, алар дисплейге зыян келтириши мүмкүн же вasing.
5.2 Seasonal Considerations
As an indoor controller, the unit is not directly exposed to outdoor elements. However, ensure the indoor environment remains within recommended operating temperatures to prolong its lifespan.
6. Кыйынчылыктарды
| Көйгөй | Мүмкүн себеп | Чечим |
|---|---|---|
| Контроллердин дисплейи бош. | Күч жок. | Check power outlet, ensure power cord is securely plugged in. Verify circuit breaker. |
| Жамгырткычтар иштебейт. | Incorrect programming, wiring issue, or rain sensor activated. | Verify watering schedule. Check valve wiring connections. Ensure rain sensor is not active or bypassed. |
| Only some sprinklers turn on. | Faulty valve, wiring issue to specific station. | Check wiring for the non-working station. Test the valve manually. |
| Сугаруу туура эмес убакта жүргүзүлөт. | Incorrect time/date setting or program schedule. | Учурдагы убакытты жана датаны текшериңиз.view and adjust program start times and watering days. |
7. Техникалык шарттар
- Модел: Orbit 27954 Pocket Star 4-Station Plus Indoor Controller
- Бренд: Орбита
- Бөлүмдүн номери: 27954
- Станциялардын саны: 4
- Тtage: 24 вольт (AC)
- Адам интерфейсинин киргизүүсү: Buttons
- Батареялар талап кылынат: Жок
- Орнотуу: Indoor
- Өзгөчөлүктөрү: Dual program, Rain delay
- Пакеттин өлчөмдөрү: 21.84 x 13.46 x 6.6 см
- Салмагы: 226.8 г
8. Кепилдик жана колдоо
Кепилдик жөнүндө маалымат же техникалык колдоо алуу үчүн, расмий Orbit сайтына кайрылыңыз webсайтка же кардарларды тейлөө бөлүмүнө кайрылыңыз. Сатып алганыңыздын далили катары сатып алуу дүмүрчөгүңүздү сактаңыз.