Gloria 000910.0000
GLORIA AutoPump Set User Manual
Модель: 000910.0000
1. Продукт бүтүп калдыview
The GLORIA AutoPump Set is a 5-liter pressure sprayer designed for efficient plant protection and care. It features an integrated electric AutoPump that automatically generates and maintains the required operating pressure, eliminating the need for manual pumping. This ensures continuous and effortless spraying.
The set includes the cordless electric AutoPump unit and a high-quality GLORIA prima 5 pressure sprayer made from robust plastic. Key components include a large filling funnel, a comfortable carrying strap, a durable brass spray lance, and an adjustable hollow cone nozzle for versatile application.
Негизги өзгөчөлүктөрү:
- Integrated electric AutoPump for automatic pressure generation.
- Continuous adjustment of spray pressure during operation.
- Optimal spraying results due to constant working pressure.
- Effortless operation without muscular strain.
- 5.0 L filling capacity (7.0 L total volume).
- Maximum operating pressure of 1.5 bar.
- Robust plastic container with transparent viewing strip for level control.
- Brass spray lance with adjustable hollow cone nozzle.
- Operates with 8 x 1.5V AA standard batteries or rechargeable batteries (not included).
- Sufficient power for up to 12 (standard batteries) or 16 (rechargeable batteries) device fillings.

2. Коопсуздук эскертүүлөрү
Маанилүү: Read all instructions carefully before use. Failure to follow these safety guidelines may result in injury or damage to the product.
- Always wear appropriate protective clothing, including eye protection and gloves, when operating the sprayer.
- Avoid direct skin or eye contact with the sprayed liquid. In case of contact, rinse immediately with plenty of water and seek medical advice if irritation persists.
- Never point the spray nozzle at people, animals, or electrical equipment.
- Ensure the area is well-ventilated when spraying, especially indoors.
- Do not use the sprayer with flammable liquids, corrosive chemicals, or hot liquids. Only use liquids recommended by the manufacturer for pressure sprayers.
- Продукцияны балдар жана үй жаныбарлары жетпеген жерде сактаңыз.
- Always follow the manufacturer's instructions for the handling, use, maintenance, and disposal of any chemicals or liquids used with the sprayer.
- Do not modify the sprayer or its components. Use only original GLORIA spare parts.
- Before storing, ensure the sprayer is depressurized and thoroughly cleaned.
3. Орнотуу жана чогултуу
- Пакеттен чыгаруу: Carefully remove all components from the packaging. Verify that all parts listed in the product manual are present.
- Батарея орнотуу:
- Locate the battery compartment on the AutoPump unit.
- Open the compartment and insert 8 x 1.5V AA standard batteries or rechargeable batteries, ensuring correct polarity (+/-). Batteries are not included.
- Батарея отсегин бекем жабыңыз.
- Attaching the AutoPump Unit:
Place the AutoPump unit onto the top of the GLORIA prima 5 pressure sprayer tank. Ensure it is seated correctly and securely fastened according to the markings or locking mechanism.
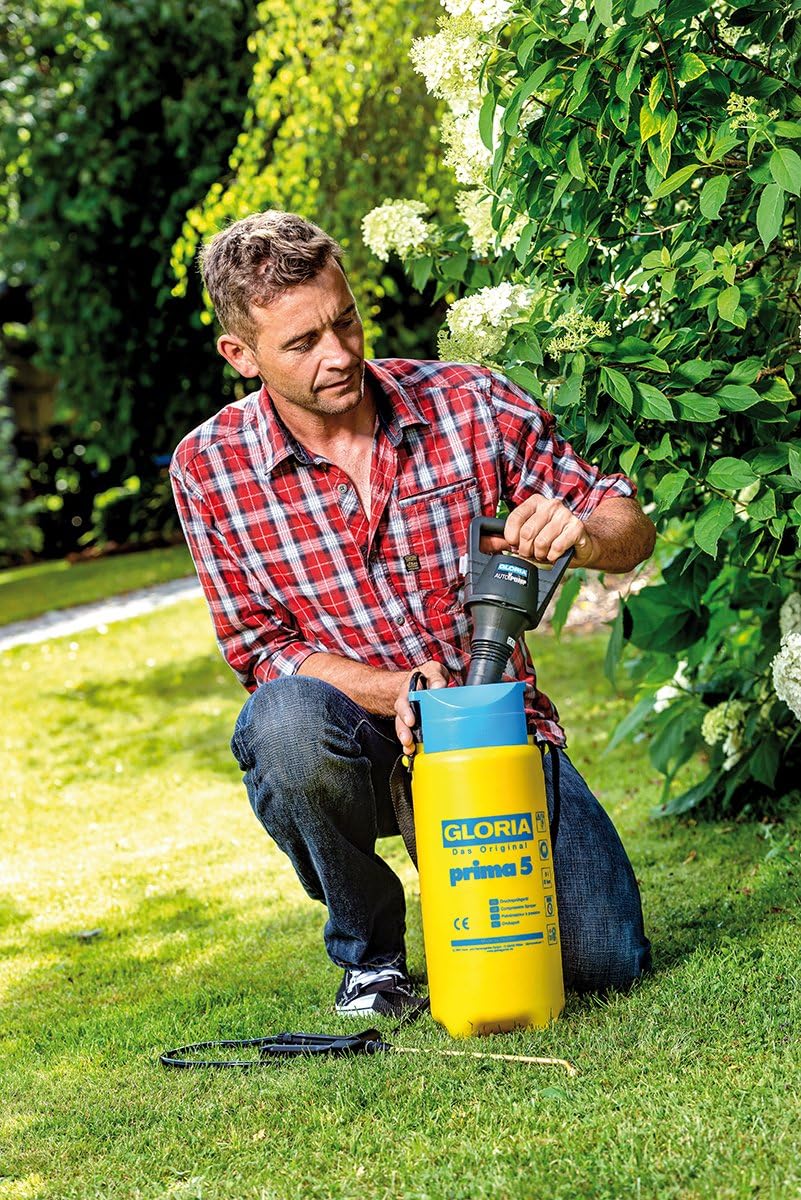
Figure 2: A user is shown attaching the black AutoPump unit to the yellow GLORIA prima 5 sprayer tank, demonstrating the assembly process. - Connecting the Spray Lance:
Connect the brass spray lance to the handle/trigger mechanism, and then connect the hose from the handle to the sprayer tank. Ensure all connections are tight to prevent leaks.
- Погонду тагуу:
Attach the provided shoulder strap to the designated points on the sprayer tank for comfortable carrying during operation.
4. Иштөө нускамалары
- Чачыраткычты толтуруу:
- Ensure the AutoPump unit is securely attached.
- Unscrew the AutoPump unit to access the large filling funnel.
- Pour the desired liquid (e.g., plant protection solution, fertilizer) into the tank, observing the maximum 5.0 L filling capacity and the transparent level indicator strip. Do not overfill.
- Securely re-attach the AutoPump unit, ensuring a tight seal.
- Starting the AutoPump:
Turn on the AutoPump unit (refer to the specific switch/button on the unit). The pump will automatically begin to build pressure within the tank. The pump will stop once the optimal operating pressure of 1.5 bar is reached.
- Чачыруу:
- Aim the spray lance at the target area.
- Press the trigger on the handle to begin spraying. The AutoPump will automatically reactivate as needed to maintain constant pressure during spraying.
- Adjust the hollow cone nozzle at the end of the lance to achieve the desired spray pattern (e.g., fine mist, targeted jet).

Figure 3: A man is shown actively spraying plants in a garden using the GLORIA AutoPump Set, demonstrating the product in typical use. 
Figure 4: A man uses the GLORIA AutoPump Set to spray taller plants, illustrating the reach and versatility of the spray lance and the convenience of the shoulder strap. - Stopping Spraying:
Release the trigger to stop spraying. The AutoPump will cease operation once the pressure is restored.
- Depressurizing and Emptying:
After use, turn off the AutoPump unit. Depressurize the tank by holding the trigger until all pressure is released. Empty any remaining liquid from the tank and dispose of it according to local regulations and the liquid manufacturer's instructions.
5. Техникалык тейлөө жана кам көрүү
- Тазалоо: After each use, thoroughly clean the sprayer tank, hose, lance, and nozzle with clean water. This prevents residue buildup and clogging.
- Соплолорду тейлөө: Regularly check the nozzle for blockages. If clogged, carefully clean it with a soft brush or needle.
- Мөөрлөр жана прокладкалар: Periodically inspect all seals and gaskets for wear or damage. Replace them if necessary to maintain proper pressure and prevent leaks.
- Батареяга кам көрүү: If the sprayer will not be used for an extended period, remove the batteries from the AutoPump unit to prevent leakage and corrosion.
- Сактагыч: Store the sprayer in a clean, dry, and frost-free environment, away from direct sunlight and out of reach of children.
6. Кыйынчылыктарды
| Көйгөй | Мүмкүн себеп | Чечим |
|---|---|---|
| Чачыратуунун кажети жок же алсыз чачыратма. |
|
|
| Pump runs continuously without building pressure. |
|
|
| Liquid leaks from connections. |
|
|
7. Техникалык шарттар
| Модель номери | 000910.0000 |
| Продукциянын өлчөмдөрү (L x W x Y) | 56.7 x 18.5 x 16.5 см |
| Салмагы (бош) | 1.61 кг |
| Материал | Бекем пластик |
| Толтуруу кубаттуулугу | 5.0 литр |
| Жалпы көлөмү | 7.0 литр |
| Максималдуу иштөө басымы | 1.5 бар |
| Power Source | 8 x 1.5V AA Batteries (standard or rechargeable, not included) |
| Spray Lance | Жез |
| Сорпо түрү | Adjustable Hollow Cone Nozzle |
| Келип чыккан өлкө | Польша |
8. Warranty and Spare Parts
Information regarding spare parts availability is provided as 1 жыл. For specific warranty terms and conditions, please refer to the documentation included with your purchase or contact GLORIA customer support directly. Keep your proof of purchase for any warranty claims.
Only use original GLORIA spare parts to ensure the proper functioning and safety of your device.
9. Кардарларды колдоо кызматы
For further assistance, technical support, or inquiries about spare parts, please contact GLORIA customer service. Refer to the contact information provided in your product packaging or visit the official GLORIA webсайт.
Колдоо кызматына кайрылганда, өнүмүңүздүн моделинин номерин (000910.0000) жана сатып алуу күнү жеткиликтүү.
Ask a question about this manual
Ask about setup, troubleshooting, compatibility, parts, safety, or missing instructions. Manuals+ will review the question and use this page’s manual context to help answer it.