
1. Киришүү
This manual provides detailed instructions for the installation, operation, and maintenance of your JL AUDIO JX360/2 2-Channel Amplifier. Please read this manual thoroughly before attempting installation or operation to ensure proper use and to prevent damage to the unit or associated components.
The JX360/2 is a Class A/B full-range amplifier designed to deliver reliable power and high-quality audio performance. It features a high-mass heatsink for improved thermal capacity, captured power and speaker connectors for easier installation and enhanced safety, and comprehensive signal processing capabilities.
2. Орнотуу жана орнотуу
Proper installation is crucial for optimal performance and safety. If you are unsure about any part of the installation process, consult a qualified professional.
2.1 Орнотуу Ampөмүрлүү
Select a mounting location that provides adequate ventilation and protection from moisture and excessive heat. Ensure the amplifier is securely fastened to a solid surface to prevent movement during vehicle operation.

Сүрөт 1: жогорудан ылдыйга view of the JL AUDIO JX360/2 ampкөтөргүч, көрсөтүүчүasing its brushed aluminum finish and model number.
2.2 Кубат туташтыруу
туташтыруу amplifier to the vehicle's electrical system using appropriate gauge wiring. The JX360/2 features captured power and speaker connectors for secure and simplified wiring.
- туташтыруу +12VDC terminal to the positive terminal of the vehicle's battery via a fuse or circuit breaker (not included). The fuse/breaker should be located within 18 inches (45 cm) of the battery.
- туташтыруу Жер terminal to a clean, unpainted metal surface of the vehicle chassis. Ensure a solid electrical connection.
- туташтыруу Алыстан terminal to the remote turn-on output of your head unit. This wire signals the ampбаш бирдиги менен күйгүзүү жана өчүрүү үчүн көтөргүч.

Сүрөт 2: View of the JL AUDIO JX360/2 amplifier's power input (+12VDC, Ground, Remote) and speaker output terminals (Bridged, R, L).
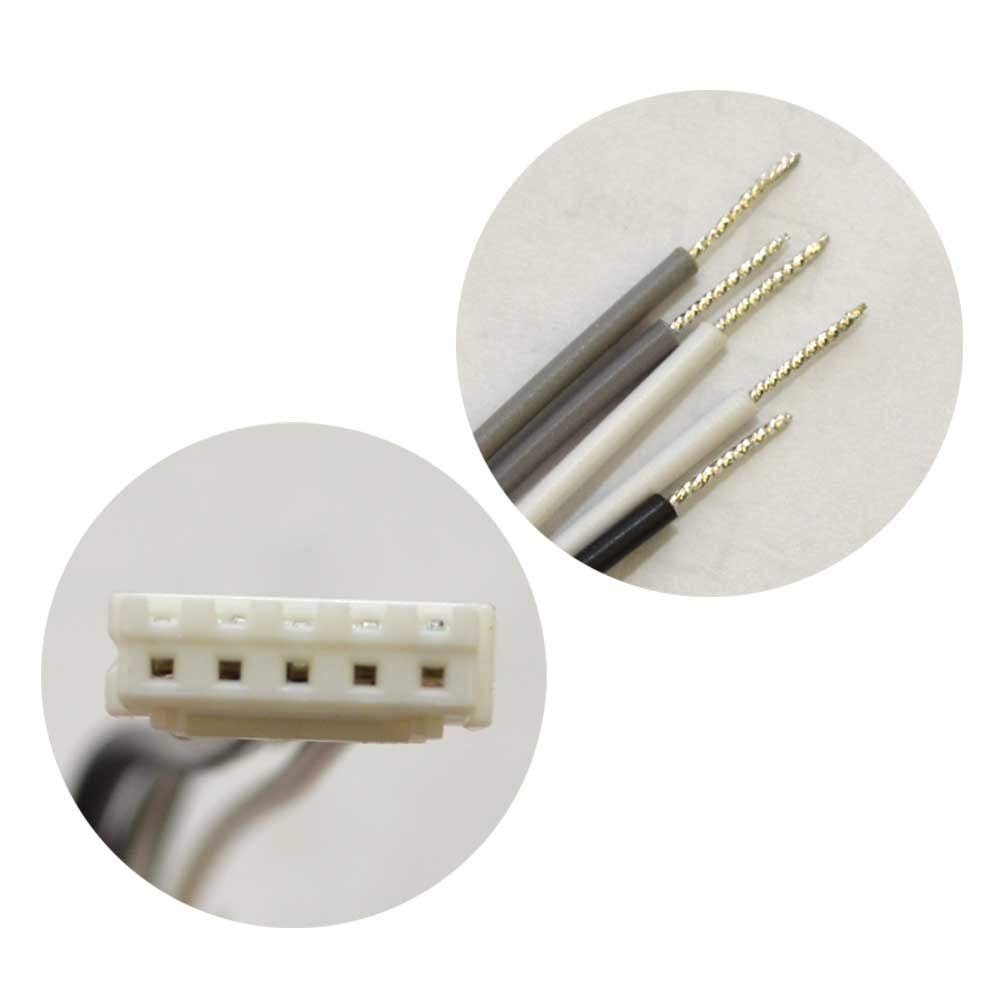
Сүрөт 3: Жакын пландан view of the captured wiring connectors for the JL AUDIO JX360/2 amplifier, showing the pre-tinned wire ends for easy insertion.
2.3 Аудио киргизүү байланыштары
The JX360/2 supports both high-level (speaker level) and low-level (RCA) inputs.
- Төмөнкү деңгээлдеги киргизүүлөр (RCA): Connect RCA cables from your head unit's preamp чыгарат amplifier's "Low-Level Inputs."
- Жогорку деңгээлдеги киргизүүлөр: If your head unit does not have RCA outputs, connect the speaker wires directly to the amplifier's "Hi-Level Inputs" using the provided connector.
2.4 Динамиктин чыгыш туташуулары
Динамиктерге туташтырыңыз amplifier's speaker output terminals. Ensure correct polarity (+ to + and - to -) for each speaker.
- For 2-channel stereo operation, connect one speaker to the Left (+) and Left (-) terminals, and another speaker to the Right (+) and Right (-) terminals.
- For bridged mono operation (e.g., for a subwoofer), connect the speaker to the "Bridged" terminals as indicated on the amplifier. The JX360/2 can deliver 360W into a 4-ohm load when bridged.

Сүрөт 4: View of the JL AUDIO JX360/2 amplifier's input and control panel, including RCA inputs, high-level inputs, filter controls, and input sensitivity adjustment.
3. иштетүү Ampөмүрлүү
3.1 Баштапкы кубаттуулук
After all connections are made, turn on your head unit. The amplifier should power on automatically via the remote turn-on wire. Observe the power indicator light on the ampөмүрлүү.
3.2 Adjusting Input Sensitivity (Gain)
The "Input Sens." control matches the ampliifier's кириш сезгичтиги чыгаруу voltage of your head unit. Start with the control at its minimum setting. Play a dynamic piece of music through your system. Slowly increase the "Input Sens." control until you hear distortion, then back it off slightly. This ensures maximum clean output from the ampөмүрлүү.
3.3 Filter Settings
The JX360/2 features a 12 dB/octave variable filter, adjustable from 50 Hz to 500 Hz. This allows you to optimize the frequency response for your speakers.
- HP (High-Pass): Use this setting to block low frequencies from reaching your full-range speakers, preventing distortion and improving clarity.
- LP (Low-Pass): Use this setting when driving a subwoofer, allowing only low frequencies to pass through.
- Толук: Disables the filter, allowing the full frequency range to pass.
Adjust the "Filter Freq." knob to select the desired crossover point.
3.4 Pass-Through Preamp Чыгуулар
The amplifier includes pass-through preamp outputs, allowing you to send the audio signal to another amplifier in your system without requiring additional RCA outputs from your head unit.
4. Техникалык тейлөө
The JL AUDIO JX360/2 amplifier is designed for reliable operation with minimal maintenance. Follow these guidelines to ensure longevity:
- Тазалоо: Мезгил-мезгили менен сүртүп туруңуз ampliifier сыртын жумшак, кургак чүпүрөк менен. Катуу химиялык заттарды же абразивдүү тазалагычтарды колдонбоңуз.
- Вентиляция: камсыз кылуу amplifier's heatsink fins are not obstructed. Adequate airflow is essential for proper cooling.
- Байланыштары: Occasionally check all power, ground, and speaker connections to ensure they remain secure. Loose connections can lead to performance issues or damage.
5. Кыйынчылыктарды
Эгер сиз менен көйгөйлөр пайда болсо amplifier, төмөнкү жалпы көйгөйлөрдү жана чечимдерди карагыла:
5.1 No Power / Amplifier Does Not Turn On
- Check the main fuse or circuit breaker on the +12VDC power line.
- Verify the ground connection is secure and making good contact with the chassis.
- Ensure the remote turn-on wire is connected and receiving +12V from the head unit when it is on.
- Check all power and ground connections at the ampөмүр терминалдары.
5.2 Аудио чыгышы жок
- ырастаңыз amplifier is powered on (power indicator light is illuminated).
- Check all RCA or high-level input connections from the head unit to the ampөмүрлүү.
- Эки жерде тең динамик зымдарынын туташууларын текшериңиз amplifier and the speakers. Ensure correct polarity.
- Башкы блоктун үнүн жана булагын тандоосун текшериңиз.
- Ensure the "Input Sens." control is not set to minimum.
5.3 Distortion or Poor Sound Quality
- Adjust the "Input Sens." (gain) control. If set too high, it can cause distortion.
- Check speaker impedance. Ensure it is within the amplifier's recommended range (2 ohms stereo, 4 ohms bridged).
- Verify filter settings (HP/LP/Full) are appropriate for your speakers.
- Inspect speaker wires for shorts or frayed strands.
- Ensure adequate power supply to the ampкөтөргүч. Тtage drops can cause distortion.
5.4 Amplifier Overheats (Protection Mode)
- камсыз кылуу amplifier has sufficient ventilation. Clear any obstructions around the heatsink.
- Check speaker impedance. Running speakers with too low an impedance can cause overheating.
- Reduce the "Input Sens." (gain) setting.
- Verify the power and ground connections are secure and of adequate gauge.
- уруксат берүү amplifier to cool down. If the issue persists, consult a professional.
6. Техникалык шарттар
| Өзгөчөлүк | Деталь |
|---|---|
| Модел | JX360/2 |
| Ampжашоо класс | А/Б классы |
| Каналдар | 2-канал |
| Rated Power (RMS) @ 14.4V | 2 x 110 W @ 4 ohms 2 x 180 W @ 2 ohms 1 x 360 W @ 4 ohms (bridged) |
| Максималдуу чыгаруу күчү | 360 Ватт |
| Operating Voltage | 14.4 Вольт (номиналдык) |
| Сигнал иштетүү | 12 dB/octave High-Pass or Low-Pass Filter |
| Чыпка жыштык диапазону | 50 - 500 Hz (variable) |
| Киргизүүлөр | Low-Level (RCA), High-Level (Speaker Level) |
| Чыгуулар | Pass-Through Preamp Чыгуулар |
| Өлчөмдөрү (L x W x Y) | 41.4 x 24.13 x 9.65 см (болжол менен 16.3 x 9.5 x 3.8 дюйм) |
| Салмагы | 3.86 кг (8.5 фунт) |
7. Кепилдик жана колдоо
For warranty information, please refer to the documentation included with your purchase or visit the official JL AUDIO webсайт. Сатып алуу квитанциясын кепилдик дооматтары үчүн сатып алуунун далили катары сактаңыз.
For technical support or service inquiries, please contact JL AUDIO customer service or an authorized JL AUDIO dealer. Contact information can typically be found on the manufacturer's webсайтында же продуктунун таңгагында.
Note: Spare parts availability information is not provided by the manufacturer.