
1. Коопсуздук боюнча маанилүү маалымат
Always observe basic safety precautions when using electrical tools to reduce the risk of fire, electric shock, and personal injury. Read all instructions carefully before operating this paint sprayer.
- Вентиляция: Use the paint sprayer only in a well-ventilated area. Paint fumes can be hazardous.
- Жеке коргонуу каражаттары: Always wear appropriate eye protection (safety glasses), respiratory protection (mask or respirator), and gloves.
- Күйүүчү материалдар: Do not spray flammable or combustible materials near open flames, pilot lights, or other ignition sources. Ensure the work area is free of sparks.
- Электр коопсуздугу: Ensure the power source matches the sprayer's voltage (230V). Do not operate the sprayer in wet conditions. Keep the power cord away from heat, oil, sharp edges, or moving parts.
- Chemical Warnings: Some paints and coatings may contain chemicals known to cause cancer, birth defects, or other reproductive harm. Refer to the material safety data sheet (MSDS) for the specific coating being used. Dispose of contents and containers in accordance with local, state, and federal regulations. Keep out of reach of children and pets. Do not ingest or inhale contents.
- Балдар жана байкоочулар: Чачыраткычты иштетип жатканда балдарды жана башка адамдарды алыс кармаңыз.
2. Продукт бүтүп калдыview
The BLACK+DECKER HVLP400C-IT is a 450W 230V High Volume Low Pressure (HVLP) paint sprayer designed for various painting tasks. It features a separate air generator for lighter handling of the spray gun.
Компоненттер камтылган:
- Paint Sprayer Unit (HVLP gun and separate air generator)
- Hose (1.5 meters)
- Paint Container (1.2 Liters)
- Илешкектүүлүгүн өлчөөчү чөйчөк
- Тазалоочу щетка
- User Manual

Image: Main components of the BLACK+DECKER HVLP400C-IT paint sprayer, showing the spray gun, hose, and air generator.
3. Орнотуу жана даярдоо
3.1. Иш аянтын даярдоо
- Ensure the work area is clean, well-ventilated, and free from dust and debris.
- Cover all surfaces not intended for painting with drop cloths or plastic sheeting.
- Тийиштүү жеке коргонуу шаймандарын кийиңиз.
3.2. Paint Preparation and Dilution
Proper paint consistency is critical for optimal spraying results. Always refer to the paint manufacturer's instructions for dilution ratios for spray applications.
- Боёкту жакшылап аралаштырыңыз.
- Use the provided viscosity measuring cup to check the paint's consistency. Fill the cup with paint and time how long it takes for the paint to flow out completely. Compare this time to the recommended viscosity range in your paint sprayer manual or paint manufacturer's guidelines.
- If the paint is too thick, dilute it gradually with the recommended thinner (water for latex, mineral spirits for oil-based, etc.), stirring well after each addition. Re-check viscosity until the desired consistency is achieved.
- Strain the diluted paint through a paint strainer or cheesecloth to remove any lumps or debris that could clog the sprayer nozzle.

Image: Preparing paint by pouring it into the sprayer's container after proper dilution and straining.
3.3. Чачыраткычты чогултуу
- Attach the hose to the air generator unit and the spray gun. Ensure connections are secure.
- Fill the paint container with the prepared paint and securely attach it to the spray gun.
- Ensure the nozzle and air cap are correctly installed and tightened.
4. Иштөө нускамалары
4.1. Adjusting Spray Pattern
The HVLP400C-IT allows adjustment of the spray pattern for different applications:
- Horizontal Fan Pattern: Ideal for spraying vertical surfaces.
- Vertical Fan Pattern: Ideal for spraying horizontal surfaces.
- Тегерек үлгү: Suitable for small objects, edges, or corners.
Rotate the air cap on the front of the spray gun to select the desired pattern.
4.2. Чачыратуу техникасы
- Сыноочу спрей: Before painting your actual project, always perform a test spray on a piece of cardboard or scrap material to check the pattern and flow. Adjust as necessary.
- Аралык: Бүркүтүүчү тапанчаны бетинен болжол менен 6-10 дюйм (15-25 см) алыстыкта кармаңыз.
- Кыймыл: Move the spray gun at a consistent speed, keeping it perpendicular to the surface. Use smooth, overlapping strokes. Avoid arcing the wrist, which can lead to uneven coverage.
- Trigger Control: Press the trigger fully to start spraying and release it at the end of each pass.
- Coats: Apply multiple thin coats rather than one thick coat to prevent drips and ensure better adhesion. Allow adequate drying time between coats as recommended by the paint manufacturer.

Image: Demonstrating proper spraying technique on an interior wall, maintaining consistent distance and movement.
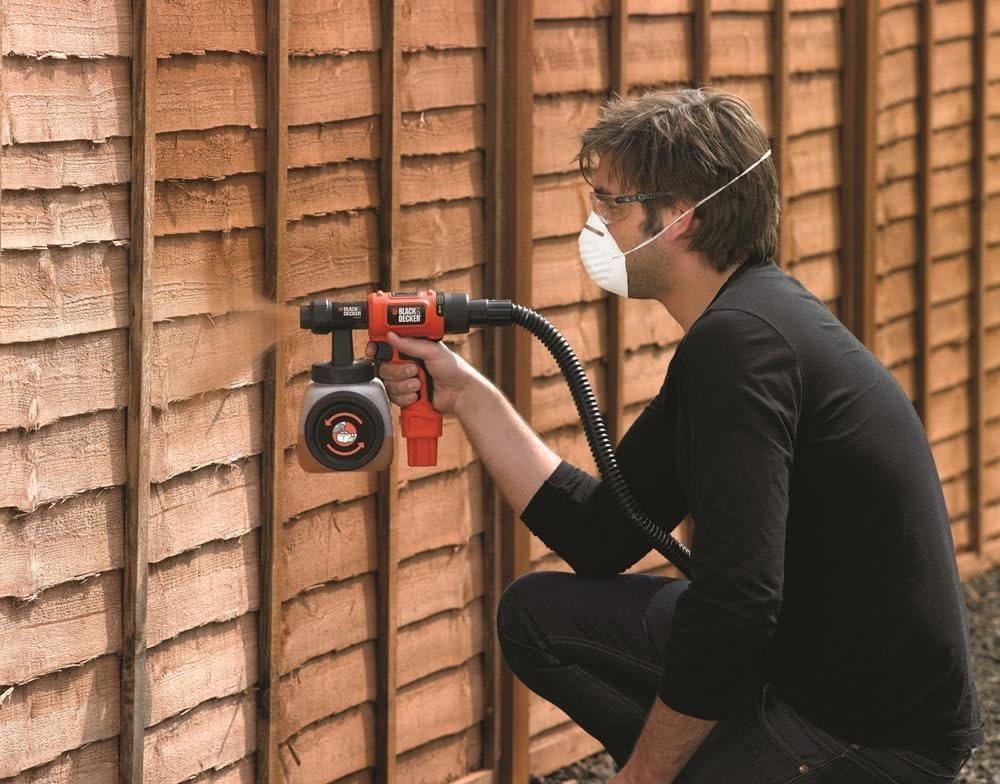
Image: Using the paint sprayer to apply finish to a wooden fence, showing outdoor application.

Image: Applying paint to a bookshelf, illustrating use on furniture and smaller objects.
5. Техникалык тейлөө жана тазалоо
Thorough cleaning after each use is essential to ensure the longevity and proper functioning of your paint sprayer.
- Боёктун бош контейнери: Disconnect the power. Empty any remaining paint from the container back into its original can.
- Алгачкы чайкоо: Fill the paint container with the appropriate cleaning solution (water for latex paints, mineral spirits for oil-based paints). Reattach the container and spray the cleaning solution into a waste container until the spray runs clear.
- Бөлүктөргө бөлүп алып, тазалаңыз: Disassemble the spray gun components (nozzle, air cap, fluid tip, paint container). Clean all parts thoroughly with the appropriate cleaning solution and the provided cleaning brush. Pay special attention to small orifices to prevent clogging.
- Clean Air Generator: Wipe down the exterior of the air generator unit with a damp cloth. Ensure no paint or cleaning solution enters the air vents.
- Кургатуу жана кайра чогултуу: Allow all components to dry completely before reassembling the sprayer.
- Сактагыч: Store the clean and dry paint sprayer in a cool, dry place, away from direct sunlight and extreme temperatures.
6. Кыйынчылыктарды
Refer to this section for common issues and their potential solutions. If problems persist, contact customer support.
| Көйгөй | Мүмкүн себеп | Чечим |
|---|---|---|
| No Spray or Weak Spray |
|
|
| Uneven Spray Pattern / Spitting |
|
|
| Paint Dripping |
|
|
| Мотор иштебей жатат |
|
|
7. Техникалык шарттар
| Өзгөчөлүк | Спецификация |
|---|---|
| Модель номери | HVLP400C-IT |
| Power Source | Электр зымдары |
| Тtage | 230V |
| Ватtage | 450 Вт |
| Танк көлөмү | 1.2 литр |
| Шлангдын узундугу | 1.5 метр |
| Элемент Салмагы | 2.8 килограмм |
| Материал | Пластик |
| Сунушталган колдонуу | Сүрөт тартуу |
8. Кепилдик маалыматы
BLACK+DECKER products are manufactured to high quality standards and are guaranteed for a period of 24 months from the date of purchase against faulty materials or workmanship. This guarantee does not affect your statutory rights. The guarantee is valid within the territories of the Member States of the European Union and the European Free Trade Area. For full terms and conditions, please refer to the warranty card included with your product or visit the official BLACK+DECKER webсайт.
9. Кардарларды колдоо кызматы
For technical assistance, spare parts, or repair services, please contact your local BLACK+DECKER service center or visit the official BLACK+DECKER webсиздин аймакка тиешелүү байланыш маалыматы үчүн сайт.
Webсайт: www.blackanddecker.com