
Ferm WSM1009
FERM WSM1009 Wall Slotter Instruction Manual
Модели: WSM1009
1. Киришүү
The FERM WSM1009 Wall Slotter is a powerful tool designed for making precise cuts and grooves in walls and floors. This allows for the efficient concealment of cables and electrical pipes. Equipped with two 125mm diamond discs, a 1700W motor, and laser guidance, it is capable of cutting through various hard and dense materials, including stone and concrete.
This manual provides essential information for the safe and effective operation, maintenance, and troubleshooting of your FERM WSM1009 Wall Slotter. Please read it thoroughly before initial use and keep it for future reference.
2. Коопсуздук нускамалары
Электр шаймандарынын коопсуздугу боюнча жалпы эскертүүлөрдү жана жергиликтүү эрежелерди ар дайым сактаңыз. Бул көрсөтмөлөрдү аткарбоо электр тогуна урунууга, өрткө жана/же оор жаракатка алып келиши мүмкүн.
2.1 Жалпы коопсуздук эскертүүлөрү
- Жумуш аймагынын коопсуздугу: Жумушчу жерди таза жана жакшы жарыктандырыңыз. Башаламан же караңгы жерлер кырсыкка чакырат. Жарылуучу чөйрөдө, мисалы, күйүүчү суюктуктар, газдар же чаң бар жерде электр шаймандарын иштетпеңиз.
- Электр коопсуздугу: Электр шайманынын сайгычтары розеткага дал келиши керек. Эч качан сайгычты эч кандай жол менен өзгөртпөңүз. Электр шаймандарын жамгырга же нымдуу шарттарга тийгизбеңиз.
- Жеке коопсуздук: Always wear appropriate personal protective equipment (PPE), including safety glasses, hearing protection, dust mask, and heavy-duty gloves. Dress properly; avoid loose clothing or jewelry.
- Куралды колдонуу жана кам көрүү: Электр аспапты күчтөп албаңыз. Колдонмоңуз үчүн туура электр шайманын колдонуңуз. Кандайдыр бир тууралоолорду жасоодон, аксессуарларды алмаштыруудан же электр шаймандарын сактоодон мурда вилканы кубат булагынан ажыратыңыз.
2.2 Specific Wall Slotter Safety
- Ensure the work piece is securely fastened.
- Before cutting, always check for hidden electrical wires, gas pipes, or water pipes using a suitable detector.
- The laser guidance system is for alignment only. Лазердик нурга тике карабаңыз.
- Connect a vacuum cleaner to the dust extraction adapter to minimize dust exposure.
- Allow the machine to reach full speed before engaging the cutting surface.
- Иштеп жаткан учурда аспапты эки колуңуз менен бекем кармап туруңуз.
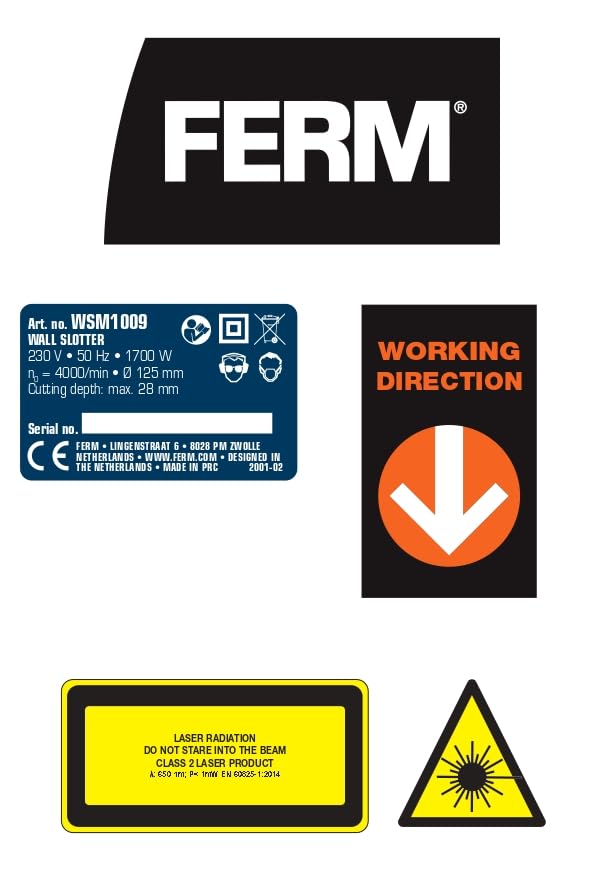
Image: Warning labels for laser radiation, indicating Class 2 laser product and caution against staring into the beam. Always observe safety warnings.
3. Product Components and Parts List
The FERM WSM1009 Wall Slotter comes with the following components:
- FERM WSM1009 Wall Slotter Unit
- 2 Diamond Discs (125mm)
- Вакуумдук адаптер
- Heavy Duty Storage Case
- Spanner for disc changes
- Hex баскычы
- Batteries (2 AAA for laser)

Image: The FERM WSM1009 Wall Slotter, showing the main unit, diamond discs, vacuum adapter, spanner, hex key, and the heavy-duty storage case.

Сүрөт: жакын план view of the FERM WSM1009 Wall Slotter, highlighting the laser guidance system projecting a red line.
4. Орнотуу
4.1 Installing Diamond Discs
- Курал кубат булагынан ажыратылганын текшериңиз.
- Open the blade guard.
- Use the provided spanner to loosen the arbor nut.
- Place the two 125mm diamond discs onto the arbor, ensuring they are correctly oriented for cutting.
- Tighten the arbor nut securely with the spanner.
- Close the blade guard.
4.2 Connecting Vacuum Adapter
For dust-free operation, connect a suitable vacuum cleaner to the integrated vacuum adapter port on the tool. This will significantly reduce airborne dust during cutting.

Image: Detail of the FERM WSM1009 Wall Slotter showing the dust extraction port where a vacuum cleaner hose can be attached.
4.3 Adjusting Cutting Depth and Width
The cutting depth can be adjusted up to 28mm, and groove widths can be set to 14mm, 19mm, or 29mm. Refer to the markings on the tool for precise adjustments. Always perform a test cut on a scrap piece of material to verify settings before cutting the main workpiece.
4.4 Laser Guidance Activation
The laser guidance system assists in maintaining a straight cutting line. Insert the 2 AAA batteries into the laser compartment. Activate the laser using its dedicated switch. The laser projects a red line indicating the cutting path.

Сүрөт: деталдуу view of the laser module on the FERM WSM1009 Wall Slotter, showing the laser emitter and warning symbols.
5. Иштөө нускамалары
5.1 Дайындаманы даярдоо
Mark the desired cutting path clearly on the wall or floor. Ensure the area is free from obstructions and hidden utilities. Secure any loose material that might interfere with the cut.
5.2 Кесүү
- Hold the wall slotter firmly with both hands.
- Align the laser line with your marked cutting path.
- Press the safety switch and then the power trigger to start the motor. Allow the discs to reach full operating speed (Max RPM 4000).
- Slowly and steadily guide the tool along the marked line, applying consistent pressure. Let the machine do the work; do not force it.
- Once the cut is complete, release the power trigger and allow the discs to stop rotating before lifting the tool from the workpiece.

Image: A user demonstrating the FERM WSM1009 Wall Slotter in action on a brick wall, with a vacuum hose connected for dust extraction and safety gear worn.

Image: A user operating the FERM WSM1009 Wall Slotter on a plastered wall, showing the laser guide in use for precise cutting.
6. Техникалык тейлөө
Regular maintenance ensures the longevity and optimal performance of your wall slotter.
6.1 Тазалоо
- After each use, disconnect the tool from power and clean off any dust and debris from the housing, air vents, and blade area using a brush or compressed air.
- Чаң соргучтун тешиги бүтөлүп калбаганын текшериңиз.
6.2 Disc Inspection and Replacement
- Regularly inspect the diamond discs for wear, cracks, or damage.
- Replace worn or damaged discs immediately to ensure safe and efficient cutting. Refer to section 4.1 for disc installation.
6.3 Сактоо
Store the wall slotter in its heavy-duty storage case in a dry, secure location, out of reach of children.
7. Кыйынчылыктарды
| Көйгөй | Мүмкүн себеп | Чечим |
|---|---|---|
| Курал башталбайт | No power supply; Safety switch not engaged; Damaged power cord. | Check power connection; Ensure both safety switch and trigger are pressed; Inspect power cord for damage. |
| Төмөндөтүлгөн кесүү натыйжалуулугу | Worn or dull diamond discs; Incorrect cutting depth setting; Overloading the tool. | Replace discs; Adjust cutting depth; Reduce pressure and allow the tool to work at its own pace. |
| Иш учурунда ашыкча чаң | Vacuum cleaner not connected or full; Dust extraction port blocked. | Connect vacuum cleaner and empty if full; Clear any blockages from the dust port. |
| Лазер иштебейт | Dead batteries; Laser switch off. | Replace AAA batteries; Turn on laser switch. |
8. Техникалык шарттар
| Атрибут | Нарк |
|---|---|
| Бренд | Ферм |
| Модель номери | WSM1009 |
| Power Input | 1700 Ватт |
| Тtage | 230 Вольт, 50 Гц |
| Диск диаметри | 125мм |
| Макс RPM | 4000 RPM |
| Макс кесүү тереңдиги | 28мм |
| Groove Widths | 14мм, 19мм, 29мм |
| Элемент Салмагы | 7.23 кг |
| Продукциянын өлчөмдөрү (LxWxH) | 35 x 23 x 36 см |
| Батареялар талап кылынат | 2 AAA (included for laser) |

Image: Product label displaying technical specifications for the FERM WSM1009 Wall Slotter, including voltage, frequency, power, disc diameter, and cutting depth.
9. Кепилдик жана колдоо
For warranty information and customer support, please refer to the documentation included with your purchase or contact FERM International directly. Contact details for FERM International are typically found on the product packaging or their official webсайт.
Manufacturer: FERM, Ferm International, Lingenstraat 6, 8028 PM Zwolle, Netherlands
Байланыш: +31 38 385 2525
Ask a question about this manual
Ask about setup, troubleshooting, compatibility, parts, safety, or missing instructions. Manuals+ will review the question and use this page’s manual context to help answer it.