
Introduction
This manual provides essential instructions for the safe and effective operation, setup, and maintenance of your Hilka 91600012 Pro Craft 6-inch Bench Grinder. Please read this manual thoroughly before using the product to ensure proper handling and to prevent injury or damage. Keep this manual for future reference.
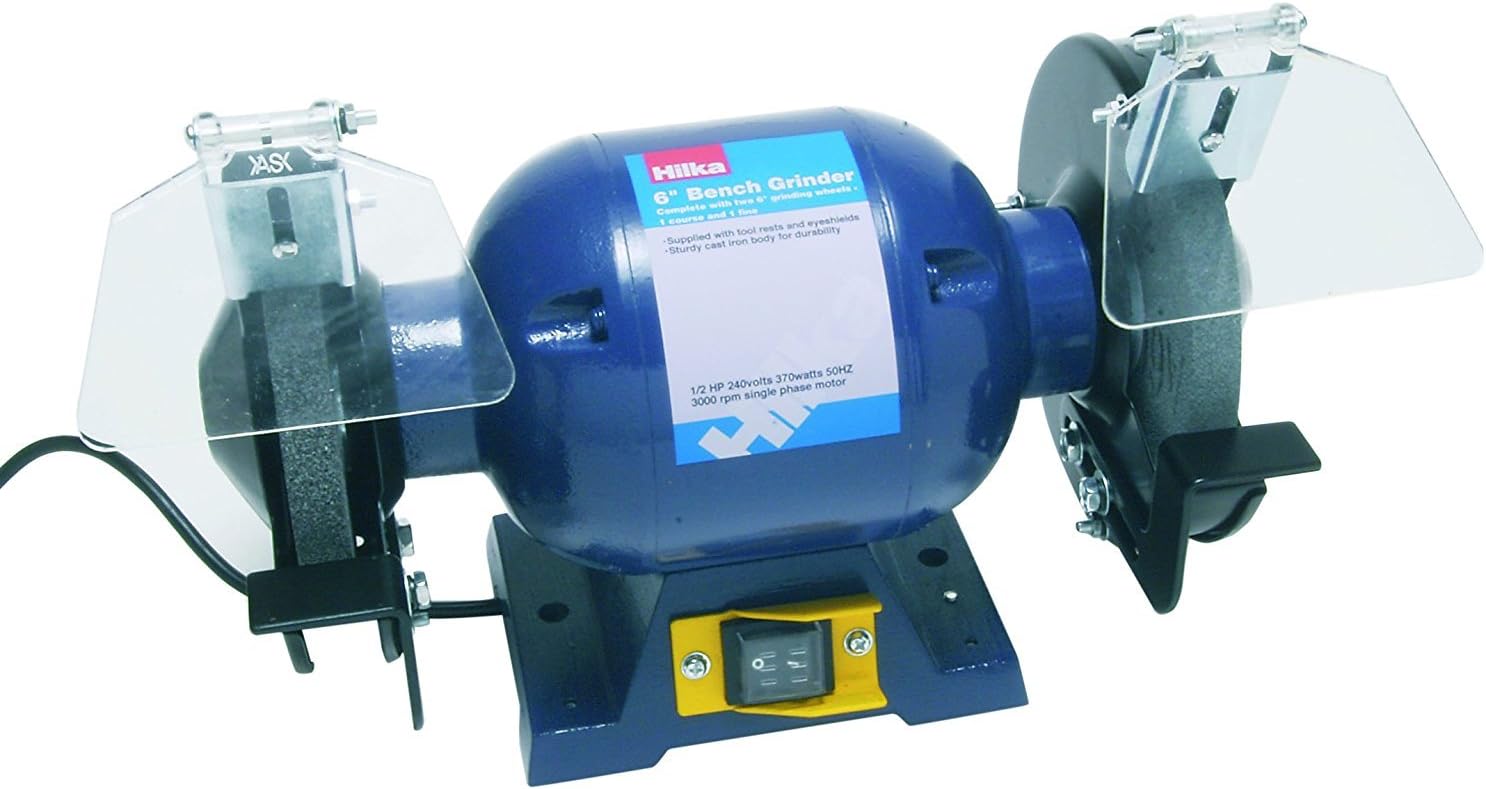
Image: The Hilka 91600012 Pro Craft 6-inch Bench Grinder, featuring a blue motor housing, two grinding wheels with clear eye shields, and a yellow power switch on the front base.
Коопсуздук нускамалары
Өрт, электр тогуна урунуу жана жеке жаракат алуу коркунучун азайтуу үчүн электр шаймандарын колдонууда ар дайым негизги коопсуздук чараларын сактаңыз.
- Бардык нускамаларды окуңуз: Familiarize yourself with the controls and proper use of the bench grinder.
- Көздү коргоону тагыныңыз: Always wear safety goggles or a face shield to protect against flying debris.
- Тийиштүү кийим кийиңиз: Avoid loose clothing, gloves, ties, or jewelry that can get caught in moving parts.
- Коопсуз жумуш бөлүгү: Always use the tool rests to support the workpiece firmly.
- Иш аянтын таза кармаңыз: Башаламан жерлер кырсыкка чакырат.
- Do not operate in hazardous environments: г-да электр куралдарын колдонбоңузamp же нымдуу жерлерде, же аларды жамгырга дуушар кылуу.
- Балдарды алыс кармаңыз: Бардык зыяратчылар жумуш аймагынан коопсуз аралыкта кармалышы керек.
- Туура куралды колдонуңуз: Кичинекей аспапты же тиркемени оор жүк көтөрүүчү аспаптын ишин аткарууга мажбурлабаңыз.
- Бузулган бөлүктөрүн текшериңиз: Before further use, carefully check the guard or other parts to determine that they will operate properly and perform their intended function.
- Электр кубатын өчүрүү: Always disconnect the grinder from the power supply before making adjustments, changing accessories, or performing maintenance.
Продукт бүттүview
The Hilka 91600012 Pro Craft Bench Grinder is designed for sharpening tools, removing rust, and general grinding tasks. Key components include:
- Жылмалоо дөңгөлөктөрү: Two 6-inch (15.2 cm) grinding wheels, typically one coarse and one fine, for various grinding applications.
- Eye Shields: Transparent shields positioned above each grinding wheel to protect the user's eyes from sparks and debris.
- Tool Rests: Adjustable platforms in front of each grinding wheel to support the workpiece during grinding.
- Мотор корпусу: The central blue body containing the electric motor that drives the grinding wheels.
- Кубат которгучу: A yellow switch located on the front base for turning the grinder on and off.
- Негизги: A sturdy base with mounting holes for securing the grinder to a workbench.
Жайгашуу
- Пакеттен чыгаруу: Carefully remove the bench grinder and all accessories from the packaging. Inspect for any damage that may have occurred during transit. Report any damage to your supplier immediately.
- Монтаждоо:
- Position the grinder on a sturdy workbench at a comfortable working height.
- Mark the locations for the mounting bolts through the holes in the grinder's base.
- Drill appropriate holes in the workbench.
- Secure the grinder to the workbench using bolts, washers, and nuts (not supplied). Ensure it is firmly attached to prevent movement during operation.
- Attaching Eye Shields and Tool Rests:
- Attach the eye shields and tool rests to their respective mounting points using the provided hardware.
- Adjust the eye shields so they provide maximum protection without obstructing your view жумуш бөлүгүнүн.
- Adjust the tool rests so that the gap between the wheel and the rest is no more than 1/16 inch (1.5 mm). This minimizes the risk of the workpiece getting jammed.
- Электр байланышы:
- Кубат өчүргүчтүн "OFF" абалында экенин текшериңиз.
- Connect the power cord to a suitable grounded electrical outlet. The grinder operates on 240 volts, 50 Hz, with a 373-watt motor.
- Электр менен камсыздоонун продукттун этикеткасында көрсөтүлгөн мүнөздөмөлөргө дал келерин текшериңиз.
Иштөө нускамалары
- Ишке чейинки текшерүү:
- Ensure all guards and eye shields are securely in place and properly adjusted.
- Check that the grinding wheels are not cracked or damaged. Replace any damaged wheels immediately.
- Confirm the tool rests are adjusted to the correct distance from the grinding wheels.
- Майдалагычты ишке киргизүү:
- Stand to one side of the grinder.
- Press the "ON" button on the power switch. Allow the wheels to reach full operating speed before beginning any work.
- Майдалоо техникалары:
- Hold the workpiece firmly against the tool rest.
- Apply light, even pressure to the grinding wheel. Avoid excessive force, which can damage the wheel or motor.
- Move the workpiece slowly and consistently across the face of the wheel to ensure even wear and a smooth finish.
- Use the coarse wheel for heavy material removal and the fine wheel for sharpening and finishing.
- Periodically check the temperature of the workpiece and cool it with water if it becomes too hot.
- Майдалагычты токтотуу:
- Press the "OFF" button on the power switch.
- Wait for the grinding wheels to come to a complete stop before leaving the machine or performing any adjustments.
Техникалык тейлөө
Regular maintenance ensures the longevity and safe operation of your bench grinder. Always disconnect the power before performing any maintenance.
- Тазалоо: Regularly clean dust and debris from the motor housing and around the grinding wheels. Use compressed air or a soft brush.
- Дөңгөлөктөрдү кооздоо: Over time, grinding wheels can become glazed or out of round. Use a wheel dresser to restore the wheel's cutting surface and shape.
- Дөңгөлөк алмаштыруу:
- When a grinding wheel wears down to within 1/2 inch (12 mm) of its flange, it must be replaced.
- To replace, remove the eye shield, tool rest, and outer flange nut. Carefully remove the old wheel and replace it with a new one of the correct size and type.
- Ensure the new wheel is properly seated and the flange nut is tightened securely, but not excessively, to avoid cracking the wheel.
- Жалпы текшерүү: Periodically check all nuts, bolts, and screws for tightness. Inspect the power cord for any signs of damage.
Проблемаларды чечүү
| Көйгөй | Мүмкүн себеп | Чечим |
|---|---|---|
| Жаргылчак иштебейт. | Электр энергиясы жок; туура эмес өчүргүч; мотор маселеси. | Check power cord and outlet. Ensure switch is "ON". If problem persists, consult a qualified technician. |
| Grinder trips circuit breaker/fuse. | Overload; short circuit; faulty wiring. | Reduce load. Check for damaged power cord or internal wiring. If issue persists, discontinue use and seek professional repair. |
| Иш учурунда ашыкча титирөө. | Unbalanced grinding wheel; loose mounting; worn bearings. | Dress or replace grinding wheel. Tighten mounting bolts. If bearings are suspected, professional service is required. |
| Начар майдалоо. | Glazed or worn grinding wheel; incorrect wheel type. | Dress the grinding wheel. Replace worn wheels. Ensure the correct grit wheel is used for the task. |
Техникалык шарттар
| Өзгөчөлүк | Спецификация |
|---|---|
| Модель номери | 91600012 |
| Бренд | Хилка |
| Күч | 373 Ватт |
| Киргизүү көлөмүtage | 240 вольт |
| Жыштык | 50 Гц |
| Продукциянын өлчөмдөрү (L x W x Y) | 37 x 25 x 21 см |
| Салмагы | 8.01 кг |
| Майдалоочу дөңгөлөктүн диаметри | 6 дюйм (15.2 см) |
Кепилдик жана колдоо
Specific warranty terms and conditions for the Hilka 91600012 Pro Craft Bench Grinder are typically provided at the point of purchase or included with the product packaging. For detailed warranty information, technical support, or spare parts inquiries, please refer to the documentation supplied with your product or contact Hilka customer service directly. Information regarding spare parts availability is not provided in this manual.