
1. Киришүү
This manual provides comprehensive instructions for the installation, operation, and maintenance of your Hertz HDP4 4-Channel 1000W Max D-Class Ampкөтөргүч. Туура иштешин жана коопсуздугун камсыз кылуу үчүн орнотуудан же иштетүүдөн мурун ушул колдонмону кылдат окуп чыгыңыз.
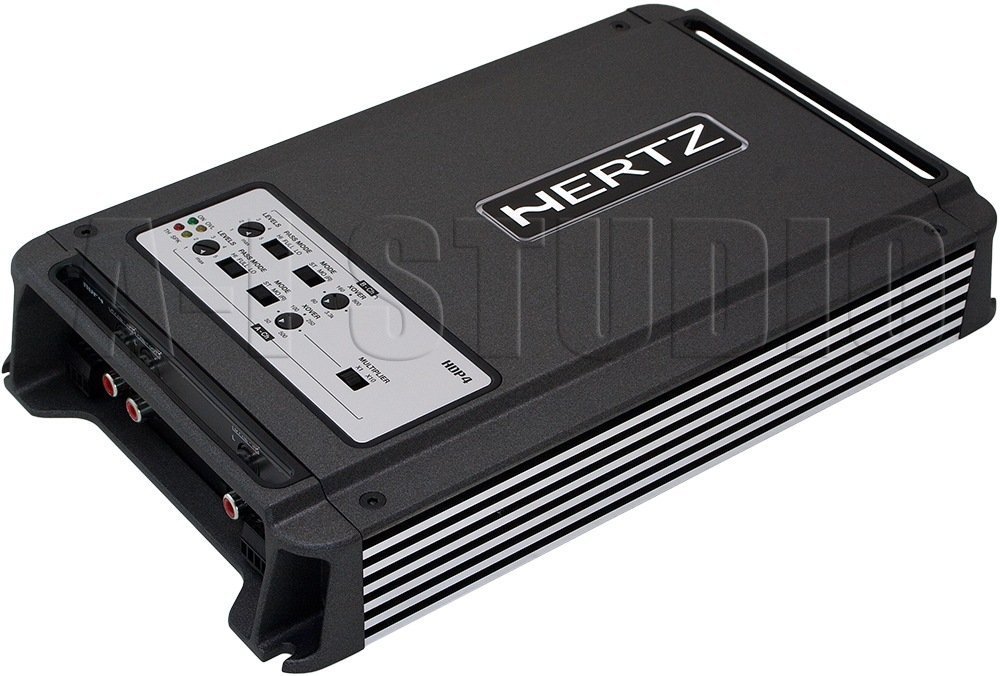
1.1-сүрөт: Жогору жактан ылдый бурчтуу view of the Hertz HDP4 ampкөтөргүч, көрсөтүүчүasing анын компакттуу кара casing and control panel on the top surface. The Hertz logo is visible on the main body.
2. Коопсуздук маалыматы
Ар дайым төмөнкү коопсуздук чараларын сактаңыз:
- Disconnect the vehicle's battery before any installation or wiring.
- Кыска туташуунун алдын алуу үчүн бардык зымдар туура изоляцияланганын текшериңиз.
- монтаждоо amplifier securely in a well-ventilated area, away from moisture and direct heat.
- Орнотуу бөлүмүндө көрсөтүлгөндөй, электр жана жерге туташтыруу үчүн тиешелүү өлчөөчү зымдарды колдонуңуз.
- Орнотуу процессинин кандайдыр бир бөлүгүнө ишенбесеңиз, профессионал орнотуучу менен кеңешиңиз.
3. Пакеттин мазмуну
Пакетте бардык буюмдар бар экенин текшериңиз:
- Hertz HDP4 Ampкөтөргүч бирдиги
- Монтаждоочу жабдыктар (буроолор, кашаалар)
- Колдонуучунун Колдонмосу (бул документ)
4. Орнотуу жана орнотуу
4.1 Орнотуу Ampөмүрлүү
Choose a suitable location for mounting the amplifier. It should be a dry, well-ventilated area, protected from direct sunlight and excessive vibration. Ensure there is sufficient space around the ampаба айлануу үчүн көтөргүч.

4.1-сүрөт: Жогорку view of the Hertz HDP4 amplifier, illustrating its compact design and potential mounting points. The amplifier features a textured black finish with the Hertz logo prominently displayed.
- кой amplifier in the desired mounting location and mark the screw holes.
- Drill pilot holes if necessary, ensuring not to damage any vehicle components.
- камсыз кылуу ampмонтаждоо бурамалар менен көтөргүч.
4.2 Зымдарды туташтыруу
Proper wiring is critical for performance and safety. Refer to the diagram below for power, ground, remote, and speaker connections.

Figure 4.2: Rear panel of the Hertz HDP4 amplifier, detailing the power input (BATT), ground (GND), remote turn-on (REM) terminals, and speaker output terminals (L/R mono for channels A and B). Two 40A fuses are also visible.
- Power (BATT): Connect a fused power cable (minimum 8 AWG recommended) directly from the vehicle's positive battery terminal to the BATT terminal on the ampөмүрлүү.
- Жер (GND): Connect a ground cable of the same gauge as the power cable from the GND terminal to a clean, unpainted metal point on the vehicle chassis.
- Алыстан (REM): Connect a remote turn-on wire from your head unit's remote output to the REM terminal.
- Динамиктин чыгышы: Connect your speakers to the appropriate L (left) and R (right) terminals for each channel (A and B). Ensure correct polarity. The amplifier supports mono bridging for increased power output to a single speaker or subwoofer.
- Эритиндилер: The amplifier is equipped with two 40A fuses. Replace only with fuses of the same type and rating.
4.3 Input Connections and Controls
The amplifier offers both RCA (low-level) and High-Level inputs, along with various crossover and gain controls.

Figure 4.3: Input and control panel of the Hertz HDP4 amplifier. This panel includes RCA pre-inputs (A PRE-IN, B PRE-IN), high-level inputs (A HI-IN, B HI-IN), and various adjustment knobs for levels, pass mode, and crossover settings. A switch for HI-IN AUTO TURN-ON is also present.
- RCA Pre-Inputs (A PRE-IN, B PRE-IN): Connect your head unit's RCA outputs to these inputs for low-level signal.
- High-Level Inputs (A HI-IN, B HI-IN): If your head unit does not have RCA outputs, connect speaker-level signals directly to these inputs. The amplifier features an auto turn-on function for high-level inputs.
- Деңгээлдери: Adjust the input sensitivity (gain) to match the output of your head unit. Start with the gain at minimum and slowly increase until desired volume is achieved without distortion.
- Өтүү режими: Select the desired crossover mode (e.g., Full, HPF, LPF) for each channel pair.
- Crossover Frequency (XOVER): Adjust the frequency point for the selected crossover mode.
- Көбөйткүч: Use this switch to multiply the crossover frequency setting by 1 or 10, depending on your system requirements.
5. Иштөө нускамалары
5.1 Баштапкы кубаттуулук
- After all connections are made and verified, reconnect the vehicle's battery.
- Башыңыздын бирдигин күйгүзүңүз. The amplifier should power on automatically (if remote wire is connected or HI-IN AUTO TURN-ON is active).
- Start with the head unit volume low and gradually increase it, listening for clear audio.
5.2 Аудио жөндөөлөрүн тууралоо
жакшылап жөндөңүз amplifier's settings for optimal sound quality:
- Gain Matching: тууралаңыз amplifier's gain controls (LEVELS) to match the output voltage of your head unit. This is crucial to prevent distortion.
- Кроссовер орнотуулары: Set the crossover frequencies (XOVER) and pass modes (PASS MODE) according to the specifications of your speakers. For full-range speakers, a high-pass filter (HPF) is often used to protect them from low bass frequencies. For subwoofers, a low-pass filter (LPF) is used.
6. Техникалык тейлөө
To ensure the longevity and optimal performance of your Hertz HDP4 amplifier, бул тейлөө көрсөтмөлөрүн аткарыңыз:
- Тазалоо: Мезгил-мезгили менен тазалаңыз ampliifier сыртын жумшак, кургак чүпүрөк менен. Катуу химиялык заттарды же абразивдүү тазалагычтарды колдонбоңуз.
- Вентиляция: камсыз кылуу amplifier's cooling fins are free from dust and obstructions to maintain proper heat dissipation.
- Байланыштары: Regularly check all wiring connections for tightness and corrosion. Loose connections can lead to poor performance or damage.
- Эритиндилер: If a fuse blows, replace it only with a fuse of the exact same type and rating (2 x 40A). Using an incorrect fuse can cause severe damage to the amplifier or vehicle electrical system.

Figure 6.1: Bottom panel of the Hertz HDP4 amplifier, displaying the serial number label and important caution notes regarding insulated screws. This area should be kept clean and free from obstructions.
7. Кыйынчылыктарды
Эгер сиз менен көйгөйлөр пайда болсо ampкөтөргүч, колдоо кызматына кайрылуудан мурун төмөнкү таблицаны караңыз:
| Көйгөй | Мүмкүн себеп | Чечим |
|---|---|---|
| Кубат жок / Ampкөтөргүч күйбөйт | Blown fuse, loose power/ground/remote wire, faulty head unit remote output. | Check and replace fuses. Verify all power, ground, and remote connections are secure. Test remote wire for 12V signal. |
| Үн жок | Loose RCA/speaker wires, incorrect input selection, amplifier in protection mode, faulty speakers. | Check all signal and speaker connections. Ensure correct input mode is selected. Check for protection light. Test speakers. |
| Distorted Sound | Gain set too high, incorrect crossover settings, poor quality audio source, damaged speakers. | Reduce gain. Adjust crossover settings. Test with a different audio source. Inspect speakers for damage. |
| Ampliifier Overheats | Insufficient ventilation, impedance mismatch, prolonged high-power operation. | айланасында туура аба агымын камсыз кылуу ampкөтөргүч. Динамиктин импедансынын дал келишин текшериңиз amplifier's capabilities. Reduce volume or operating time. |
8. Техникалык шарттар
Technical specifications for the Hertz HDP4 4-Channel 1000W Max D-Class Ampөмүр берүүчү:
- Модел: HDP4
- Бренд: ГЕРЦ
- Түрү: 4-Channel D-Class Ampөмүрлүү
- Макс кубаттуулугу: 1000W (as per product title, specific RMS not provided in data)
- Продукциянын өлчөмдөрү (L x W x Y): 11.18 x 6.73 x 1.83 дюйм
- Салмагы: 6.35 фунт
- Тtage: 14.4 вольт (иштетүү)
- Монтаж түрү: Surface Mount
- Эритиндилер: 2 x 40A
- ASIN: B00AWBU1FQ
9. Кепилдик маалыматы
Hertz products are designed and manufactured to the highest quality standards. For specific warranty terms and conditions, please refer to the warranty card included with your product or visit the official Hertz webсайт. Сатып алуу квитанциясын кепилдик дооматтары үчүн сатып алуунун далили катары сактаңыз.
10. Колдоо
For technical assistance, troubleshooting beyond this manual, or warranty inquiries, please contact Hertz customer support through their official website or authorized dealer. Ensure you have your product model (HDP4) and serial number ready when contacting support.
Official Hertz Webсайт: www.hertzaudiovideo.com