
Продукт бүттүview
The Mount-It! MI-35114S is a robust and versatile wall-mounted monitor arm designed to enhance your workspace ergonomics and organization. Constructed from high-gloss aluminum, this mount provides a stable and aesthetically pleasing solution for displays up to 27 inches and weighing between 4.4 to 19.8 lbs (2 to 9 kg). Its articulating design allows for extensive adjustability, including height, tilt, swivel, and rotation, ensuring optimal viewing comfort and flexibility.
Негизги өзгөчөлүктөр төмөнкүлөрдү камтыйт:
- Бийиктиги жөндөлүүчү: Offers 11.5 inches of vertical adjustment.
- Articulating Arms: Provides 180-degree swivel and extends up to 27.5 inches from the wall.
- Tilting and Rotating: Screen can tilt 105 degrees and rotate 360 degrees for portrait or landscape orientation.
- Интегралдык кабелдик башкаруу: Keeps cables organized and out of sight.
- Тез чыгарылуучу дизайн: Facilitates easy installation and adjustments at connecting points.
- VESA шайкеш: Supports 75x75mm and 100x100mm mounting patterns.

Figure 1: The Mount-It! MI-35114S monitor wall mount, showcasing its articulating arm and sleek design.
Орнотуу жана орнотуу
Proper installation is crucial for the stability and safety of your monitor and the mount. It is highly recommended to mount the unit directly into a wall stud for maximum security. All necessary hardware and instructions are included with your purchase.
Баштоодон мурун:
- Verify your monitor's weight and VESA mounting pattern are compatible with the MI-35114S. This mount supports VESA 75x75mm and 100x100mm.
- Gather tools: Phillips head screwdriver, drill, stud finder, level, pencil.
- Ensure the wall location is free of electrical wires or plumbing.

Figure 2: VESA mounting compatibility for the MI-35114S, supporting 75x75mm and 100x100mm patterns.
Орнотуу кадамдары:
- Дубал плитасын бекитүү: Locate a wall stud using a stud finder. Mark the desired height for the mount. Secure the wall plate to the stud using appropriate screws. Use a level to ensure it is straight.
- Assemble Arm Components: The MI-35114S features quick-connect designs. Attach the main arm assembly to the wall plate. Ensure all connections click securely into place.
- Монитор үчүн VESA пластинкасын тиркөө: Carefully place your monitor face down on a soft, clean surface. Align the VESA plate (the part that connects to the monitor) with the mounting holes on the back of your monitor. Secure it with the provided screws.
- Мониторду куралга орнотуу: With the VESA plate attached to your monitor, carefully lift the monitor and slide the VESA plate onto the monitor end of the arm until it locks into place.
- Кабелдик башкаруу: Route your monitor cables through the integrated cable management clips along the arm for a clean and organized setup.

Figure 3: Technical diagram highlighting the quick connect points and articulation capabilities of the MI-35114S.

Figure 4: A monitor securely mounted on the MI-35114S, demonstrating the rear attachment and cable management.
Operating the Monitor Mount
The MI-35114S offers a wide range of motion to customize your viewing experience. Adjustments should be smooth and require minimal effort once the gas spring tension is properly set.
Позицияны тууралоо:
- Бийиктигин тууралоо: Gently push or pull the monitor up or down to achieve the desired height. The gas spring mechanism will hold it in place.
- Кеңейтүү/чектөө: Extend or retract the arm by pulling or pushing the monitor towards or away from the wall. The arm can extend up to 27.5 inches.
- Айлануучу: The arm and monitor plate can swivel up to 360 degrees, allowing you to easily share your screen or change viewбурчтар.
- Россия: Grasp the top and bottom edges of your monitor and gently tilt it forward or backward to achieve the optimal viewing angle. The mount allows for 105 degrees of tilt.
- Айлануу: Rotate the monitor 360 degrees to switch between landscape and portrait orientations. This is ideal for reading long documents or viewing specific content.

Figure 5: Demonstrating the tilting capability of the MI-35114S for ergonomic viewing.

Figure 6: The 360-degree rotation feature allows for easy switching between landscape and portrait monitor orientations.
Adjusting Gas Spring Tension:
The gas spring tension may need adjustment to properly support your monitor's weight. If the monitor sags or springs up too easily, adjust the tension screw located on the arm. Typically, you will need to raise the arm to a vertical position to access and adjust the tension. Turn clockwise to increase tension for heavier monitors, and counter-clockwise to decrease tension for lighter monitors.
Техникалык тейлөө
Regular maintenance ensures the longevity and optimal performance of your Mount-It! MI-35114S monitor mount.
- Тазалоо: Орноткуч беттерди жумшак, d менен сүртүңүзamp кездеме. Финишке зыян келтирүүчү абразивдүү тазалагычтардан же эриткичтерден качыңыз.
- Байланыштарды текшерүү: Periodically inspect all screws and connections to ensure they remain tight and secure, especially the wall mounting screws and the VESA plate screws.
- Газ булагы жөндөө: Re-adjust the gas spring tension if you change monitors or notice the arm is no longer holding its position correctly.
Проблемаларды чечүү
Эгерде сиз мониторуңузду орнотууда көйгөйлөргө туш болсоңуз, төмөнкү кеңири таралган көйгөйлөрдү жана чечимдерди караңыз:
| Көйгөй | Мүмкүн себеп | Чечим |
|---|---|---|
| Монитор салбырап же ордунда турбайт. | Incorrect gas spring tension for monitor weight. | Adjust the gas spring tension screw. Increase tension for heavier monitors, decrease for lighter ones. Ensure monitor weight is within 4.4 - 19.8 lbs range. |
| Mount feels unstable or loose on the wall. | Improper wall installation; not mounted into a stud or loose anchors. | Ensure the wall plate is securely fastened into a wall stud. If using drywall anchors, ensure they are appropriate for the weight and properly installed. Re-tighten all wall mounting screws. |
| Difficulty moving the arm or monitor. | Gas spring tension too high or connections too tight. | Decrease gas spring tension. Check for any overtightened screws at the joints and loosen slightly if necessary. |
| Monitor does not rotate 360 degrees. | Obstruction or limited range of motion. | Ensure no cables or objects are obstructing the rotation. Verify the monitor is centered on the VESA plate. |
Техникалык шарттар
Detailed technical specifications for the Mount-It! MI-35114S monitor wall mount:
| Өзгөчөлүк | Спецификация |
|---|---|
| Модель номери | MI-35114S (also MI-35114) |
| Салмак сыйымдуулугу | 4.4 - 19.8 lbs (2 - 9 kgs) |
| VESA орнотуу үлгүлөрү | 75x75мм, 100x100мм |
| Тилтүү диапазону | 105 градус |
| Айлануу | 360 degrees (screen) |
| Айналма тоо | Max 360 degrees (arm joints) |
| Максималдуу кеңейтүү | 27.5 дюйм (дубалдан) |
| Бийиктигин тууралоо | 11.5 дюйм |
| Материал | High-gloss Aluminum |
| Продукциянын өлчөмдөрү | 16 x 8 x 8 дюйм (пакеттелген) |
| Элемент Салмагы | 4 фунт |
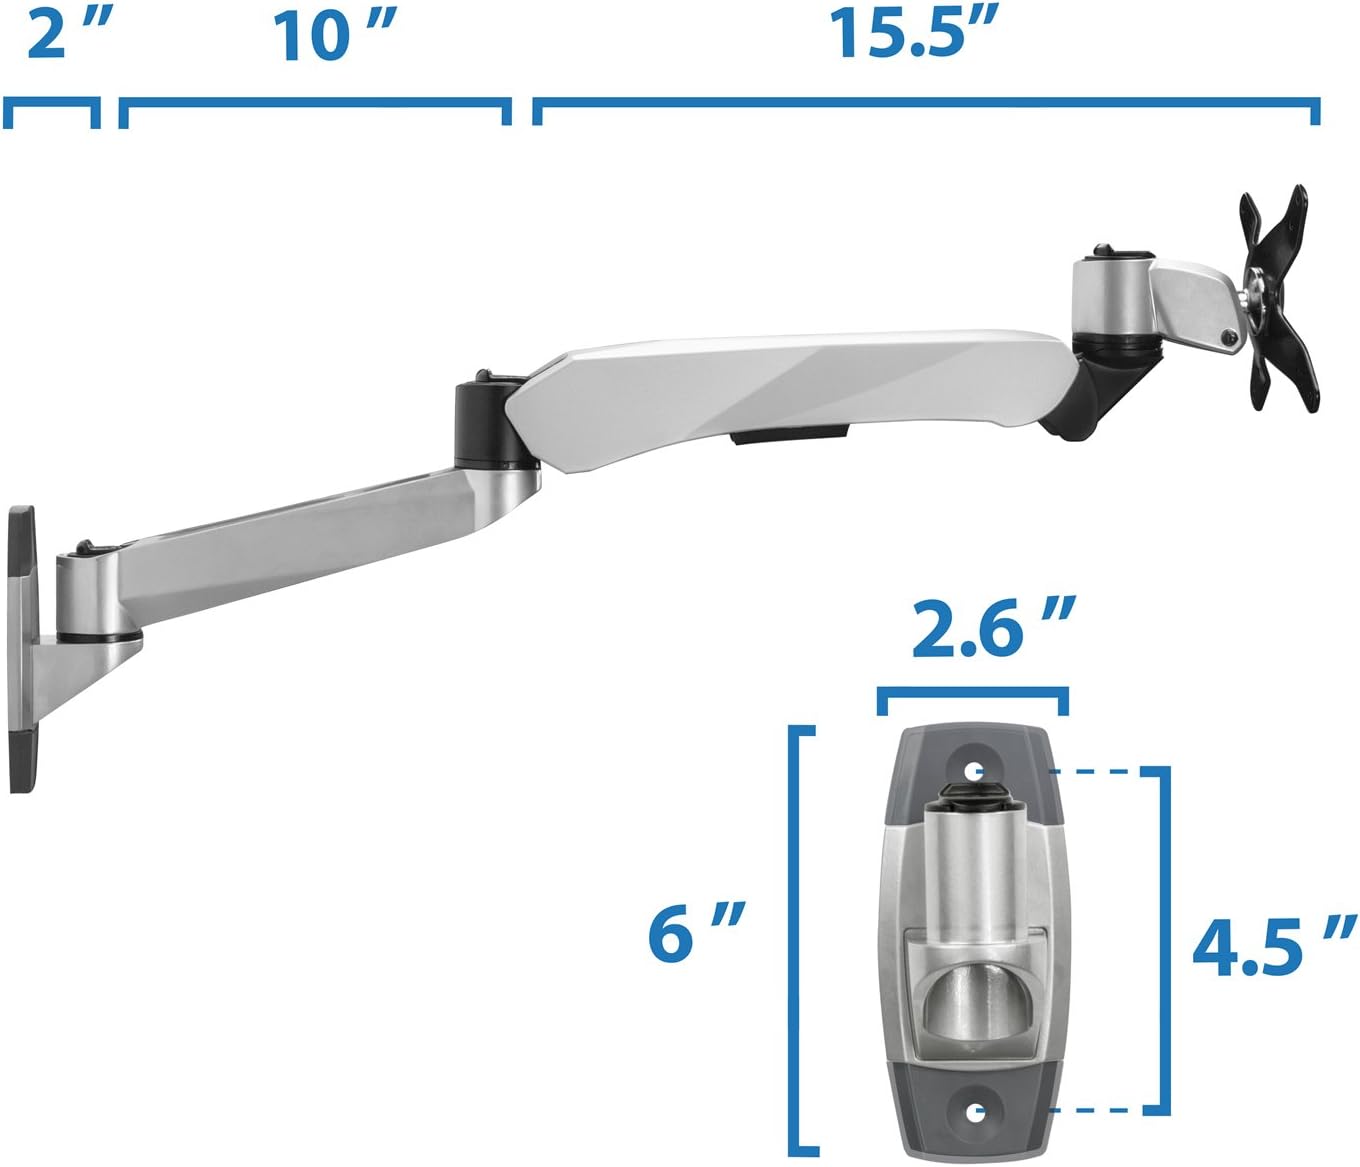
7-сүрөт: Өлчөмдүүview of the MI-35114S mount.
Кепилдик жана колдоо
For warranty information, product support, or to purchase replacement parts, please refer to the documentation included with your product or visit the official Mount-It! website. You can also contact Mount-It! customer service directly for assistance.
Visit the official Mount-It! Store: Mount-It! Store on Amazon