
1. Киришүү
This manual provides detailed instructions for the installation, operation, and maintenance of the Supermicro MBD-X10SLH-F-O uATX Server Motherboard. Please read this manual thoroughly before beginning installation to ensure proper setup and to maximize the performance and longevity of your system. This motherboard is designed for server applications, supporting Intel LGA1150 processors and DDR3 memory.
2. Продукт бүтүп калдыview
The Supermicro MBD-X10SLH-F-O is a high-performance uATX server motherboard featuring the Intel C226 chipset. It is engineered for reliability and efficiency in server environments.
Негизги өзгөчөлүктөрү:
- CPU розеткасы: LGA1150, supporting Intel Xeon E3-1200 v3/v4 series, 4th/5th Gen Core i3, Pentium, Celeron processors.
- Эстутум: 4x 204-pin DDR3-1600 SODIMM slots, supporting up to 32GB ECC/non-ECC Unbuffered memory.
- Кеңейтүү уячалары: 1x PCI-Express 3.0 x16, 1x PCI-Express 2.0 x8, 1x PCI-Express 2.0 x4.
- Сактагыч: 6x SATA3 (6Gbps) ports.
- Байланыш: Dual Gigabit Ethernet LAN ports (2x RJ45) and 1x Dedicated IPMI LAN port (RJ45).
- USB порттору: 4x USB 3.0 ports, 6x USB 2.0 ports.
- Видео чыгаруу: 1x VGA port.
- Форма фактору: uATX (9.6" x 9.6").
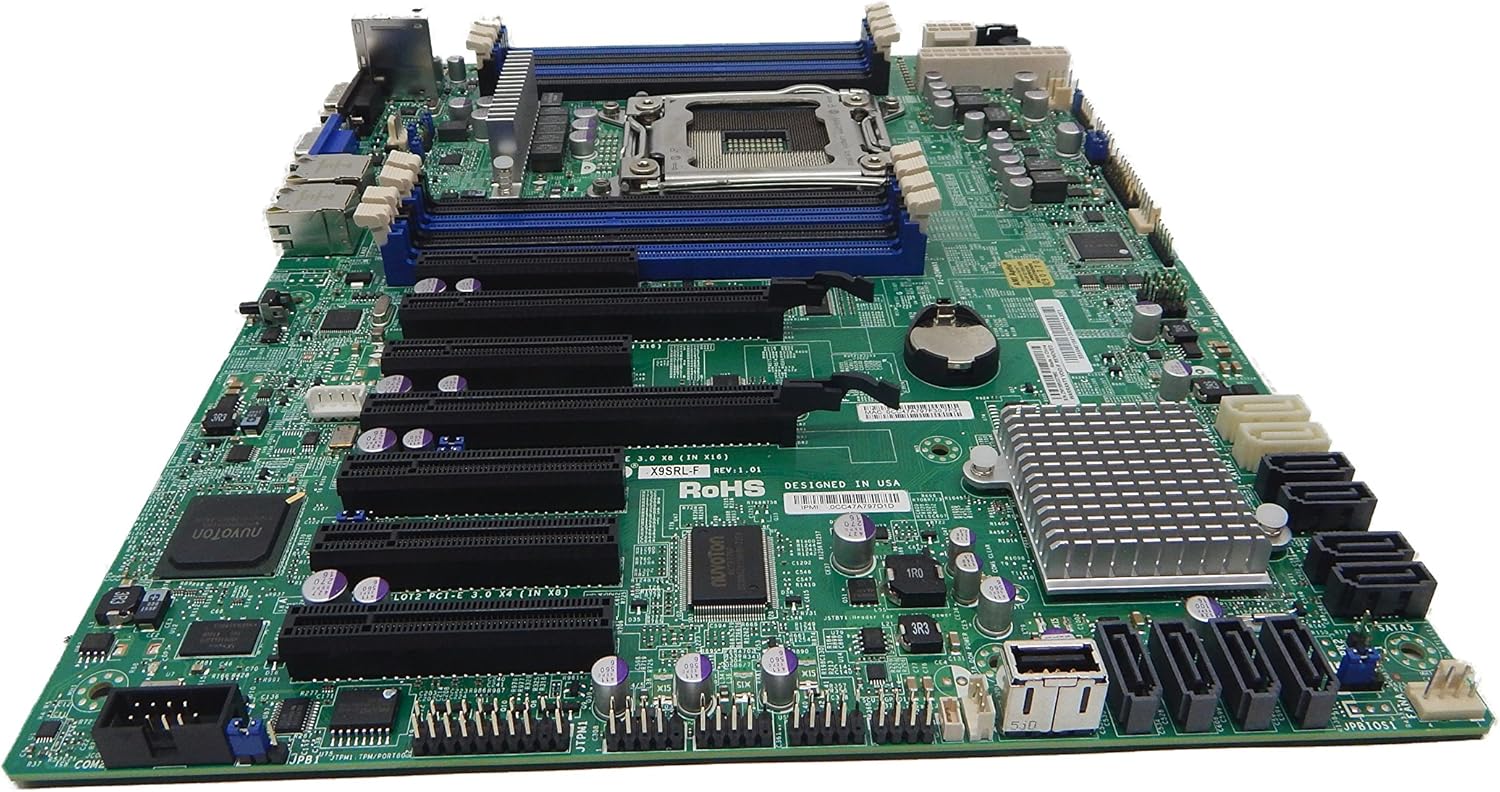
2.1-сүрөт: Жогорудан төмөн view of the Supermicro MBD-X10SLH-F-O motherboard, showing the CPU socket, RAM slots, and various expansion slots.

2.2-сүрөт: Бурчтуу view of the motherboard, highlighting the LGA1150 CPU socket and the four DDR3 SODIMM memory slots.

2.3-сүрөт: Арткы view of the Supermicro MBD-X10SLH-F-O motherboard, displaying the I/O panel with USB, VGA, LAN, and IPMI ports.

2.4-сүрөт: Жакын план view of the motherboard, showing the six SATA3 ports and other onboard connectors.
3. Техникалык шарттар
| Өзгөчөлүк | Спецификация |
|---|---|
| Бренд | Supermicro |
| Модель аты | MBD-X10SLH-F-O |
| CPU розетка | LGA 1150 |
| Чипсет түрү | Intel C226 |
| Шайкеш процессорлор | Intel Core i3-4xxx, i5-4xxx, i7-4xxx, i3-5xxx, i5-5xxx, i7-5xxx, Intel Xeon E3-1200 v3/v4 series |
| RAM эс технологиясы | DDR3 |
| Memory Speed | 1600 МГц |
| Колдоого алынган максималдуу RAM | 32 ГБ |
| USB 2.0 порттордун саны | 6 |
| USB 3.0 порттордун саны | 4 |
| SATA порттору | 6x SATA3 (6Gbps) |
| Кеңейтүү уячалары | 1x PCIe 3.0 x16, 1x PCIe 2.0 x8, 1x PCIe 2.0 x4 |
| Форма фактору | uATX |
| Өлчөмдөрү (LxWxH) | 14 x 11 x 3.5 дюйм |
| Элемент Салмагы | 3.52 унция |
4. Орнотуу
Before beginning installation, ensure your system is powered off and disconnected from the power source. Always handle the motherboard by its edges to avoid static discharge.
4.1. CPU орнотуу
- Gently lift the CPU socket lever.
- CPU'ну розетка менен тегиздеп, CPU'дагы алтын үч бурчтук розеткадагы үч бурчтукка дал келерин текшериңиз.
- Процессорду мажбурлабастан розеткага этияттык менен салыңыз.
- Lower the socket lever and secure it.
- Термикалык пастаны сүйкөңүз жана CPU муздаткычын өндүрүүчүнүн көрсөтмөлөрүнө ылайык орнотуңуз.
4.2. Эстутум орнотуу
- DIMM уячасынын эки учундагы клиптерди ачыңыз.
- Align the memory module's notch with the key in the DIMM slot.
- Эстутум модулунун эки учуна кысылганчалар орнотулганга чейин катуу басыңыз.
4.3. Кеңейтүү картасын орнотуу
- Remove the corresponding slot cover from your chassis.
- Кеңейтүү картасын каалаган PCIe уячасы менен тегиздеңиз.
- Карта толугу менен отурганга чейин бекем басыңыз.
- Картаны бурамалар же бекитүүчү клип менен бекитиңиз.
4.4. Сактагыч түзмөгүнө туташуу
- SATA маалымат кабелинин бир учун энелик платадагы SATA портуна туташтырыңыз.
- SATA маалымат кабелинин экинчи учун сактоо түзмөгүңүзгө (HDD/SSD) туташтырыңыз.
- SATA кубат кабелин кубат булагыңыздан сактагыч түзмөгүнө туташтырыңыз.
4.5. Электр байланыштары
- 24 пин ATX негизги кубат туташтыргычын кубат булагыңыздан энелик платага туташтырыңыз.
- 8-пиндүү (же 4-пиндүү) ATX 12V CPU кубат туташтыргычын энелик платага туташтырыңыз.
4.6. Front Panel Connections
Connect the front panel headers (Power LED, HDD LED, Power Switch, Reset Switch, USB, Audio) to the corresponding pins on the motherboard. Refer to the motherboard's silkscreen labels for correct pin orientation.
5. Иштөө нускамалары
5.1. Баштапкы жүктөө
- After all components are installed and connected, connect the power cord to your power supply and turn on the power switch.
- Шассидеги кубат баскычын басыңыз.
- Система күйүп, мониторуңузда дисплейди көрүшүңүз керек.
5.2. BIOS/UEFI мүмкүнчүлүгү
To enter the BIOS/UEFI setup utility, press the designated key (commonly DEL or F2) during the initial boot sequence. The exact key may vary; observe the on-screen prompts.
5.3. IPMI алыстан башкаруу
This motherboard features a dedicated IPMI LAN port for remote management. To access the IPMI interface, connect the IPMI LAN port to your network. Obtain the IP address assigned to the IPMI interface (either from BIOS or a network scan) and access it via a web browser from another computer on the same network. Java may be required for remote console functionality.
6. Техникалык тейлөө
Үзгүлтүксүз тейлөө сиздин энелик платаңыздын жана тутумуңуздун туруктуулугун жана узак иштөөсүн камсыз кылууга жардам берет.
- Чаңды тазалоо: Мезгил-мезгили менен кысылган абаны колдонуп, энелик платадан жана компоненттерден чаңды тазалап туруңуз. Тазалоодон мурун системанын өчүрүлгөнүн жана розеткадан ажыратылганын текшериңиз.
- Кабелдик башкаруу: Аба агымына тоскоол болуп калбашы жана кокустуктан ажырап калбоо үчүн бардык кабелдердин тыкан өткөрүлүшүн жана бекитилишин текшериңиз.
- BIOS/программалык камсыздоону жаңыртуу: Supermicro текшерүү website for the latest BIOS and IPMI firmware updates. Follow the provided instructions carefully. Note that IPMI BIOS upgrades may require a separate license. Always update BIOS before IPMI firmware.
- Компонентти текшерүү: Occasionally inspect all connections (power, data, expansion cards) to ensure they are securely seated.
7. Кыйынчылыктарды
Бул бөлүм сиз кабылышы мүмкүн болгон жалпы көйгөйлөрдү карайт.
7.1. System Fails to Boot
- Электр байланыштарын текшерүү: Ensure the 24-pin ATX and 8-pin CPU power connectors are securely attached.
- Reseat компоненттери: Remove and re-install the CPU, memory modules, and any expansion cards to ensure they are properly seated.
- CMOS тазалоо: Refer to your motherboard's detailed manual for instructions on how to clear the CMOS, which can resolve boot issues caused by incorrect BIOS settings.
- Минималдуу конфигурация: Try booting with only essential components (CPU, one RAM stick, power supply, and display) to isolate the problem.
7.2. Fan Speed Issues
Some low RPM, high-efficiency fans may not be accurately detected by the motherboard's fan controller, leading to erratic fan speed behavior (e.g., fans spinning up to max RPM). This is often due to the controller expecting server-grade fans with higher RPM ranges.
- BIOS Орнотуулары: Check BIOS settings for fan control options. Adjust fan curves or modes if available.
- 3-Pin vs. 4-Pin Fans: If using 4-pin PWM fans that exhibit this behavior, consider using 3-pin adapters if available with your fans. This can sometimes provide a more stable, albeit less precise, fan control.
- IPMI Fan Control: While IPMI offers fan control, it may have limitations for low RPM fans.
7.3. SATA Port Obstruction
When installing a full-size graphics processing unit (GPU), some SATA ports may become physically blocked or difficult to access.
- Алдына план: Connect SATA cables to the necessary ports before installing large expansion cards.
- Angled SATA Cables: Use SATA cables with angled connectors if straight connectors are obstructed.
- Alternative Ports: Utilize any unblocked SATA ports first.
8. Кепилдик жана колдоо маалыматы
For detailed warranty information, including terms, conditions, and duration, please refer to the official Supermicro website or the warranty card included with your product. For technical support, driver downloads, and additional documentation, visit the Supermicro support portal.
Supermicro расмий Webсайт: www.supermicro.com