
1. Киришүү
The Mount-It! MI-65156 Quad Monitor Desk Mount is designed to optimize your workspace by securely holding up to four monitors. This full-motion mount features height-adjustable arms, VESA compatibility, and integrated cable management, providing an ergonomic and organized setup. This manual provides detailed instructions for assembly, operation, and maintenance to ensure safe and efficient use of your monitor mount.
2. Коопсуздук маалыматы
- Чогултуу жана орнотуудан мурун бардык көрсөтмөлөрдү кунт коюп окуп чыгыңыз.
- Ensure your desk surface can support the combined weight of the mount and all monitors.
- Do not exceed the maximum weight capacity of 19.8 lbs (9 kg) per monitor.
- Use only the hardware provided. If any parts are missing or damaged, contact Mount-It! customer service.
- Чогултуу учурунда балдарды жана үй жаныбарларын алыс кармаңыз.
- Бардык бурамаларды бекем бекитиңиз, бирок өтө катуу тартпаңыз.
3. Пакеттин мазмуну
Verify that all components are present and undamaged before proceeding with assembly. The package includes the main pole, clamp base, L-plate, grommet plate, arm segments, VESA heads, and various screws and tools for installation.
4. Орнотуу жана чогултуу
Follow these steps to assemble your Mount-It! MI-65156 Quad Monitor Desk Mount.
4.1. Base Installation (Clamp же Громмет)
The mount offers both C-clamp and grommet mounting options to suit various desk types. The C-clamp supports desk thicknesses from 0.79 to 2.36 inches.

1-сүрөт: Clamp жана рычагдарды орнотуу параметрлери
For a visual guide on converting between clamp and grommet mounting, refer to the 'Convert Clamp to Grommet' section in the troubleshooting video below.
Video 1: Full Motion Quad Monitor Desk Mount Assembly (MI-65156)
4.2. Attaching Arm Segments
Once the pole is securely mounted, attach the arm segments. The modular design allows for flexible arrangement. Ensure each arm segment clicks firmly into place.

Figure 2: MI-65156 Assembly Diagram
4.3. Attaching Monitors to VESA Heads
The mount supports VESA patterns of 75x75mm and 100x100mm. Attach the VESA plate to the back of your monitor using the provided screws. Then, slide the monitor with the attached VESA plate onto the end of the arm until it clicks into place. The quick-release mechanism allows for easy attachment and removal.

Figure 3: Quick-Release and Cable Management Features

Figure 4: Screen Size and VESA Compatibility
5. Пайдалануу боюнча нускамалар жана жөндөөлөр
The MI-65156 mount offers extensive adjustability for optimal viewсооронуч.
5.1. Gas Spring Arm Tension Adjustment
Adjust the gas spring tension to ensure your monitors stay in the desired position. If a monitor drops, increase tension by turning the adjustment screw counter-clockwise. If it rises, decrease tension by turning it clockwise. Use the provided Allen wrench.

5-сүрөт: Газ жазыгынын чыңалуусун жөндөө
For a detailed video guide on gas spring arm tension adjustment, refer to the 'Gas Spring Arm Tension Adjustment' section in the troubleshooting video below.
5.2. Tilt, Swivel, Rotation, and Height Adjustment
The arms provide 105 degrees of tilt, 360 degrees of rotation (for portrait or landscape orientation), and 360 degrees of swivel. The height is adjustable by 15.75 inches along the pole.
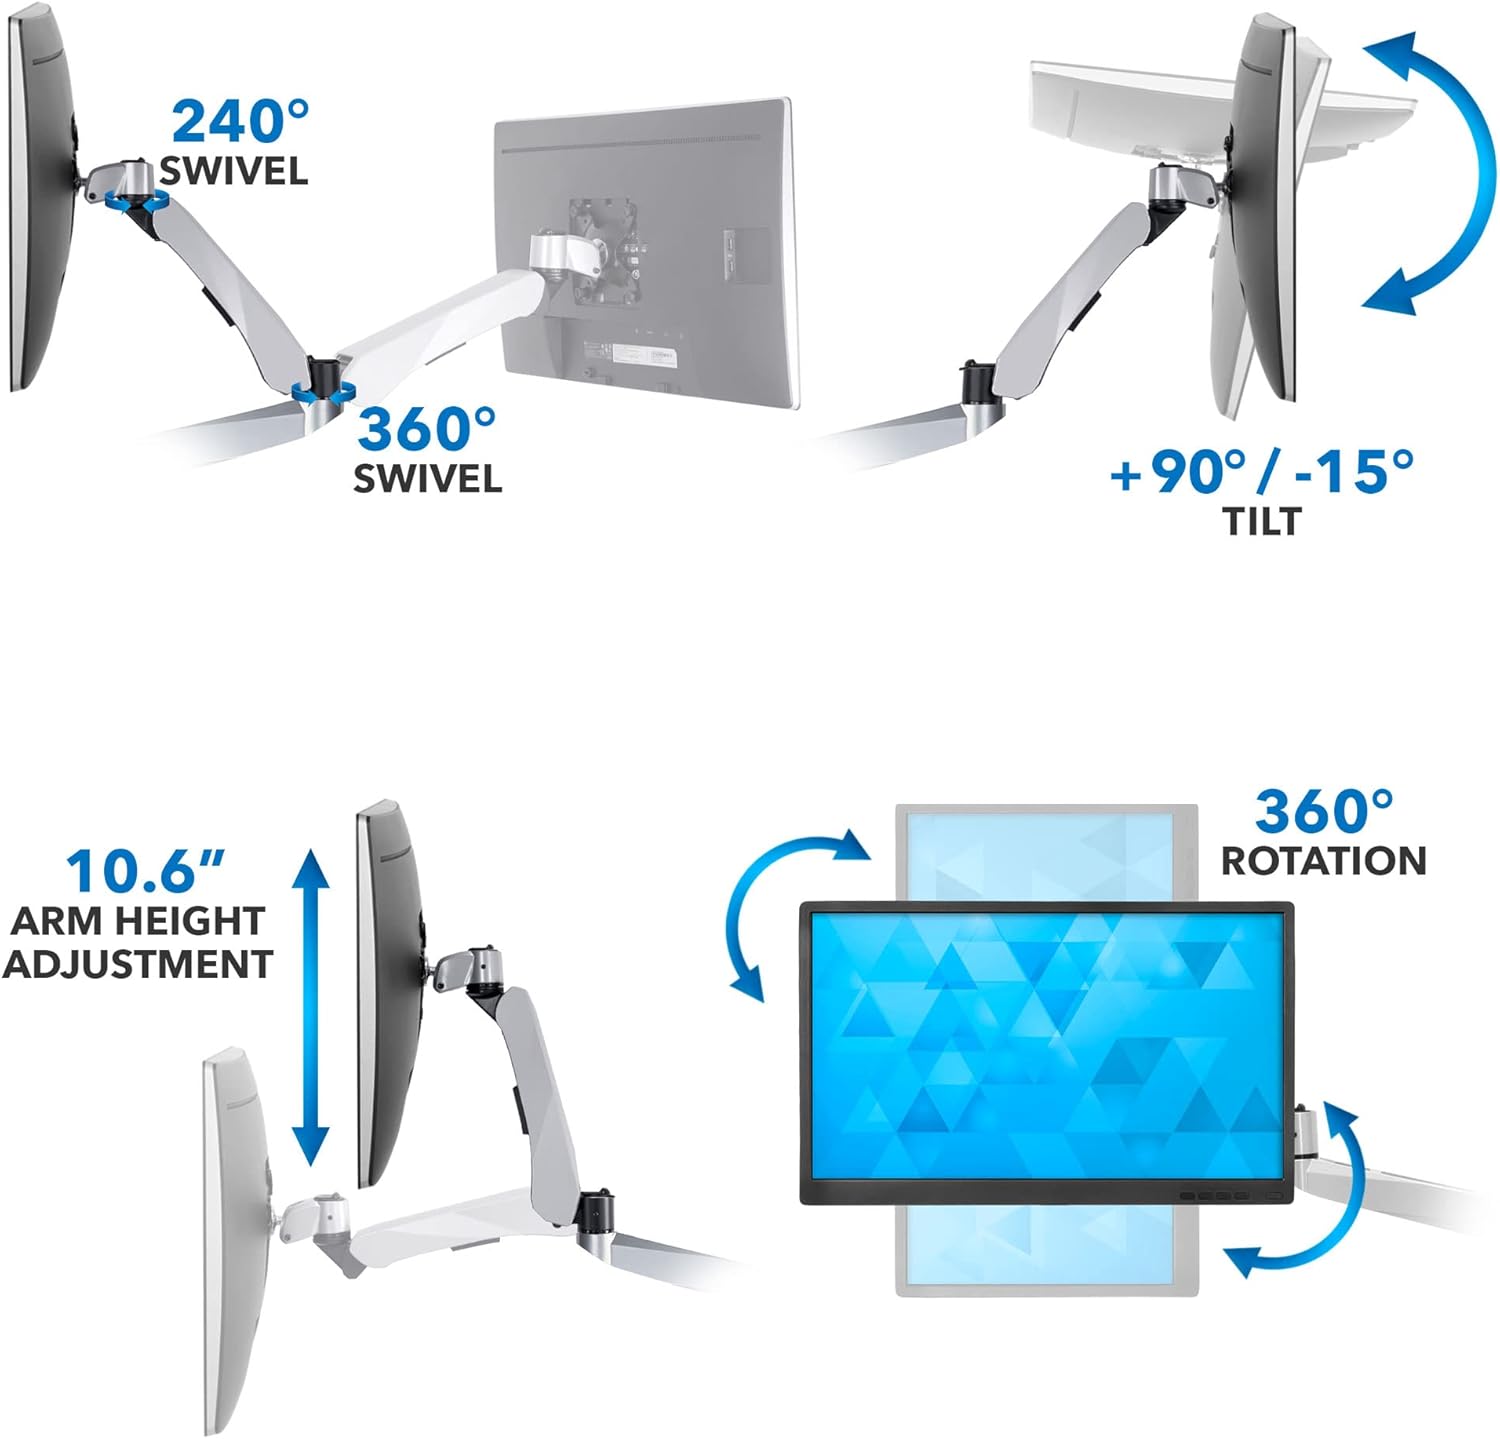
Figure 6: Articulation Features
5.3. Кабелдик башкаруу
Route your cables through the integrated cable management channels in the arms and use the pole clips to maintain a neat and organized workspace.
6. Техникалык тейлөө
Regularly check all screws and connections to ensure they remain tight. Clean the mount with a soft, damp кездеме. Финишке зыян келтирүүчү абразивдүү тазалагычтарды же эриткичтерди колдонуудан алыс болуңуз.
7. Кыйынчылыктарды
If you encounter any issues with your monitor mount, refer to the following video for common troubleshooting steps.
Video 2: Modular Monitor Mount Troubleshooting Video!
- Vesa Plate Rotation: If the VESA plate is difficult to rotate upon assembly, loosen the screw on the VESA plate using the provided Allen key. Place the VESA plate flat on a table, attach the arm, and firmly hold the VESA plate while pulling back on the arm to rotate.
- Clamp to Grommet Conversion: The video demonstrates how to convert the clamp base to a grommet mount by disassembling the clamp and reassembling with the grommet plate and bolt.
- Gas Spring Arm Tension: If your monitor is not holding its position, adjust the gas spring tension as described in Section 5.1.
- Quick Release Issues: Ensure the quick-release mechanism clicks into place during assembly. To remove a component, pull back on the clip and slide the component off.
8. Техникалык шарттар
| Өзгөчөлүк | Спецификация |
|---|---|
| Модель номери | MI-65156 |
| Монтаж түрү | Үстөлгө орнотуу (Cl)amp же Громмет) |
| Монитор колдоо | Quad Monitor |
| Максималдуу экран өлчөмү | 27 дюйм |
| Жүктөө жөндөмдүүлүгү | 19.8 lbs (9 kg) per monitor |
| VESA шайкештиги | 75x75 мм, 100x100 мм |
| C-Clamp Table Thickness | 0.79ден 2.36 дюймга чейин |
| Кыймыл түрү | Айландыруу, айландыруу, буроо, эңкейтүү |
| Тилтүү диапазону | 105 градус (+90°/-15°) |
| Айлануу | 360 degrees (portrait or landscape) |
| Айлануучу | Макс 360 градус |
| Бийиктиги жөнгө салынуучу | 15.75 дюйм |
| Материал | Алюминий |

7-сүрөт: Продукциянын өлчөмдөрү жана кубаттуулугу
9. Кепилдик жана колдоо
Mount-It! products are designed for durability and performance. For warranty information or technical support, please contact Mount-It! customer service. Keep your purchase receipt for warranty claims.