
1. Киришүү
The Palmer PAL-PPB20 Press Patch Box is an audio signal distributor designed for use in press conference environments. It facilitates the distribution of audio signals to multiple recording devices simultaneously.
This unit features dedicated inputs for both microphone and line-level signals, sourced typically from a mixing console output. A high-quality input amplifier, equipped with a transformer-balanced input, ensures a wide dynamic range for optimal audio fidelity.
The PAL-PPB20 provides a total of 20 transformer-balanced XLR/male outputs, each with separate paired driver circuits. This design allows for reliable connection to various recording equipment, including video cameras. The nominal output level for these XLR outputs is +4 dBu at 600 ohms. Channels 19 and 20 additionally offer TRS jack sockets for balanced or unbalanced signals, as well as phono sockets with a nominal level of -10 dBu.
For scenarios requiring more than 20 outputs, additional PPB20 units can be interconnected via the rear BUS IN/OUT sockets. Signal monitoring is provided by a 10-segment LED strip, displaying levels from -40 to +10 dB (where 0 dB on the display corresponds to a +4 dBu output). An adjustable headphone amplifier is also included for convenient audio monitoring.
The PAL-PPB20 incorporates an integral, shielded power supply unit. An auxiliary DC input allows for the connection of an external backup battery power source, such as a Palmer PW4, which can power two PPB20 units.
2. Продукт бүтүп калдыview
2.1 алдыңкы панели
The front panel of the PAL-PPB20 provides access to the primary audio inputs, output connections, and monitoring controls.

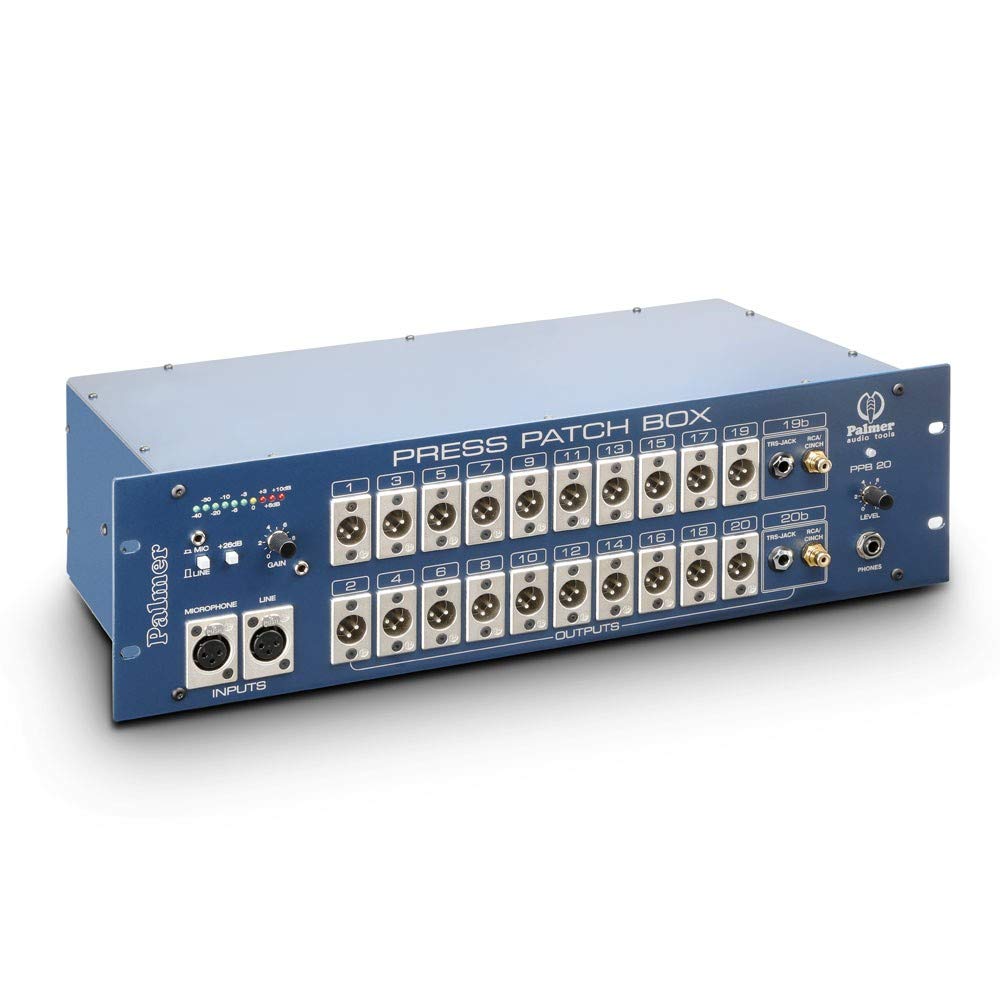
1-сүрөт: Фронт view of the Palmer PAL-PPB20. This image displays the microphone and line inputs, 20 XLR outputs, channels 19 and 20 with additional TRS and RCA outputs, the LED level meter, and headphone output with level control.
- Киргизүүлөр: XLR connectors for Microphone and Line signals. A gain control knob is located near the inputs.
- Чыгуулары: 20 transformer-balanced XLR male outputs (numbered 1-20). Channels 19 and 20 also feature TRS jack and RCA phono sockets.
- Деңгээл өлчөгүч: A 10-segment LED display indicates the output signal level.
- Телефондор: Headphone output with an adjustable level control.
2.2 Арткы панель
The rear panel houses power connections, ground lift switches, and bus connectors for linking multiple units.
2-сүрөт: Арткы view of the Palmer PAL-PPB20. This image shows the MAINS AC-IN power connector, fuse holder, DC-IN for backup power, 20 individual ground lift switches for each output channel, and BUS IN/OUT connectors.
- MAINS AC-IN: Standard IEC power inlet with an integrated power switch.
- FUSE: Fuse holder for circuit protection.
- DC-IN: Input for external backup battery power supply.
- Жер көтөргүч өчүргүчтөр: Individual switches for each of the 20 output channels to address ground loop issues.
- BUS IN/OUT: Connectors for linking multiple PAL-PPB20 units.
2.3 Ички компоненттер
The internal design of the PAL-PPB20 emphasizes robust signal distribution and power management.

3-сүрөт: Ички view of the Palmer PAL-PPB20. This image reveals the organized layout of circuit boards, transformer-balanced output stages, and internal wiring, highlighting the robust construction.
- Transformer-Balanced Outputs: Each of the 20 outputs is individually transformer-balanced for optimal signal isolation and noise rejection.
- Shielded Power Supply: An integral, shielded power supply unit minimizes interference.
3. Орнотуу
Proper setup ensures optimal performance and reliable audio distribution.
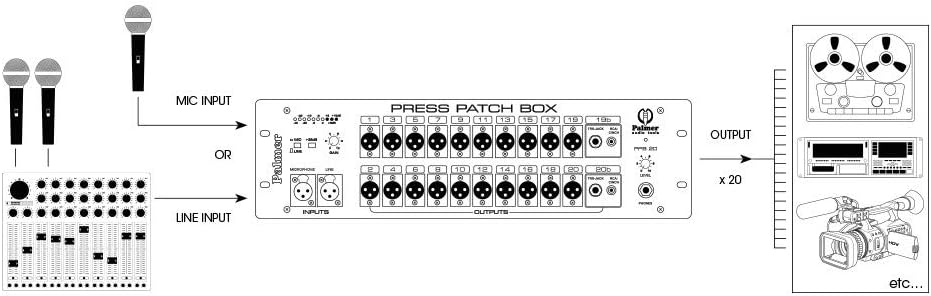
4-сүрөт: Connection diagram for the Palmer PAL-PPB20. This diagram illustrates how microphones or a mixing console's line output connect to the PPB20's inputs, and how the 20 outputs distribute the signal to multiple recording devices like tape recorders, digital recorders, and video cameras.
- Кубат туташуу: Connect the PAL-PPB20 to a suitable AC power source using the MAINS AC-IN inlet on the rear panel. Ensure the power switch is in the OFF position before connecting. If using a backup battery, connect it to the DC-IN port.
- Киргизүү байланышы:
- For microphone signals, connect your microphone(s) to the XLR MIC INPUT.
- For line-level signals (e.g., from a mixing console's output), connect to the XLR LINE INPUT.
- Чыгуу туташуулары: Connect your recording devices (e.g., video cameras, audio recorders) to the 20 XLR male OUTPUTS on the front panel. For channels 19 and 20, you may also use the TRS jack or phono sockets as needed.
- Жер көтөргүч: For each output, assess if a ground lift is necessary to prevent hum or noise. Use the individual ground lift switches on the rear panel. The '0-LIFT' position disconnects the ground.
- Linking Multiple Units (Optional): If more than 20 outputs are required, connect the BUS OUT of the first PAL-PPB20 to the BUS IN of the second unit using a suitable cable. Repeat for additional units.
- Гарнитура туташуу: Connect your headphones to the PHONES output on the front panel for monitoring.
4. Операция
Follow these steps for proper operation of the PAL-PPB20.
- Күйгүзүү: After all connections are made, switch on the power using the MAINS AC-IN switch on the rear panel.
- Киргизүүнүн пайдасын тууралоо: Use the GAIN control knob on the front panel to adjust the input level. Monitor the LED level meter to ensure the signal is strong but not clipping. Aim for the 0 dB indicator (corresponding to +4 dBu output) during peak signal levels.
- Сигнал мониторинги: The 10-segment LED strip provides a visual indication of the output signal level, ranging from -40 dB to +10 dB. Ensure levels are within an appropriate range for connected recording devices.
- Наушник мониторинги: Adjust the PHONES LEVEL control to set a comfortable listening volume for monitoring the distributed audio signal.
- Ground Lift Management: If any hum or ground loop noise is present in the output signals, individually toggle the GROUND LIFT SWITCHES on the rear panel for the affected channels. Experiment with the 'I-GND' (grounded) and '0-LIFT' (lifted) positions to find the quietest setting.
5. Техникалык шарттар
| Өзгөчөлүк | Description |
|---|---|
| Бренд | Палмер |
| Модел | PAL-PPB20 |
| Элемент түрү аты | Audio Interface (Press Patch Box) |
| Каналдардын саны | 20 (split outputs per channel) |
| Аудио киргизүү | XLR (Microphone, Line) |
| Байланыш технологиясы | XLR, TRS, RCA |
| Nominal Output Level (XLR) | +4 dBu at 600 ohm |
| Nominal Output Level (Phono) | -10 дБу |
| Өзгөчөлүктөрү | Attenuator, Ground Lift, Input Gain, Mic/Line Switch, Phones Level Control |
| Шайкеш түзмөктөр | Headphones, Microphones, Mixing Consoles, Recording Equipment |
| Элемент Салмагы | 19.8 фунт (болжол менен 8.98 кг) |
| Өндүрүүчү | Палмер |
| ASIN | B00EFOSSSI |
6. Кыйынчылыктарды
Бул бөлүмдө сиз кабылышы мүмкүн болгон жалпы маселелерди чечүү жолдору каралган.
- Кубат жок:
- Ensure the power cable is securely connected to both the unit and a live AC outlet.
- Арткы панелдеги кубат которгучу ON абалында экенин текшериңиз.
- Inspect the fuse on the rear panel. If blown, replace it with a fuse of the correct rating (230V - 160mAT or 115V - 315mAT).
- If using DC backup power, ensure the battery is charged and correctly connected.
- Аудио чыгышы жок:
- Verify that the input source (microphone or line) is active and sending a signal.
- Check all input and output cable connections for security and correct polarity.
- Ensure the input GAIN control is set appropriately and the LED level meter shows activity.
- Confirm that the connected recording devices are correctly configured and receiving input.
- Күңүрт же ызылдаган ызы-чуу:
- This is often caused by ground loops. Use the individual GROUND LIFT SWITCHES on the rear panel for the affected output channels. Toggle between 'I-GND' and '0-LIFT' to find the setting that eliminates the noise.
- Ensure all audio cables are in good condition and properly shielded.
- Бурмаланган аудио:
- Reduce the input GAIN control. The LED level meter should not consistently hit the +10 dB indicator, which suggests clipping.
- Check the input signal source for distortion before it reaches the PAL-PPB20.
7. Техникалык тейлөө
To ensure the longevity and optimal performance of your PAL-PPB20, follow these maintenance guidelines:
- Тазалоо: Regularly wipe the exterior of the unit with a soft, dry, lint-free cloth. Avoid using abrasive cleaners, solvents, or waxes.
- Курчап турган чөйрө: Operate and store the unit in a clean, dry environment, away from extreme temperatures, direct sunlight, and excessive dust or moisture.
- Вентиляция: Ашыкча ысып кетүүнүн алдын алуу үчүн аппараттын айланасында туура желдетүүнү камсыз кылыңыз. Эч кандай желдетүүчү тешиктерди жаап албаңыз.
- Кабелдик башкаруу: Туташтыргычтарга жана ички зымдарга зыян келтирбөө үчүн кабелдерди иреттүү жана ийилип кетпеген же ашыкча чыңалуудан алыс кармаңыз.
- Сактагычты алмаштыруу: If the fuse blows, replace it only with a fuse of the exact same type and rating as specified on the rear panel.
8. Кепилдик жана колдоо
The Palmer PAL-PPB20 comes with a 5 жылдык кепилдик. For warranty claims, technical support, or service inquiries, please contact Palmer customer support or your authorized dealer. Keep your proof of purchase for warranty validation.
For further information and support, please visit the official Palmer webсайтка кириңиз же өнүмүңүздүн документтеринде берилген байланыш маалыматына кайрылыңыз.