
1. Продукт бүтүп калдыview
The HP ProDisplay P17A is a 17-inch LED-backlit LCD monitor designed for general computing tasks. It features a 5:4 aspect ratio with a maximum resolution of 1280 x 1024 pixels, providing clear and consistent visuals. This monitor is equipped with both VGA and HDMI connectivity options, offering versatility for various system configurations. Its compact design and energy-efficient LED backlighting make it suitable for a range of environments.

Сүрөт 1: Алдыңкы view of the HP ProDisplay P17A monitor, showcasing анын дисплейи жана стенди.
2. Орнотуу нускамалары
2.1 Мониторду таңгактан чыгаруу
Бардык компоненттерди таңгактан кылдаттык менен алып салыңыз. Төмөнкү нерселердин бар экенин текшериңиз:
- HP ProDisplay P17A Monitor
- Monitor Stand (base and neck)
- Электр кабели
- VGA кабели (аймакка/пакетке жараша өзгөрүшү мүмкүн)
- HDMI кабели (аймакка/пакетке жараша өзгөрүшү мүмкүн)
2.2 Стендди чогултуу
- Чийип кетпеши үчүн мониторду жумшак, таза бетке ылдый каратып кой.
- Attach the stand neck to the back of the monitor, aligning the tabs and pushing until it clicks into place.
- Attach the stand base to the bottom of the stand neck, securing it with the captive screw if present.
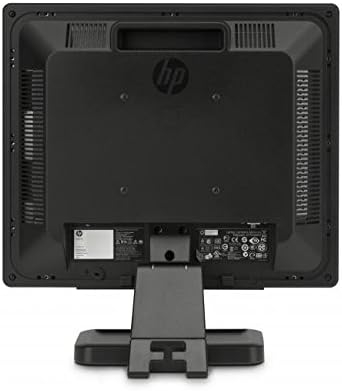
2-сүрөт: Арткы view of the monitor, illustrating the stand attachment point and various connectivity ports.
2.3 Туташтыруучу кабельдер
- Кубат туташуу: Кубат кабелин монитордун кубат киресине, анан жерге туташтырылган электр розеткасына туташтырыңыз.
- Видео туташуу:
- For VGA: Connect one end of the VGA cable to the VGA port on the monitor and the other end to the VGA port on your computer. Tighten the screws on the VGA connector.
- For HDMI: Connect one end of the HDMI cable to the HDMI port on the monitor and the other end to the HDMI port on your computer.
- Бардык байланыштар коопсуз экенин текшериңиз.
3. Иштөө нускамалары
3.1 Күйгүзүү/өчүрүү
Press the power button located on the front bezel of the monitor to turn it on or off. The power indicator light will illuminate when the monitor is on.
3.2 Дисплей жөндөөлөрүн тууралоо (OSD менюсу)
The On-Screen Display (OSD) menu allows you to adjust various monitor settings. Use the buttons on the front bezel to navigate and select options.
- Меню баскычы: OSD менюсун ачат.
- Чабыттоо баскычтары (+ / - or Up/Down): Move through menu options and adjust values.
- Тандоо/ОК баскычы: Тандоону ырастайт же кошумча менюга кирет.
- Чыгуу баскычы: Учурдагы менюдан же OSDден чыгат.
Жалпы жөнгө салынуучу орнотуулар төмөнкүлөрдү камтыйт:
- Жарыктык/Контраст: Жарык жана караңгы аймактардын жалпы жарыктыгын жана айырмасын тууралайт.
- Түстү көзөмөлдөө: Allows adjustment of color temperature, RGB levels, or preset color modes.
- Киргизүүнү тандоо: Manually switches between VGA and HDMI input sources.
- Сүрөттү башкаруу: Adjusts sharpness, aspect ratio, and auto-adjustment for analog signals.
- Башкаруу: Энергияны үнөмдөө параметрлери, OSD тайм-аут, тилди тандоо.
4. Техникалык тейлөө
4.1 Мониторду тазалоо
- Тазалоодон мурун ар дайым мониторду өчүрүп, электр зымдарын сууруп алыңыз.
- Жумшак, түксүз кездемени жеңил колдонуңуз dampсуу же абразивдүү эмес экран тазалагыч менен иштетиңиз.
- Тазалоочу каражатты түз эле экранга же мониторго чачпаңыз.asing.
- Avoid using benzene, thinner, ammonia-based cleaners, or abrasive materials, as these can damage the surface.
4.2 Жалпы кам көрүү
- Мониторду күн тийген жерге же жылуулук булактарынын жанына коюудан алыс болуңуз.
- Монитордун айланасында жетиштүү желдетүүнү камсыз кылыңыз.
- Желдетүүчү тешиктерди жаппаңыз.
- Protect the screen from sharp objects or excessive pressure.
5. Кыйынчылыктарды
Колдоо кызматына кайрылуудан мурун, төмөнкү негизги көйгөйлөрдү чечүү кадамдарын жасап көрүңүз:
5.1 Экранда сүрөт жок
- Монитордун электр кабели мониторго да, иштеп жаткан электр розеткасына да бекем туташтырылганын текшериңиз.
- Verify the power indicator light on the monitor is on. If not, press the power button.
- Check that the video cable (VGA or HDMI) is securely connected to both the monitor and the computer.
- Ensure the correct input source is selected on the monitor (use the OSD menu to switch inputs).
- Компьютериңизди өчүрүп күйгүзүңүз.
5.2 Сүрөттүн сапаты начар
- Fuzzy or Blurry Image: Компьютериңиздеги дисплейдин чечилиши монитордун жергиликтүү резолюциясына (1280 x 1024) коюлганын текшериңиз.
- Туура эмес түстөр: Adjust color settings through the OSD menu or your computer's display settings.
- Image Off-Center/Incorrect Size (VGA only): Use the "Auto Adjust" function in the OSD menu.
- Жылтылдап: Check the refresh rate setting on your computer; ensure it is set to 60 Hz.
5.3 Monitor Not Responding to Buttons
- Unplug the monitor's power cable, wait 10 seconds, then plug it back in and try again.
- Эч кандай баскычтардын тыгылып калбаганын текшериңиз.
6. Техникалык шарттар
| Өзгөчөлүк | Спецификация |
|---|---|
| Бренд | HEWLETT PACKARD |
| Модель аты | HP P17A |
| Модель номери | F4M97AAABA |
| Screen Size | 17 дюйм |
| Дисплей түрү | LED арткы жарык LCD |
| Native Resolution | 1280 x 1024 (SXGA) |
| Аспект катышы | 5:4 |
| Контраст катышы | 1000:1 |
| Жаңыртуу ылдамдыгы | 60 Гц |
| Жооп убактысы | 5 Миллисекунд |
| Viewбурч | 170 градус |
| Байланыш | 1x VGA, 1x HDMI |
| Энергияны керектөө | 25 Ватт (максималдуу) |
| Элементтин өлчөмдөрү (D x W x Y) | 8.12"D x 14.85"W x 15.24"H |
| Элемент Салмагы | 8.2 фунт |
| Монтаж түрү | Дубалга орнотуу (VESA шайкеш) |
| Кошумча функциялар | Anti Glare Screen |

Figure 3: Dimensions of the HP ProDisplay P17A monitor.
7. Кепилдик жана колдоо
7.1 Кепилдик маалыматы
This product is often sold as a refurbished item. Refurbished products typically come with a limited warranty provided by the refurbisher or seller. Please refer to your purchase documentation for specific warranty terms and conditions, including duration and coverage details.
7.2 Техникалык колдоо
For technical assistance, troubleshooting beyond this manual, or warranty claims, please contact the vendor or HP customer support. Have your monitor's model number (F4M97AAABA) and serial number ready when contacting support.
You can find additional support resources, drivers, and documentation on the official HP support webсайт.