
BLACK+DECKER EVO183B1
BLACK+DECKER 18V Multi-Tool EVO183B1 User Manual
Model: EVO183B1
1. Киришүү
The BLACK+DECKER 18V Multi-Tool EVO183B1 is a versatile power tool designed to handle a variety of DIY and home improvement tasks. Its innovative interchangeable head system allows you to quickly switch between drill driver, jigsaw, and sander functions, providing efficiency and convenience. This manual provides essential information for the safe and effective operation, maintenance, and troubleshooting of your multi-tool.

Figure 1.1: The BLACK+DECKER 18V Multi-Tool showing the main body and the three interchangeable heads: drill driver, jigsaw, and sander. Arrows indicate the attachment points for each head.
2. Негизги өзгөчөлүктөрү
- Тtage: DC18V
- Батарея сыйымдуулугу: 1.5Ah Литий-ион
- Которуу: Variable Speed for precise control
- LED жарык: Integrated for illuminating the work area
- Бит кармоочу: Magnetic for secure bit retention
- Drill Driver:
- Rotation Speed: 0-800 rpm
- Max Torque: 22 N·m
- Clutch: 11 stages for various materials
- Чак сыйымдуулугу: 1-10 мм
- Jigsaw:
- Stroke Rate: 0-2,800 spm
- Узундугу: 13 мм
- Сандер:
- Rotation Speed: 0-9,000 rpm
- Pad Replacement: One-touch system
3. Пакеттин мазмуну
Ensure all items listed below are present in your kit:
- BLACK+DECKER 18V Multi-Tool Main Unit
- Drill Driver Head Attachment
- Jigsaw Head Attachment
- Sander Head Attachment
- 11 x Bits (Drill: 2.5/4/5/6/8mm; Phillips: #1/#2; Slotted: #6; Pozi: #2; Hex: #5/#6)
- 5 x Jigsaw Blades (6 TPI wood cutting x2, 10 TPI wood cutting x2, curve cutting x1)
- 10 x Sandpaper Sheets (Coarse #80 x5, Fine #120 x5)
- Чаңды чогултуучу адаптер
- 2 х 1.5Ач литий-иондук батарейкалар
- 40-minute Rapid Charger
- Dedicated Kit Box

Figure 3.1: A visual representation of the various accessories included with the multi-tool, such as drill bits, jigsaw blades, sandpaper, charger, and batteries.
4. Орнотуу
4.1 Батареяны заряддоо
- Insert the battery into the rapid charger.
- Заряддоо түзүлүштү стандарттуу розеткага сайыңыз.
- The charger indicator light will show the charging status. A full charge typically takes 40 minutes.
- Толук заряддалгандан кийин, батареяны заряддагычтан чыгарыңыз.
4.2 Баштыкчаларды бекитүү/ажыратуу
- Ensure the tool is switched off and the battery is removed before attaching or detaching heads.
- Align the desired head attachment (drill, jigsaw, or sander) with the main unit.
- Push the head firmly onto the main unit until it clicks securely into place.
- To detach, press the release buttons on the sides of the main unit and pull the head away.

Figure 4.1: Illustrates the process of attaching or detaching an interchangeable head from the main multi-tool body, highlighting the secure connection mechanism.
5. Иштөө нускамалары
5.1 Жалпы операция
- Insert a charged battery into the tool's base.
- Select the appropriate head attachment for your task.
- Press the trigger to start the tool. The variable speed switch allows for controlled operation.
- The integrated LED light will illuminate the work area when the trigger is pressed.
5.2 Using the Drill Driver Attachment
- Attach the drill driver head.
- Insert the desired drill bit or screwdriver bit into the chuck and tighten securely.
- Adjust the clutch setting (1-11) based on the material and desired torque to prevent overtightening or stripping screws.
- For drilling, apply steady pressure and maintain a straight angle. For screwdriving, ensure the bit is fully engaged with the screw head.
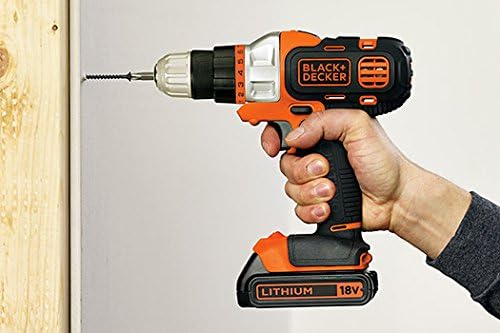
Figure 5.1: A user demonstrating the drill driver attachment in action, screwing into a wooden surface. This highlights the tool's ergonomic design and ease of use for drilling and fastening tasks.
5.3 Using the Jigsaw Attachment
- Attach the jigsaw head.
- Select the appropriate jigsaw blade for your material (wood, metal, etc.) and insert it into the blade clamp. Ensure it is securely locked.
- Place the base plate of the jigsaw firmly on the workpiece.
- Start the tool and guide it along your cutting line, applying consistent, moderate pressure.
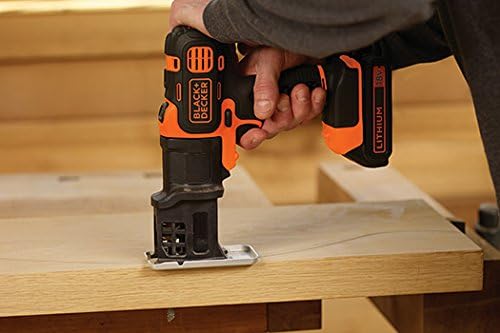
Figure 5.2: A user operating the jigsaw attachment to make a cut in a wooden board. This image emphasizes the tool's capability for precise cutting tasks.
5.4 Using the Sander Attachment
- Attach the sander head.
- Attach the appropriate sandpaper sheet to the sanding pad. Ensure the dust collection adapter is connected if using dust extraction.
- Place the sander flat on the surface to be sanded.
- Start the tool and move it in smooth, overlapping motions across the surface.

Figure 5.3: A user demonstrating the sander attachment smoothing a wooden surface. This illustrates the tool's effectiveness for finishing and surface preparation.
6. Техникалык тейлөө
Regular maintenance ensures the longevity and optimal performance of your BLACK+DECKER Multi-Tool.
- Тазалоо: Ар бир колдонгондон кийин, шайманды жана анын тиркемелерин таза, нымдуу чүпүрөк менен сүртүңүзamp кездеме. Катуу химиялык заттарды же абразивдүү тазалагычтарды колдонбоңуз.
- Вентиляция тешиктери: Ашыкча ысып кетүүнүн алдын алуу үчүн вентиляция тешиктерин чаңдан жана калдыктардан тазалаңыз. Зарыл болсо кысылган абаны колдонуңуз.
- Аксессуарларды текшерүү: Regularly inspect drill bits, jigsaw blades, and sandpaper for wear or damage. Replace worn accessories promptly for best results and safety.
- Батареяга кам көрүү: Батареяларды күн тийбеген, салкын, кургак жерде сактаңыз. Толук заряды бүтүп калган батарейкаларды узак убакытка сактабаңыз.
- Сактагыч: Store the tool, batteries, and charger in the dedicated kit box in a dry, secure location, out of reach of children.
7. Кыйынчылыктарды
Эгерде сиз көп функциялуу куралыңыз менен көйгөйлөргө туш болсоңуз, төмөнкү кеңири таралган көйгөйлөрдү жана чечимдерди караңыз:
| Көйгөй | Мүмкүн себеп | Чечим |
|---|---|---|
| Курал башталбайт | Батарея заряддалган эмес же туура салынган эмес. | Батареянын толук заряддалганын жана шайманга туура орнотулганын текшериңиз. |
| Төмөнкү күч же аткаруу | Battery low or accessory (bit/blade/sandpaper) is dull/worn. | Recharge battery. Replace worn accessories. |
| Head attachment not securing | Head not fully aligned or debris in connection. | Ensure proper alignment and push firmly until it clicks. Clean connection points. |
| Ашыкча ысып кетүү | Бөгөттөлгөн желдетүү тешиктери же үзгүлтүксүз оор колдонуу. | Таза желдетүү тешиктери. Узакка созулган колдонууда куралды муздатып туруңуз. |
Бул чечимдерди колдонгондон кийин көйгөй чечилбесе, BLACK+DECKER кардарларды колдоо кызматына кайрылыңыз.
8. Техникалык шарттар
- Бренд: BLACK+DECKER
- Продукт моделинин номери: EVO183B1
- Продукциянын өлчөмдөрү: 22.5 x 7.5 x 23 см
- Элемент Салмагы: 970 г
- Түсү: Ачык күрөң
- Кубат булагы: Зарядкалуу
- Тtage: 18 вольт DC
- Max Torque (Drill Driver): 22 Н·м
- Max Rotation Speed (Drill Driver): 800 RPM
- Батарея түрү: Литий-ион
- Батарея камтылган: Yes (2x 1.5Ah)
- Өзгөчө өзгөчөлүгү: Интегралдык LED Work Light
9. Кепилдик жана колдоо
9.1 Кепилдик маалыматы
This BLACK+DECKER Multi-Tool EVO183B1 comes with a 1 жылдык кепилдик сатып алынган күндөн тартып. Кепилдик дооматтары үчүн сатып алганыңыздын далилин сактап коюңуз. Кепилдик нормалдуу колдонуудагы материалдардагы жана жасалгадагы кемчиликтерди камтыйт.
9.2 Кардарларды колдоо
For technical assistance, warranty claims, or to purchase replacement parts and accessories, please visit the official BLACK+DECKER website or contact their customer service department. Refer to the contact information provided on the product packaging or the official brand webсайт.
Ask a question about this manual
Ask about setup, troubleshooting, compatibility, parts, safety, or missing instructions. Manuals+ will review the question and use this page’s manual context to help answer it.