1. Киришүү
The ULTRICS Digital Multimeter is a compact and versatile tool designed for both commercial and home use. It functions as a voltmeter, ammeter, and ohmmeter, capable of testing continuity, AC/DC voltage, diode, transistor HFE, and car batteries. This manual provides essential information for the safe and effective operation, maintenance, and troubleshooting of your multimeter.

Image 1.1: The ULTRICS Digital Multimeter, including the main unit, test leads, and a 9V battery.
2. Коопсуздук маалыматы
Always adhere to the following safety precautions to prevent personal injury or damage to the multimeter:
- Кандайдыр бир диапазон үчүн максималдуу киргизүү маанилеринен ашпаңыз.
- Ensure the test leads are properly connected and the rotary switch is set to the correct range before making measurements.
- Avoid touching the metal tips of the test leads when connected to a circuit.
- Эгерде мультиметр бузулгандай көрүнсө же сыноо өткөргүчтөрү эскирген болсо, аны колдонбоңуз.
- Always disconnect power to the circuit before measuring resistance, continuity, or diodes.
- Батареяны так көрсөткүчтөрдү камсыз кылуу үчүн батарейка аз индикатор пайда болгондо алмаштырыңыз.
3. Продукт бүтүп калдыview
Familiarize yourself with the components and features of your ULTRICS Digital Multimeter:
- LCD арткы жарык дисплей: Provides clear digital readings, visible in low light conditions.
- Айлануучу которгуч: Каалаган өлчөө функциясын тандоо үчүн колдонулат (мисалы, Көлөмtage, Current, Resistance).
- Сыноо өткөргүчтөрү: Input terminals for connecting the test leads (COM, VΩmA, 10ADC).
- Дайындарды кармоо баскычы: Freezes the current reading on the display for easy note-taking.
- Арткы жарык баскычы: Дисплейдин арткы жарыгын иштетет.
- Камтылган Kickstand: Allows the multimeter to stand upright for convenient viewing.
- Removable Rubber Casing: Provides protection against splashes and minor impacts.
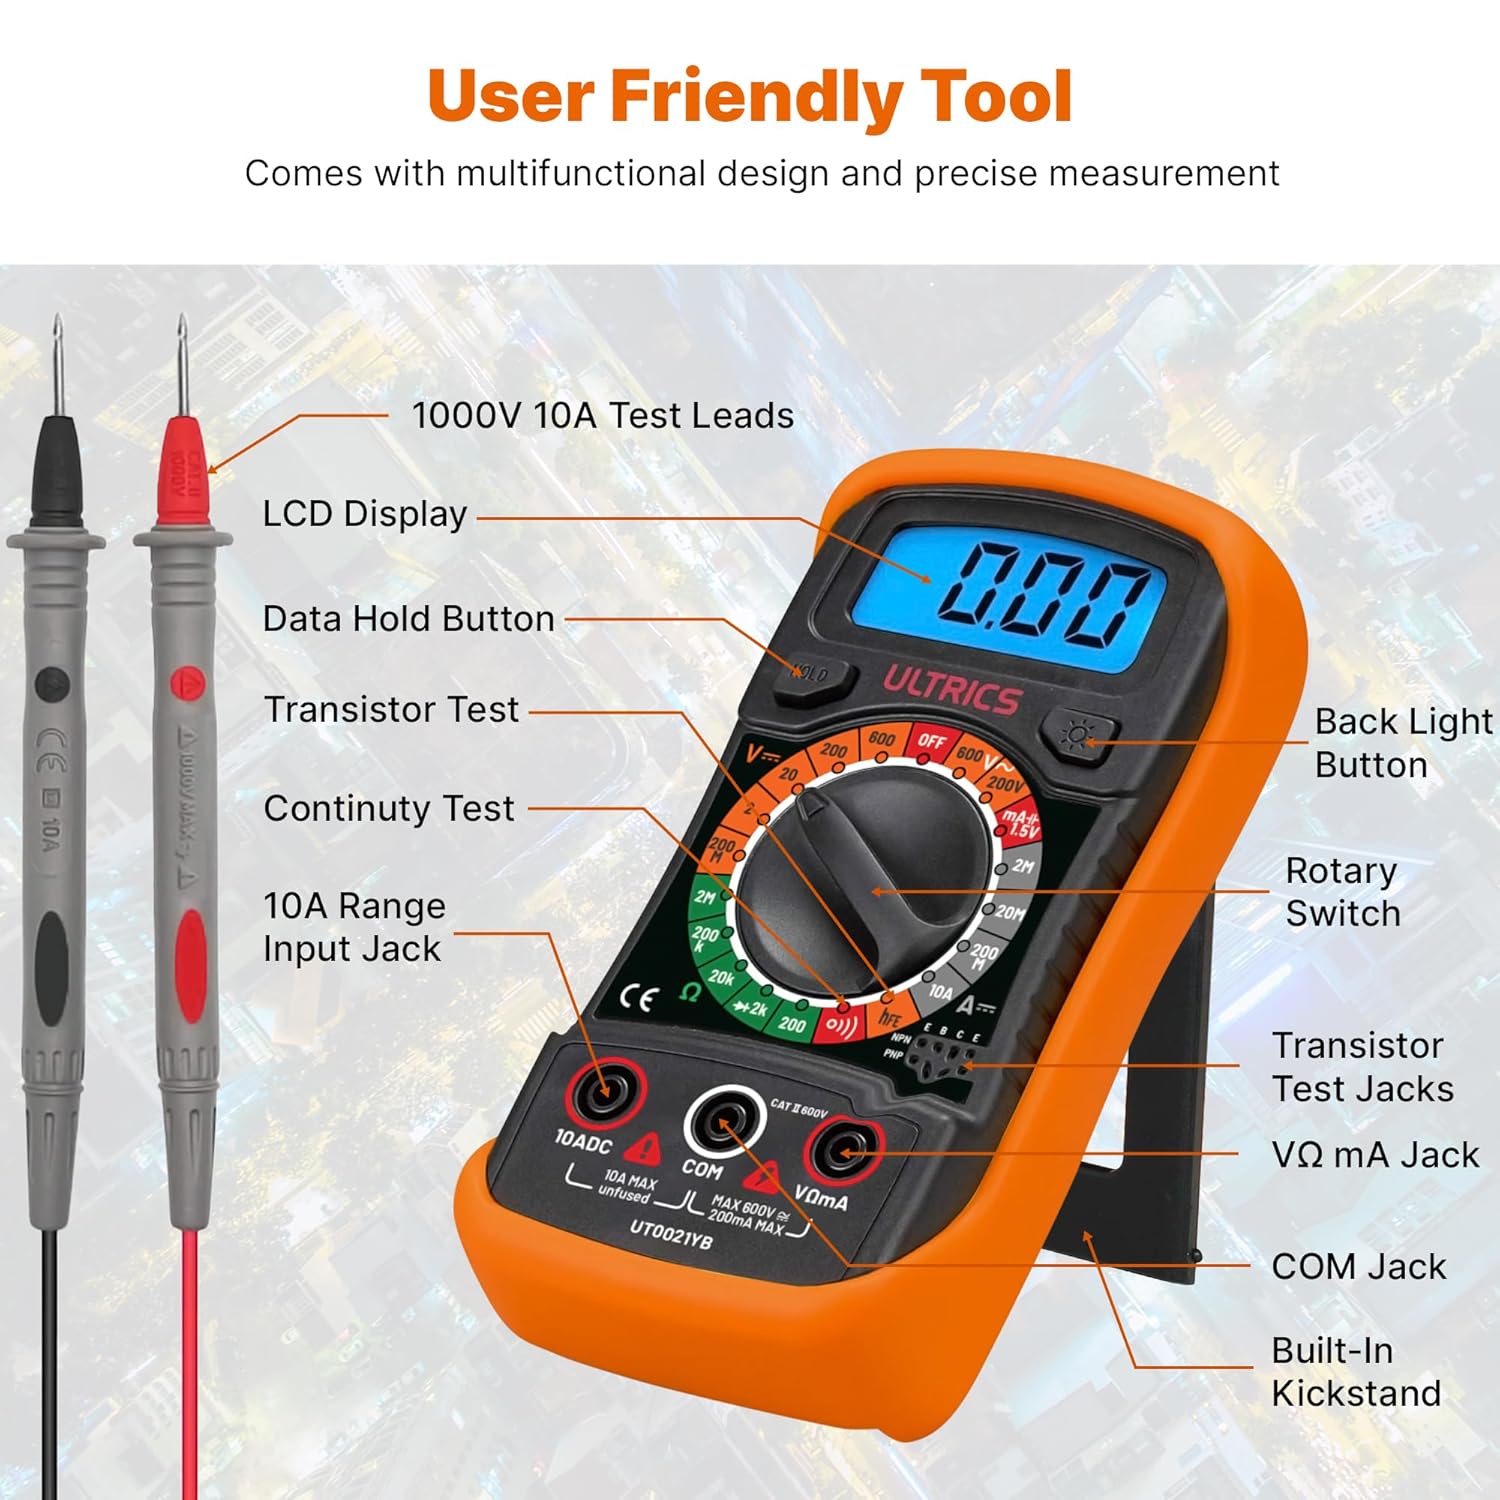
Image 3.1: Detailed diagram showing the various parts of the multimeter, including the LCD display, rotary switch, test lead jacks, and buttons.

Сүрөт 3.2: Жакын план view highlighting the backlit LCD screen and the retractable kickstand for improved usability.
4. Орнотуу
Before first use, or when the low battery indicator appears, install or replace the 9V battery.
- Батарея орнотуу: Locate the battery compartment on the back of the multimeter. Use a screwdriver to open the cover. Insert a 9V battery, observing the correct polarity. Close the cover securely.
- Сыноо өткөргүчтөрүн туташтыруу: Insert the black test lead into the 'COM' (Common) jack. Insert the red test lead into the 'VΩmA' jack for voltage, resistance, and small current measurements. For high current (up to 10A), insert the red lead into the '10ADC' jack.
5. Иштөө нускамалары
This multimeter offers a range of measurement capabilities. Always ensure the correct function is selected and leads are connected appropriately.

Image 5.1: Visual representation of the multimeter's multi-functional capabilities, including AC/DC Voltage, Current, Resistance, Continuity, Diode, Capacity, and Transistor testing.
- Өлчөө AC/DC Voltage:
Айланма которгучту 'V~' абалына коюңуз (AC Voltage) же 'V-' (ТК көлөмүtage) range. Connect the test leads in parallel to the circuit or component being measured. Read the value on the LCD. - Туруктуу токту өлчөө:
Set the rotary switch to the 'A-' (DC Current) range. Ensure the red lead is in the appropriate current jack (VΩmA for mA, 10ADC for 10A). Connect the multimeter in series with the circuit. Read the value on the LCD. - Measuring Resistance (Ω):
Set the rotary switch to the 'Ω' (Resistance) range. Ensure the circuit is de-energized. Connect the test leads across the component. Read the value on the LCD. - Үзгүлтүксүздүк тести:
Set the rotary switch to the continuity symbol (speaker icon). Connect the test leads across the circuit or component. An audible beep indicates continuity (low resistance). - Диод сыноо:
Set the rotary switch to the diode symbol. Connect the red lead to the anode and the black lead to the cathode of the diode. The display will show the forward voltagтүшүп калсын. Ажыраган чынжырды текшерүү үчүн зымдарды оодарыңыз. - Транзистордун жогорку чыңалуудагы чыңалуусун текшерүү:
Set the rotary switch to the 'hFE' range. Insert the transistor's emitter, base, and collector leads into the corresponding sockets on the multimeter. The display will show the transistor's HFE value. - Батарея сыноо:
Set the rotary switch to the '1.5V' or '9V' battery test range. Connect the test leads to the battery terminals (red to positive, black to negative). The display will show the battery voltage.

Image 5.2: Demonstrates the 'Hold' button function, which allows users to freeze the displayed reading for convenient note-taking or collaboration.

Сүрөт 5.3: Мисamples of the multimeter being used for various tests, including AC/DC Voltage, DC Current, Battery, and Continuity measurements.

Image 5.4: Illustrates the versatile usability of the multimeter across different scenarios such as car battery testing, appliance repair, laboratory work, and general DIY projects.
6. Техникалык тейлөө
Туура тейлөө мультиметриңиздин узак мөөнөттүү жана тактыгын камсыздайт.
- Тазалоо: Мультиметрди жарнама менен сүртүңүзamp кездеме. Абразивдүү тазалагычтарды же эриткичтерди колдонбоңуз.
- Батареяны алмаштыруу: Replace the 9V battery promptly when the low battery indicator appears. Remove the battery if the multimeter will not be used for an extended period.
- Сактагыч: Мультиметрди салкын, кургак жерде, күндүн түз нурунан жана өтө жогорку температурадан алыс сактаңыз.
7. Кыйынчылыктарды
Эгерде сиз мультиметриңиз менен көйгөйлөргө туш болсоңуз, төмөнкү кеңири таралган көйгөйлөрдү жана чечимдерди караңыз:
| Көйгөй | Мүмкүн себеп | Чечим |
|---|---|---|
| Дисплей жок же күңүрт дисплей | Өлгөн же аз батарея | 9V батарейканы алмаштырыңыз. |
| Туура эмес окуулар | Incorrect function selected, poor lead connection, or battery low. | Verify rotary switch setting, ensure leads are firmly connected, replace battery if needed. |
| Үзгүлтүксүздүк сигналы жок | Ачык схема же жогорку каршылык. | Check the circuit for breaks or high resistance points. |
| Overload indication ('OL') | Өлчөө тандалган диапазондон ашып кетти. | Select a higher range or ensure the input is within the multimeter's limits. |
8. Техникалык шарттар
Detailed technical specifications for the ULTRICS Digital Multimeter:
| Өзгөчөлүк | Спецификация |
|---|---|
| Модель номери | UT0021YB |
| Өлчөмдөр | 14.6 x 10 x 5 см |
| Элемент Салмагы | 240 г |
| Power Source | Battery Powered (9V battery included) |
| Макс томtage | 1000 вольт |
| Материал | Пластик |
| Өзгөчөлүктөр | DC Voltage Range, AC Voltage, Diode Check, Battery Check, Transistor HFE Check, Overload Protection on all ranges, Low Battery Voltage Indication, Data Hold Function, Removable Thick rubber casing, Fold-out stand |
| Сертификаттар | CE, UKCA |
9. Кепилдик жана колдоо
The ULTRICS Digital Multimeter comes with a 12-month warranty from the date of purchase. This warranty covers manufacturing defects and ensures reliable performance under normal use. For technical support, warranty claims, or any inquiries, please contact ULTRICS customer service through the retailer's platform or the official ULTRICS webсайт. Кепилдикти текшерүү үчүн сатып алганыңыздын далилин сактап коюңуз.


