
1. Киришүү
The Youshiko YC9350 Wireless Weather Station provides accurate indoor and outdoor temperature and humidity readings, a radio-controlled clock, and a weather forecast display. This manual will guide you through the setup, operation, and maintenance of your device to ensure optimal performance.
2. Пакеттин мазмуну
Пакетиңизде бардык буюмдар бар экенин текшериңиз:
- 1 x YC9350 Main Weather Station Unit
- 1 x YC9311 Wireless Outdoor Sensor (Splash-proof)
- 1 x Instruction Manual
3. Продукт бүтүп калдыview
Familiarize yourself with the main unit and wireless sensor components.

3.1-сүрөт: Фронт view of the YC9350 Main Unit display.

3.2-сүрөт: YC9350 Main Unit with blue backlight and YC9311 Wireless Sensor.
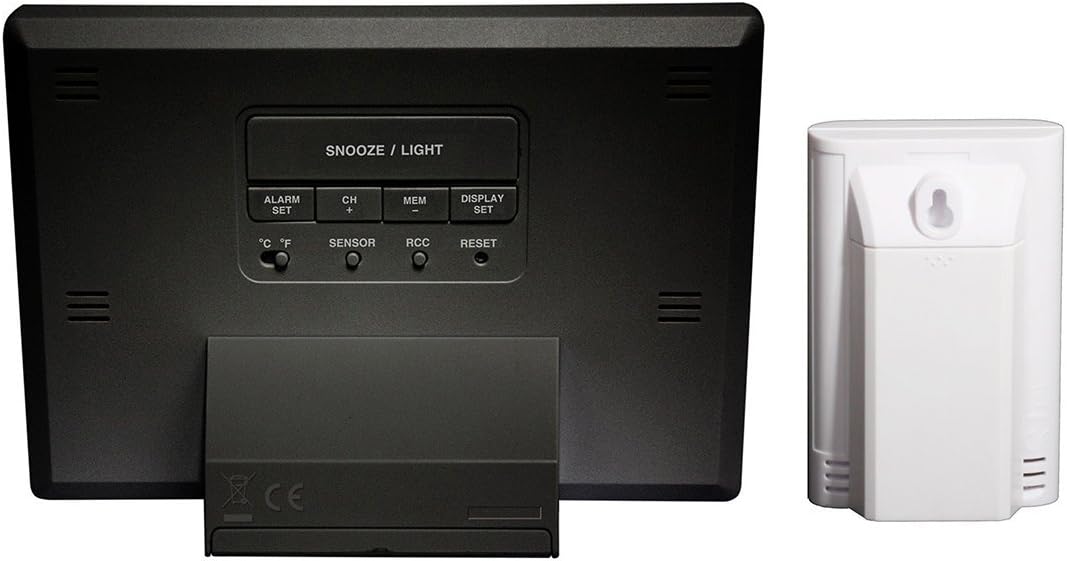
3.3-сүрөт: Арткы view of the Main Unit and Wireless Sensor, showing buttons and battery compartments.
3.1 Main Unit (YC9350)
- Дисплей: Shows time, indoor/outdoor temperature, indoor/outdoor humidity, and weather forecast icons.
- Buttons (Rear): ALARM/SET, CH/+, MEM, DISPLAY/SET, °C/°F, SENSOR, RCC, RESET.
- NOOZE/LIGHT баскычы (үстүнкү): Арткы жарык жана тындыруу функциясын иштетет.
- Батарея бөлүмү: Артында жайгашкан.
3.2 Wireless Outdoor Sensor (YC9311)
- Дисплей: Shows current channel, temperature, and humidity.
- Монтаждоо тешиги: Дубалга орнотуу үчүн.
- Батарея бөлүмү: Артында жайгашкан.
- RESET баскычы: For re-synchronization.
4. Орнотуу
4.1 Батареяны орнотуу
- Негизги блок: Open the battery compartment on the rear. Insert 2 x AA batteries (not included), observing the correct polarity (+/-). Close the compartment.
- Зымсыз сенсор: Open the battery compartment on the rear. Insert 2 x AA batteries (not included), observing the correct polarity (+/-). Close the compartment.
Эскертүү: It is recommended to insert batteries into the main unit first, then the sensor.
4.2 Баштапкы синхрондоштуруу
After battery installation, the main unit will automatically attempt to connect with the wireless sensor. This process may take a few minutes. Ensure the sensor is within range (up to 50 meters / 160 feet in open air) of the main unit.
- If the connection is not established, press the RESET button on both the main unit and the sensor (main unit first, then sensor).
- The main unit can support up to 3 wireless sensors. Press the SENSOR button to cycle through channels if you have multiple sensors.
4.3 Wireless Sensor Placement
For accurate outdoor readings, place the wireless sensor in a sheltered location, away from direct sunlight and heavy rain. While the sensor is splash-proof, it is not fully waterproof. Consider mounting it on a north-facing wall or under an overhang. The sensor can be wall-mounted using the integrated hole or placed on a flat surface.

4.1-сүрөт: Фронт view of the YC9311 Wireless Sensor.

4.2-сүрөт: Арткы view of the YC9311 Wireless Sensor with mounting option.
4.4 Radio Controlled Clock (RCC) Setup
The YC9350 features a Radio Controlled Clock (RCC) that automatically synchronizes with the MSF signal from Cumbria, UK, ensuring precise timekeeping. The clock will automatically adjust for British Summer Time (BST) changes.
- After initial power-up, the unit will automatically search for the MSF signal. A signal tower icon will flash on the display.
- Once the signal is received, the time will set automatically, and the signal tower icon will become solid. This process may take several minutes or hours depending on location and interference.
- If the signal is not received, try placing the unit near a window or in a location with less interference.
- To manually initiate an RCC search, press and hold the RCC button on the rear of the main unit.

4.3-сүрөт: Information on Radio Control Systems (MSF for UK).
5. Операция
5.1 Маалыматты көрсөтүү
The main unit's display is divided into several sections:
- Убакыт: Displays the current time (12/24 hour format).
- Имараттын температурасы жана нымдуулугу: Readings from the main unit.
- Сырттагы температура жана нымдуулук: Readings from the wireless sensor.
- Аба ырайы: Animated icons indicating predicted weather trends (sunny, partly cloudy, cloudy, rainy, snowy).
- Муз эскертүүсү: An icon will appear when outdoor temperature approaches freezing.
- RCC Signal Indicator: Shows the status of the radio-controlled clock signal.
- Төмөн батарея көрсөткүчү: Appears when batteries need replacement for either the main unit or sensor.
5.2 Температура бирдигин тандоо (°C/°F)
басыңыз ° C / ° F button on the rear of the main unit to switch between Celsius and Fahrenheit temperature display.
5.3 Viewing Minimum/Maximum Readings
басыңыз MEM button repeatedly to cycle through current, maximum (MAX), and minimum (MIN) recorded indoor and outdoor temperature and humidity values. The readings reset automatically every 24 hours or can be manually cleared by holding the MEM баскычы.
5.4 Сигналды коюу
- басыңыз ALARM/SET button once to display the alarm time.
- басып, кармап туруңуз ALARM/SET button until the hour digit flashes. Use the CH/+ саатты жөндөө үчүн баскыч.
- Басыңыз ALARM/SET again, and the minute digit will flash. Use the CH/+ мүнөттөрдү жөндөө үчүн баскычты басыңыз.
- Басыңыз ALARM/SET ырастоо үчүн.
- Ойготкучту жандыруу/өчүрүү үчүн басыңыз ALARM/SET ойготкучтун убактысын көрсөтүү үчүн баскычын бир жолу басыңыз, андан кийин басыңыз CH/+ to toggle the alarm on/off (an alarm icon will appear/disappear).
5.5 Snooze Function and Backlight
- Ойготкуч басылганда, басыңыз SNOOZE / LIGHT button on top of the unit to activate the snooze function. The alarm will sound again after approximately 5 minutes.
- Press any other button to stop the alarm for 24 hours.
- басыңыз SNOOZE / LIGHT button at any time to activate the blue backlight for a few seconds.
5.6 Аба ырайы
The weather station predicts weather trends for the next 12-24 hours based on atmospheric pressure changes. The accuracy is approximately 70-75%. The forecast icons include:
- Күн ачык
- Кооз булуттуу
- Булуттуу
- Жамгырлуу
- Snowy (indicated by a snowflake icon when temperature is low)
6. Техникалык тейлөө
6.1 Батареяны алмаштыруу
When the low battery indicator appears on the display, replace the batteries in the respective unit (main unit or sensor) with new AA batteries. Always replace all batteries in a unit at the same time.
6.2 Тазалоо
Түзмөктү жана сенсорду жумшак, d менен тазалаңызamp кездеме. Абразивдүү тазалоочу каражаттарды же эриткичтерди колдонбоңуз, анткени алар дисплейге жеasing.
6.3 Сенсорго кам көрүү
Ensure the wireless sensor remains in a sheltered location to protect it from extreme weather conditions, especially heavy rain, to prolong its lifespan and maintain accuracy.
7. Кыйынчылыктарды
| Көйгөй | Мүмкүн себеп | Чечим |
|---|---|---|
| Сырткы температура/нымдуулук көрсөткүчү жок | Sensor out of range, low sensor battery, interference, sensor not synchronized. | Move sensor closer to main unit. Replace sensor batteries. Press RESET on both units (main first, then sensor). Avoid placing near electronic devices. |
| Туура эмес убакыт көрсөтүү | RCC signal not received, manual time setting error. | Ensure unit is in a location with good MSF signal reception. Manually initiate RCC search by holding the RCC button. Check time zone setting if applicable. |
| Дисплей күңүрт же бош | Low main unit battery. | Негизги блоктун батареяларын алмаштырыңыз. |
| Weather forecast seems inaccurate | Weather forecast is a prediction based on pressure changes and has inherent limitations. | This is normal. The forecast provides a general trend, not a precise prediction. |
8. Техникалык шарттар
- Модел: YC9350
- Бренд: Youshiko
- Main Unit Dimensions (H x L x W): 100 x 140 x 47 мм
- Wireless Sensor Dimensions (H x L x W): 100 x 65 x 35 мм
- Ички температура диапазону: -9.9°Cден +50°Cге чейин (14.2°F менен 122°F)
- Тышкы температура диапазону: -40°Cден +70°Cге чейин (-40°F менен 158°F)
- Температуранын тактыгы: ±1°C
- Нымдуулуктун чеги: 20% - 90% RH
- Байланыш: Зымсыз (433MHz)
- Зымсыз диапазон: Ачык абада 50 метрге (160 фут) чейин
- Кубат булагы (Негизги блок): 2 x AA батарейкалар (киргизилген эмес)
- Кубат булагы (сенсор): 2 x AA батарейкалар (киргизилген эмес)
- Өзгөчөлүктөр: Radio Controlled Clock (MSF - UK Version), Alarm with Snooze, LED Backlight, Ice Alert, Min/Max Temperature/Humidity Display, Multi-sensor capability (up to 3).
- Түсү: Кара
9. Кепилдик жана колдоо
For warranty information and technical support, please refer to the contact details provided with your purchase documentation or visit the official Youshiko webсайт. Ар кандай кепилдик дооматтары үчүн сатып алганыңыздын далилин сактаңыз.