
1. Киришүү
This manual provides detailed instructions for the safe and efficient operation, maintenance, and troubleshooting of your Juki HZL-80HP Sewing Machine. Please read this manual thoroughly before using the machine to ensure proper function and longevity.
2. Коопсуздук чаралары
- Капкактарды алып салууда, майлоодо же колдонуучу тарабынан нускамада айтылган башка оңдоолорду жасоодо ар дайым машинаны электр розеткасынан сууруп туруңуз.
- Бармактарды кыймылдуу бөлүктөрдөн алыс кармаңыз. Тигүүчү машинанын ийнесинин айланасында өзгөчө кылдаттык талап кылынат.
- Туура ийне пластинасын колдонуңуз. Туура эмес пластина ийненин сынып кетишине алып келиши мүмкүн.
- Тигүү учурунда кездемени тартпаңыз же түртпөңүз. Бул ийненин кыйшайып, сынышына алып келиши мүмкүн.
- Ийненин аймагына кандайдыр бир өзгөртүүлөрдү киргизгенде, мисалы, ийнени жип менен өткөрүүдө, ийнени алмаштырууда, катушканы жип менен өткөрүүдө же басмактын бутунун алмаштыруусунда тигүүчү машинаны өчүрүңүз.
- Машинаны эч качан аба тешиктери жабык турган абалда иштетпеңиз. Тигүүчү машинанын жана бут контроллеринин желдетүүчү тешиктерин түктөрдүн, чаңдын жана бош кездемелердин топтолушунан алыс кармаңыз.
3. Machine Components and Overview
Familiarize yourself with the main parts of your Juki HZL-80HP sewing machine.
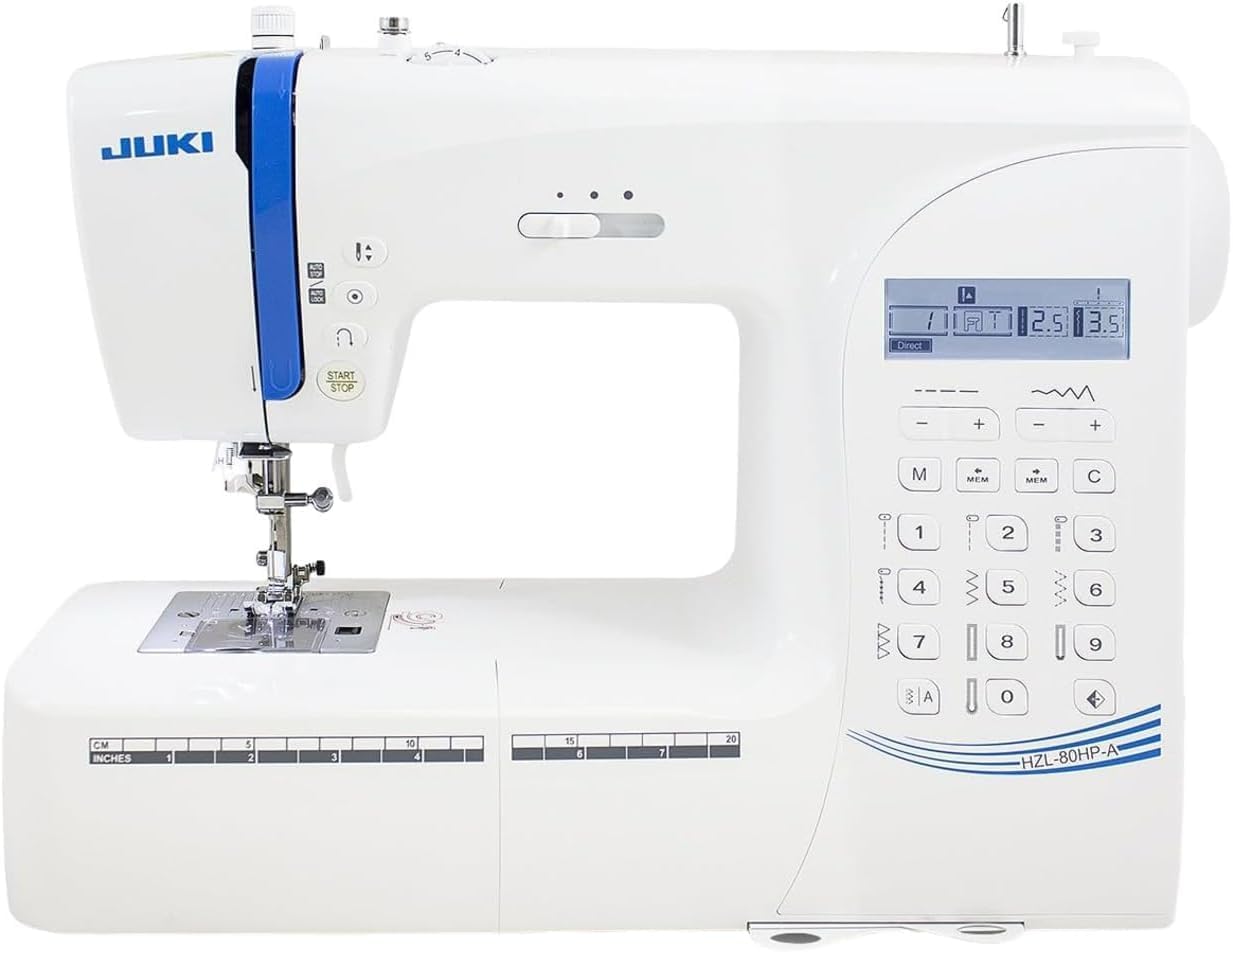
3.1-сүрөт: Фронт view of the Juki HZL-80HP sewing machine, showing the main body, needle area, and control panel.

3.2-сүрөт: Close-up of the control panel with LCD screen and stitch selection buttons.
4. Орнотуу
4.1 Пакеттен чыгаруу жана жайгаштыруу
- Машинаны таңгагынан кылдаттык менен чыгарыңыз.
- Машинаны стабилдүү, тегиз жерге коюңуз.
- Connect the power cord and foot controller to the machine and a suitable electrical outlet.
4.2 Бобинди ороо
Before you begin sewing, the bobbin must be wound with thread.
- Спулдун төөнөгүчтүн үстүнө жиптин катушкасын коюңуз.
- Follow the thread path for bobbin winding as indicated on the machine.
- Бобин орогучтун шпинделине бош бобинди коюңуз.
- Орап оруучу шпиндельди оңго түртүңүз.
- Start the machine; the bobbin will wind automatically. Stop when full.
4.3 Бобинди салуу

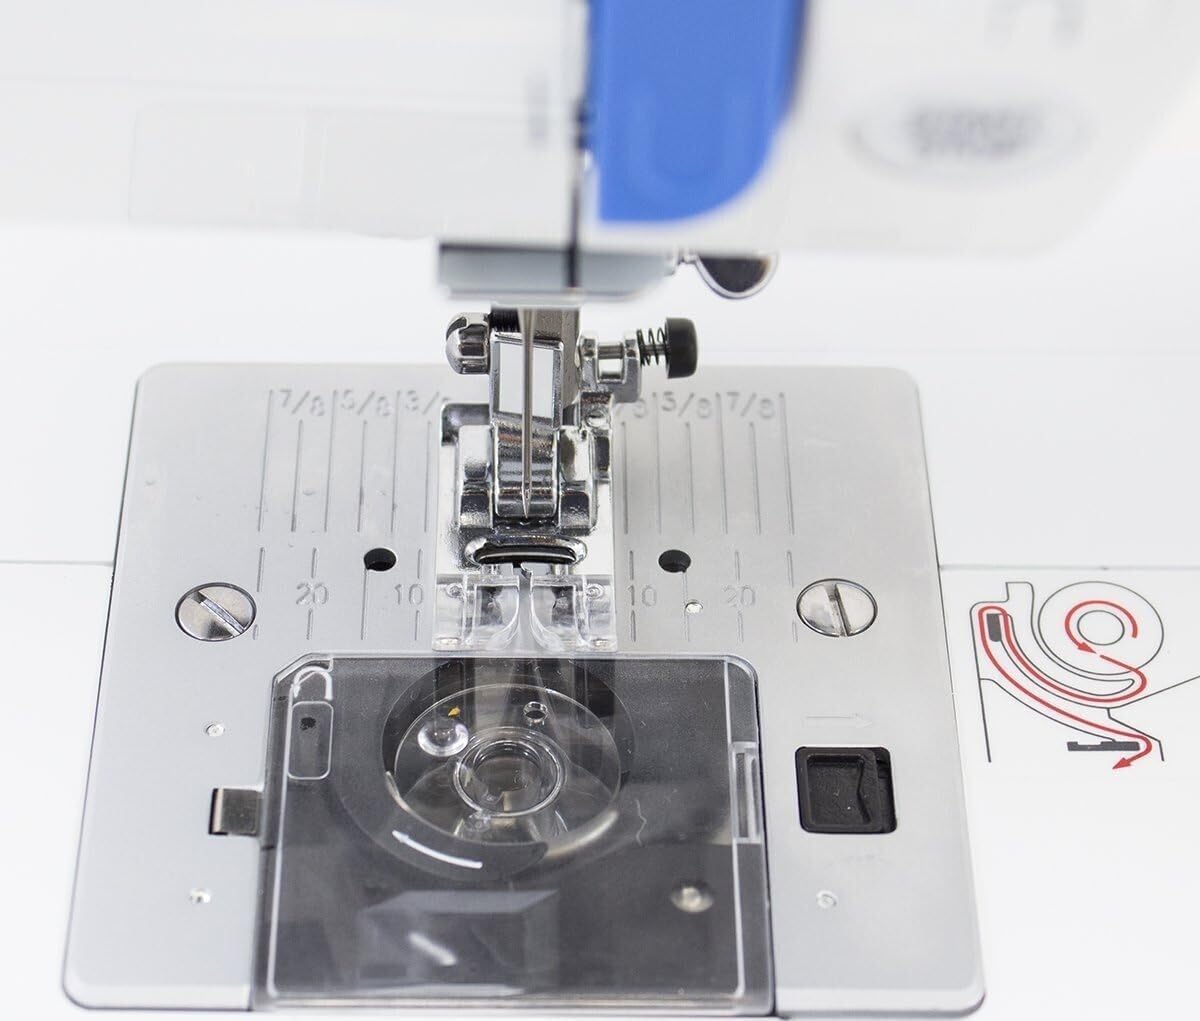
4.1-сүрөт: View of the bobbin case area beneath the needle plate.
- Бобин капкагын ачыңыз.
- Жиптин туура багытта (көбүнчө саат жебесине каршы) жайылышын камсыз кылуу менен, оролгон бобинди бобин кутусуна киргизиңиз.
- Жипти тартуу пружинасы аркылуу өткөрүп, жип багыттагычына киргизиңиз.
- Бобин капкагын жабыңыз.
4.4 Үстүнкү жипти жип салуу
- Басуу бутунун рычагын көтөрүңүз.
- Спулдун төөнөгүчтүн үстүнө жиптин катушкасын коюңуз.
- Follow the numbered thread guides on the machine, ensuring the thread passes through the tension discs.
- Жипти ийне аянтына түшүрүңүз.
- колдонуу Автоматтык ийне сайгыч for easy threading. Engage the threader, hook the thread, and release.
- Pull the bobbin thread up through the needle plate hole by turning the handwheel towards you once, catching the bobbin thread with the upper thread.
5. Иштөө нускамалары
5.1 Тигүүнү тандоо
The Juki HZL-80HP offers a wide range of stitches. Refer to the stitch chart for available patterns.

5.1-сүрөт: Pull-out stitch chart located on the machine, displaying various utility and decorative stitches.
- Машинаны күйгүзүңүз.
- Use the numerical keypad on the control panel to select the desired stitch number. The selected stitch will appear on the LCD screen.
- Adjust stitch length and width using the +/- buttons if necessary.
5.2 Automatic One-Step Buttonholing
This feature allows for precise and consistent buttonholes.
- Илгичтин бутун тиркеңиз.
- Place the button you intend to use into the buttonhole foot's holder. The machine will automatically size the buttonhole.
- Select a buttonhole stitch from the stitch chart.
- Lower the presser foot and begin sewing. The machine will sew the entire buttonhole automatically.
5.3 Adjustable Presser Foot Pressure
Adjusting the presser foot pressure is crucial for different fabric types.
- Locate the presser foot pressure adjustment dial (refer to your machine diagram for exact location).
- Increase pressure for thin fabrics to prevent puckering.
- Decrease pressure for thick or bulky fabrics to allow them to feed smoothly.
5.4 Кол менен эркин тигүү
The free arm feature is useful for sewing cylindrical items like cuffs, sleeves, and pant hems.
5.2-сүрөт: The accessory box removed to reveal the free arm for sewing small, circular items.
- Slide off the auxiliary bed/accessory box to expose the free arm.
- Position the fabric around the free arm.
- Sew as usual.
6. Техникалык тейлөө
6.1 Машинаны тазалоо
Regular cleaning ensures smooth operation and extends the life of your machine.
- Тазалоодон мурун ар дайым машинаны розеткадан ажыратыңыз.
- Ийнени, басуучу бутту жана ийне пластинасын алып салыңыз.
- Use a small brush to remove lint and dust from the bobbin case area and feed dogs.
- Машинанын сыртын жумшак, кургак чүпүрөк менен сүртүңүз. Күчтүү химиялык заттарды колдонбоңуз.
6.2 Ийне алмаштыруу
Replace the needle frequently, especially when sewing different fabric types or if it becomes bent or dull.
- Машинаны розеткадан ажыратыңыз.
- Ийне клинасын бошотуңузamp бурама.
- Эски ийнени алып салыңыз.
- Жаңы ийнени жалпак тарабын машинанын артына каратып, мүмкүн болушунча өйдө түртүңүз.
- Ийне clamp коопсуз бураңыз.
7. Кыйынчылыктарды
Бул бөлүм сиз кабылышы мүмкүн болгон жалпы көйгөйлөрдү карайт.
7.1 Machine Beeps and Does Not Operate
- Себеби: Safety feature engaged (e.g., presser foot up, bobbin winder engaged, wrong stitch selected for current setting).
- Чечим: Ensure the presser foot is down, the bobbin winder is disengaged, and the correct settings are applied for the chosen stitch. Refer to the display for error codes or indicators.
7.2 Жиптин тыгылып калышы
- Себеби: Incorrect threading, improper bobbin insertion, dull or bent needle, incorrect tension.
- Чечим: Re-thread the machine completely (both upper and bobbin threads). Ensure the bobbin is inserted correctly. Replace the needle. Check upper and lower thread tension settings.
7.3 Өткөрүлгөн тигүү
- Себеби: Incorrect needle size or type for fabric, bent needle, improper threading, low-quality thread.
- Чечим: Change the needle to the correct type and size for your fabric. Ensure the needle is inserted correctly. Re-thread the machine. Use good quality thread.
7.4 Uneven Stitching / Puckering
- Себеби: Incorrect thread tension, wrong needle for fabric, presser foot pressure too high or too low.
- Чечим: Adjust upper and bobbin thread tension. Use the appropriate needle. Adjust presser foot pressure according to fabric thickness.
8. Техникалык шарттар
| Өзгөчөлүк | Деталь |
|---|---|
| Бренд | Чыгып |
| Модель номери | HZL-80HP |
| Продукциянын өлчөмдөрү | 20.2 x 10.7 x 15.1 дюйм (51.3 x 27.2 x 38.4 см) |
| Элемент Салмагы | 19.71 фунт (8.94 кг) |
| UPC | 189684000619 |
| Дата биринчи жеткиликтүү | 26-январь, 2016-жыл |
| Негизги өзгөчөлүктөрү | Automatic Needle Threader, Automatic One-Step Buttonholing, Adjustable Presser Foot Pressure, Free Arm Sewing, Hard-Shell Carrying Case |
9. Кепилдик жана колдоо
For warranty information and technical assistance, please contact Juki customer support. While specific warranty details are not provided in this document, Juki typically offers support for their products.
If you encounter issues not covered in this manual, or require further assistance, please reach out to Juki's official support channels.


