1. Киришүү
The Ambient Weather WS-12 Wireless Weather Station provides comprehensive weather monitoring with a color-changing display. This manual details the setup, operation, and maintenance of your weather station to ensure optimal performance and longevity.
The system includes a main display console and distributed wireless sensors for outdoor temperature, humidity, wind speed, wind direction, and rainfall. The console features a customizable backlight that changes color based on temperature or can be set manually. It displays current weather conditions, historical data, moon phase, and allows for setting various alarms.
2. Пакеттин мазмуну
- Дисплей консолу
- Wireless Thermo-Hygrometer Sensor
- Жамгыр өлчөгүч сенсор
- Anemometer (Wind Speed and Direction Sensor) with Solar Panel
- Mounting Hardware for Sensors
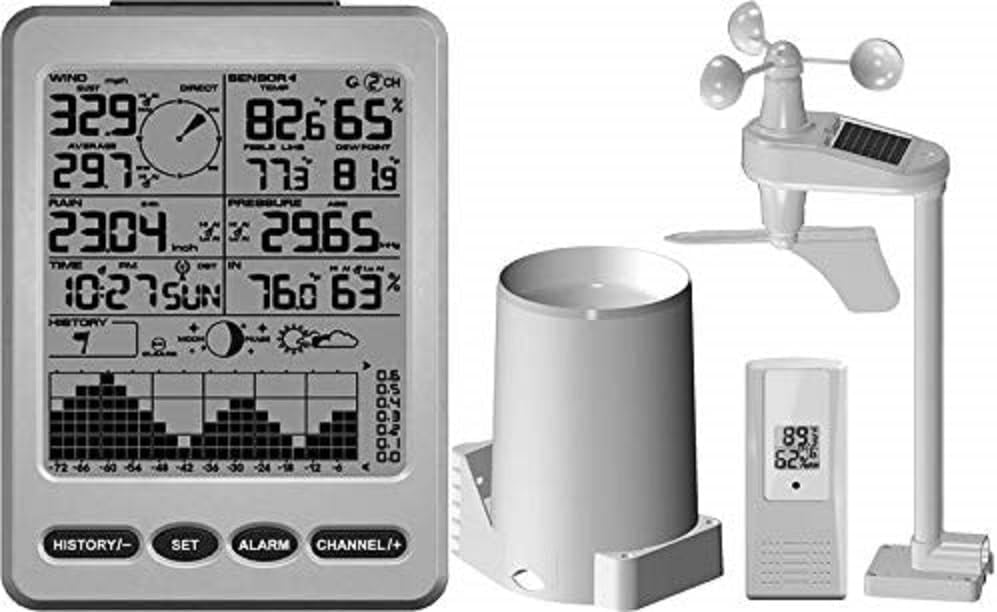
Figure 2.1: Main components of the WS-12 Weather Station. Shown are the display console, the wireless thermo-hygrometer, the rain gauge, and the anemometer with its integrated solar panel.
3. Орнотуу колдонмосу
3.1 Батареяны орнотуу
Batteries are not included and must be purchased separately. Ensure correct polarity during installation.
- Дисплей консолу: Requires 4 x AA batteries.
- Wireless Thermo-Hygrometer: 2 x AAA батарейкаларды талап кылат.
- Rain Gauge Sensor: 4 x AAA батарейкаларды талап кылат.
- Анемометр: Requires 4 x AAA batteries. The anemometer also features a solar panel for extended battery life.
Эскертүү: Install batteries in the outdoor sensors first, then in the display console to ensure proper synchronization.
3.2 Сенсордун жайгашуусу
Optimal sensor placement is crucial for accurate readings.
- Thermo-Hygrometer: Place in a shaded area, away from direct sunlight and heat sources, to measure ambient air temperature and humidity accurately. Ensure it is protected from direct rain.
- Жамгыр өлчөгүч: Install on a level surface, away from obstructions like trees or buildings that could block rainfall. Ensure easy access for periodic cleaning.
- Анемометр: Mount in an open area, as high as possible, to minimize interference from buildings or trees. The solar panel should face south for maximum sun exposure.
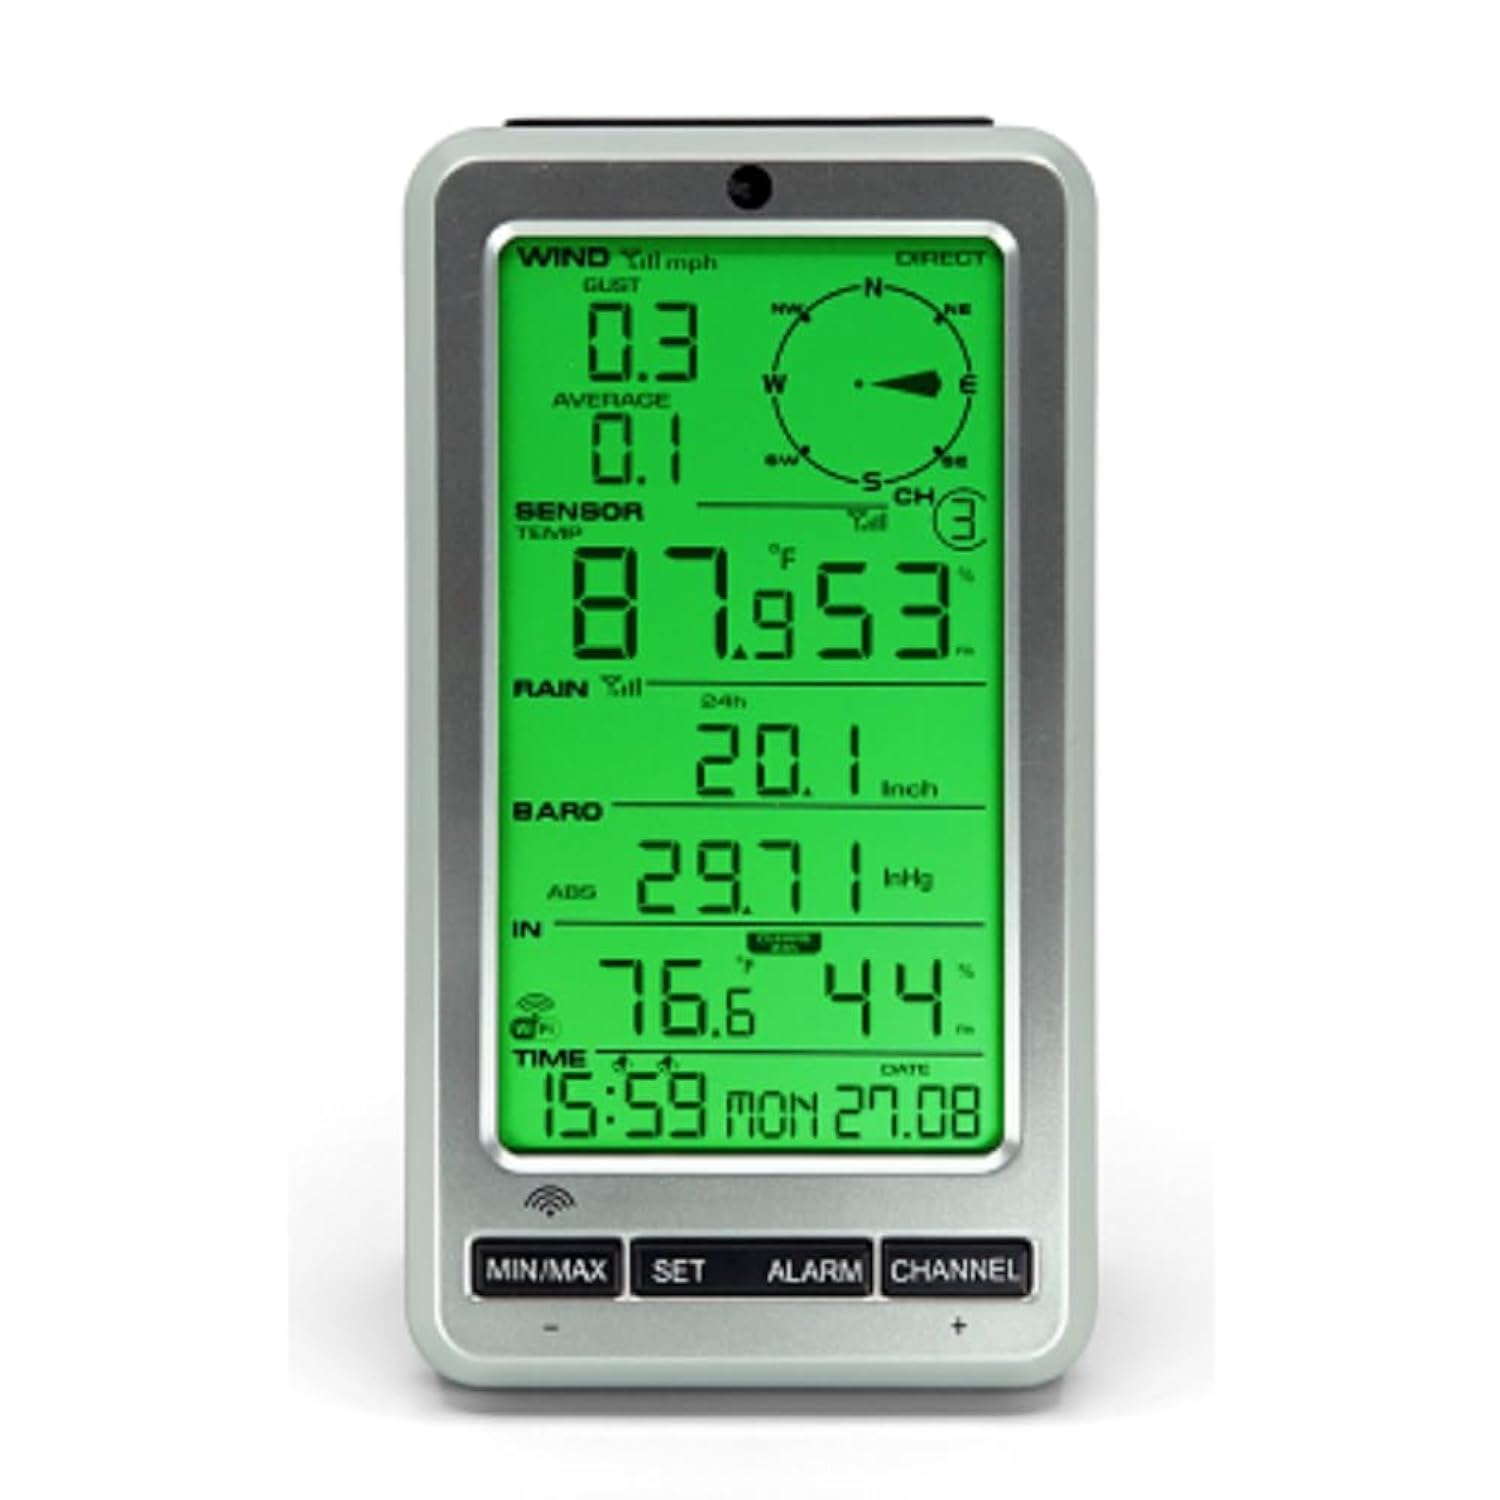
Figure 3.1: The WS-12 display console, illustrating the clear presentation of wind speed, direction, temperature, humidity, rainfall, barometric pressure, and time.
3.3 Баштапкы синхрондоштуруу
- After installing batteries in all sensors and the console, power on the display console.
- The console will automatically begin searching for the wireless sensors. This process may take several minutes.
- Once connected, the outdoor temperature, humidity, wind, and rain data will appear on the display. If data does not appear, refer to the Troubleshooting section.
4. Операция
4.1 Display Console Overview
The display console presents various weather parameters and settings. Key areas include:
- Убакыт жана дата: Displays current time and calendar date.
- Үйдүн ичиндеги/сырткы температура жана нымдуулук: Shows current readings.
- Шамалдын ылдамдыгы жана багыты: Provides current wind data.
- Жаан-чачын: Accumulates rainfall data.
- Барометрдик басым: Displays current atmospheric pressure.
- Dew Point & Feels Like Temperature: Calculated values for comfort indication.
- Ай фазасы: Indicates the current lunar phase.
4.2 Баскыч функциялары
The console typically features buttons for navigation and settings:
- MIN / MAX: View minimum and maximum recorded values for various parameters.
- ЖӨНДӨӨ: Enter setup mode for time, date, units, and other settings.
- ЭСКЕРТҮҮ: Set time alarms or weather condition alarms (e.g., high/low temperature alerts).
- КАНАЛ (+): Switch between different sensor channels if additional sensors are connected, or adjust values during setup.
4.3 Дисплейди ыңгайлаштыруу
- Арткы жарыктын түсү: The backlight color can change automatically based on outdoor temperature or be manually adjusted through the settings menu. Refer to the console's specific settings for detailed instructions.
- Бирдиктер: Temperature (Celsius/Fahrenheit), wind speed (mph, km/h, m/s), and rainfall (inches/mm) units can be configured in the setup menu.
- Калибрлөө: The console allows for calibration of certain parameters to match local conditions or other reference instruments. This feature is accessed via the SET menu.
5. Техникалык тейлөө
- Батареяны алмаштыруу: Replace batteries in all sensors and the display console annually, or when low battery indicators appear. Use high-quality alkaline batteries.
- Сенсор тазалоо:
- Жамгыр өлчөгүч: Periodically check and clean the rain gauge funnel and tipping bucket mechanism to prevent debris (leaves, insects) from obstructing accurate rainfall measurement.
- Анемометр: Ensure the wind cups and wind vane rotate freely. Remove any obstructions. The solar panel should be kept clean for efficient charging.
- Thermo-Hygrometer: Keep the sensor housing free of dust and spiderwebs.
- Программалык камсыздоонун жаңыртуулары: Айлана-чөйрөнүн аба ырайын текшериңиз webмоделиңиз үчүн бардык жеткиликтүү микропрограмма жаңыртуулары үчүн сайт.
6. Кыйынчылыктарды
| Көйгөй | Мүмкүн себеп | Чечим |
|---|---|---|
| No outdoor data displayed (dashes). |
|
|
| Температура/нымдуулуктун көрсөткүчтөрү так эмес. |
|
|
| Жаан-чачындын көрсөткүчтөрү туура эмес же нөлгө барабар. |
|
|
| Wind speed/direction inaccurate or not registering. |
|
|
7. Техникалык шарттар
| Өзгөчөлүк | Деталь |
|---|---|
| Модель номери | WS-12 |
| Дисплей түрү | LCD with Color Changing Backlight |
| Байланыш технологиясы | Зымсыз (433 МГц) |
| Кубат булагы (консол) | 4 x AA батарейкалар (киргизилген эмес) |
| Power Source (Thermo-Hygrometer) | 2 x AAA Батареялар (киргизилген эмес) |
| Power Source (Rain Gauge) | 4 x AAA Батареялар (киргизилген эмес) |
| Power Source (Anemometer) | 4 x AAA Batteries (not included), Solar Powered |
| Температуранын тактыгы | ±1 °C |
| Жогорку температура рейтинги | 140 °F (60 °C) |
| Product Dimensions (Console) | 4.5 x 1.5 x 7.5 дюйм (болжол менен) |
| Элемент Салмагы | 1.79 pounds (total package approx.) |
| Материал | Пластик |
| Ассамблея талап кылынат | Ооба |
8. Кепилдик жана колдоо
For warranty information and technical support, please refer to the official Ambient Weather webсайтка же түздөн-түз кардарларды тейлөөгө кайрылыңыз. Кепилдик дооматтар үчүн сатып алуу дүмүрчөгүңүздү сактаңыз.
Онлайн ресурстар: www.ambientweather.com