
1. Киришүү
The COTEC SP-4000-148 is a high-frequency pure sine wave inverter designed to convert 48VDC battery power into 120VAC household electricity. This inverter delivers a continuous output of 4000W, making it suitable for various applications requiring stable and clean AC power. Its robust design and advanced features ensure reliable performance and protection for your connected devices.
Негизги өзгөчөлүктөрү:
- Сезимтал электроника үчүн таза синус толкунунун чыгышы.
- Күйгүзүү/өчүрүү алыстан башкаруу мүмкүнчүлүгү (Жашыл терминал).
- Коопсуздукту жогорулатуу үчүн киргизүү жана чыгаруу толугу менен изоляцияланган.
- Temperature & load controlled cooling fan.
- 3 түстүү LED абал индикаторлору менен колдонуучуга ыңгайлуу интерфейс.
- Чыгаруу жыштыгын (50/60 Гц) DIP которгучу аркылуу тандоого болот.
- Чыгуу томtage DIP которгучу аркылуу тандалышы мүмкүн.
- Энергияны үнөмдөө режими өзгөрүлмө резистор аркылуу жөнгө салынат.
- Comprehensive input protections: Reverse Polarity (Fuse), Under Voltage, Over Voltage.
- Extensive output protections: Short Circuit, Overload, Over Temperature.
- 1-типтеги ички алюминий корпус.
- E13 / UL / CE / FCC тарабынан бекитилген.
2. Коопсуздук маалыматы
Read all instructions and warnings carefully before installing or operating the inverter. Failure to follow these instructions may result in electric shock, fire, serious injury, or death.
Жалпы коопсуздук чаралары:
- Электр коркунучу: Бул инвертор жогорку вольттуу өндүрөтtage AC power. Treat the output terminals with the same respect as any utility AC outlet.
- Квалификациялуу кадрларды: Орнотуу жана тейлөө квалификациялуу кызматкерлер тарабынан гана аткарылышы керек.
- Вентиляция: Инвертордун айланасында жетиштүү желдетүүнү камсыз кылыңыз. Желдетүүчү тешиктерди жаппаңыз. Ашыкча ысып кетүү зыянга же өрткө алып келиши мүмкүн.
- Курчап турган чөйрө: Do not expose the inverter to rain, snow, spray, or any liquids. Do not operate in areas with flammable fumes or gases.
- Негиздөө: Инвертор туура жерге туташтырылышы керек. Жерге туташтыруу боюнча нускамаларды орнотуу бөлүмүн караңыз.
- Батареянын коопсуздугу: Work near lead-acid batteries is dangerous. Batteries can generate explosive gases. Ensure proper ventilation and wear eye protection.
- DC киргизүү: Connect the DC input cables with correct polarity. Reverse polarity will blow the internal fuse and void the warranty.
- Ашыкча жүктөө: Do not exceed the inverter's rated output power. Overloading can damage the inverter and connected appliances.
- Тейлөө: Before performing any maintenance or cleaning, disconnect all power sources (DC and AC).
3. Продукт бүтүп калдыview
The COTEC SP-4000-148 inverter features a robust aluminum enclosure and clearly labeled connection points for ease of installation and operation. Familiarize yourself with the components before proceeding with installation.

3.1-сүрөт: Жалпысынан view of the COTEC SP-4000-148 Pure Sine Wave Inverter. This image shows the blue aluminum casing and the grey end caps with ventilation slots.
Front Panel (AC Output Side):
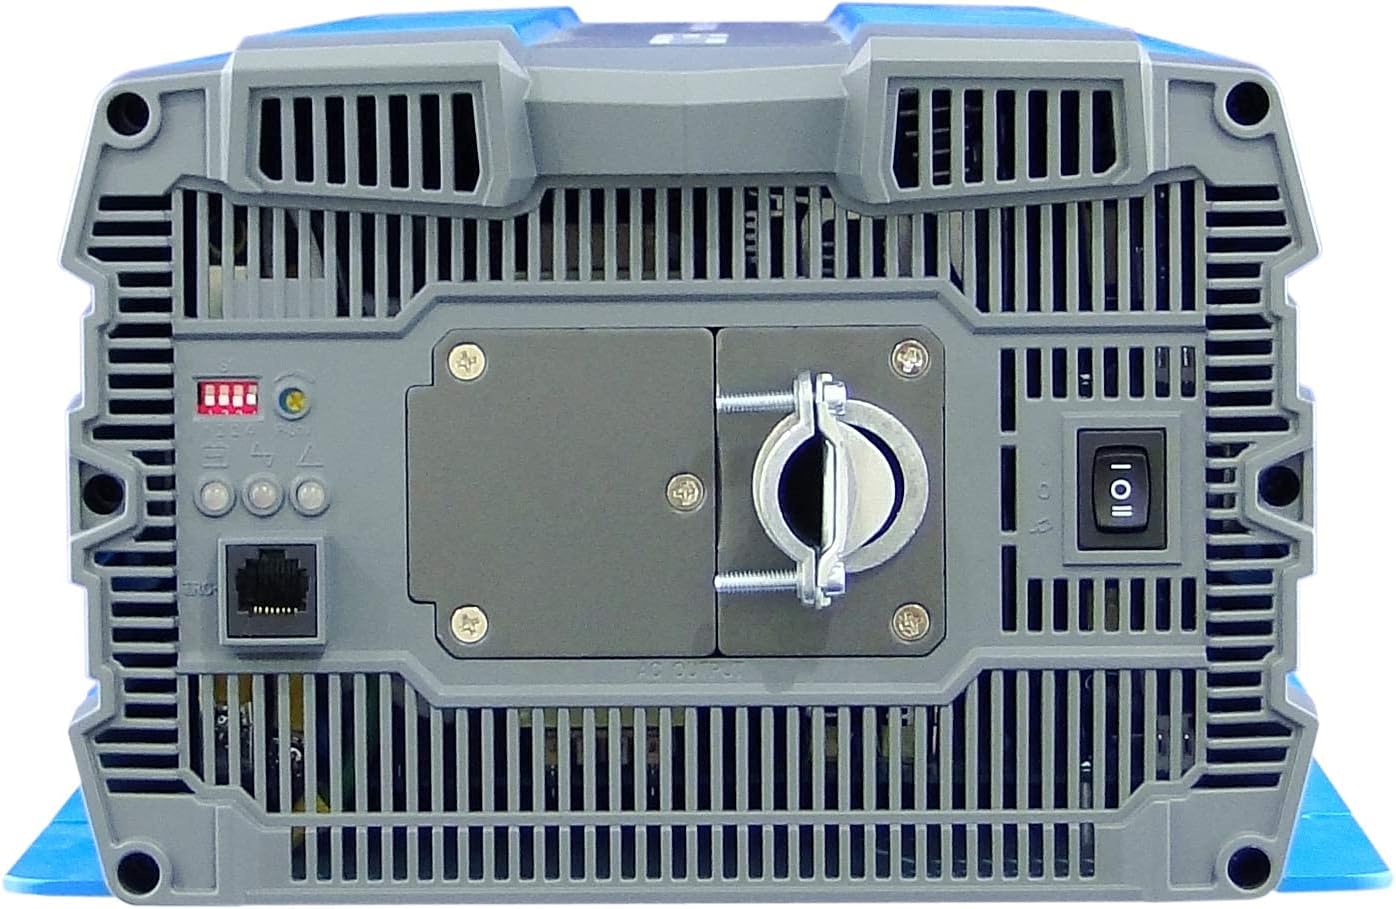
Figure 3.2: Front panel of the inverter. This view highlights the AC output terminal, the remote control terminal (green), LED status indicators, DIP switches, and the main power switch.
- AC чыгаруу терминалы: Hardwire connection for 120VAC output.
- Remote Control Terminal (Green): For connecting an optional remote ON/OFF switch.
- LED абалынын көрсөткүчтөрү: Provide visual feedback on inverter status (Power, Fault, Overload).
- DIP өчүргүчтөр: Used to select output frequency (50/60 Hz) and output voltage.
- Power Saving Mode Resistor: Adjustable resistor for fine-tuning power saving mode.
- Негизги Power Switch: Controls the inverter's power.
Rear Panel (DC Input Side):

Figure 3.3: Rear panel of the inverter. This view shows the DC input terminals (red for positive, black for negative) and the chassis ground connection point.
- Туруктуу токтун киргизүү терминалдары: Heavy-duty terminals for connecting to the 48VDC battery bank. Ensure correct polarity (Red for Positive, Black for Negative).
- Chassis Ground Terminal: Инверторду жерге туташтыруу үчүн.
- Cooling Fan Vents: Ensure these vents are not obstructed for proper heat dissipation.
4. Орнотуу
Proper installation is crucial for the safe and efficient operation of your inverter. Follow these steps carefully.
4.1 Инверторду орнотуу
- Choose a dry, well-ventilated location away from direct sunlight, heat sources, and moisture.
- Mount the inverter on a non-combustible surface.
- Ensure there is at least 6 inches (15 cm) of clear space around all sides of the inverter for proper airflow.
- Use appropriate fasteners to secure the inverter firmly to the mounting surface.
4.2 DC Input Connection
ЭСКЕРТҮҮ: Ensure the battery bank is disconnected or isolated before making any connections. Use appropriately sized cables and fuses/breakers.
- Connect the positive (+) DC cable (typically red) from your 48VDC battery bank to the red positive (+) terminal on the inverter's rear panel.
- Connect the negative (-) DC cable (typically black) from your 48VDC battery bank to the black negative (-) terminal on the inverter's rear panel.
- Ensure all DC connections are tight and secure to prevent loose connections and arcing.
- Install an external DC fuse or circuit breaker between the battery bank and the inverter's positive terminal, as close to the battery as possible. Consult the specifications for appropriate fuse sizing.
4.3 AC Output Connection
The SP-4000-148 uses a hardwire AC output connection.
- Ensure the inverter is OFF and all DC power is disconnected.
- Connect your AC load wiring to the designated AC output terminal block on the front panel.
- Follow all local electrical codes for AC wiring.
- Ensure all AC connections are secure.
4.4 Жерге туташтыруу
The inverter chassis must be properly grounded.
- Connect a ground wire from the chassis ground terminal on the inverter's rear panel to a reliable earth ground point.
- Ensure the ground connection is secure and meets all local electrical codes.
4.5 Алыстан башкаруу пультунун туташуусу (милдеттүү эмес)
If using an optional remote control, connect it to the green terminal block on the front panel according to the remote control's instructions.
5. Операция
Once the inverter is properly installed and all connections are secure, you can begin operation.
5.1 Күйгүзүү/өчүрүү
- Ensure all DC and AC connections are correct and secure.
- If an external DC breaker is installed, ensure it is closed (ON).
- Flip the main power switch on the inverter's front panel to the 'ON' position.
- The LED indicators will illuminate, and the cooling fan may briefly activate.
- Өчүрүү үчүн, негизги кубат которгучун "OFF" абалына коюңуз.
5.2 LED абал көрсөткүчтөрү
The inverter features 3-color LED indicators to display its operational status:
- Жашыл LED: нормалдуу иштешин керсетет.
- Сары LED: Indicates a warning or abnormal condition (e.g., low battery, minor overload). Refer to troubleshooting.
- Кызыл LED: Indicates a fault or critical error (e.g., severe overload, over-temperature, short circuit). The inverter will typically shut down. Refer to troubleshooting.
5.3 DIP которуштуруу орнотуулары
The DIP switches on the front panel allow configuration of output frequency and voltage. Refer to the detailed specifications or the label on the inverter for specific switch positions for desired settings.
- Чыгуу жыштыгы: Select between 50 Hz or 60 Hz.
- Output Voltage: Select desired AC output voltagд (мис., 100V, 110V, 115V, 120V).
ЭСКЕРТҮҮ: Always power off the inverter before changing DIP switch settings.
5.4 Кубатты үнөмдөө режими
The power saving mode can be adjusted via the variable resistor on the front panel. This mode reduces standby power consumption when no load or a very light load is detected. Adjust the resistor to set the threshold for entering/exiting power saving mode.
6. Техникалык тейлөө
Үзгүлтүксүз тейлөө сиздин инверторуңуздун узак иштөөсүн жана оптималдуу иштешин камсыздайт.
- Тазалоо: Инвертордун сыртын мезгил-мезгили менен кургак, жумшак чүпүрөк менен тазалап туруңуз. Желдетүүчү тешиктердин чаңдан жана таштандылардан тазаланганын текшериңиз. Суюк тазалоочу каражаттарды колдонбоңуз.
- Туташуу текшерүүлөрү: Annually inspect all DC and AC connections for tightness. Loose connections can cause overheating and damage.
- Батареяны тейлөө: Батарея өндүрүүчүнүн техникалык тейлөө боюнча сунуштарын аткарыңыз, анын ичинде электролит деңгээлин (суу каптаган батареялар үчүн) жана терминалдардын тазалыгын текшериңиз.
- Курчап турган чөйрө: Иштөө чөйрөсү белгиленген температуранын жана нымдуулуктун чегинде сакталышын камсыз кылыңыз.
7. Кыйынчылыктарды
Бул бөлүмдө инверторуңуз менен кездешиши мүмкүн болгон жалпы көйгөйлөрдүн чечимдери келтирилген.
| Көйгөй | Мүмкүн себеп | Чечим |
|---|---|---|
| Inverter does not turn on (No LEDs) | No DC input power; Blown DC fuse/breaker; Loose DC connections; Reverse polarity. | Батареянын көлөмүн текшериңизtage; Check external DC fuse/breaker; Verify DC connections are tight and correct polarity. |
| Red LED illuminates, inverter shuts down | Overload; Short circuit on AC output; Over-temperature; Input over/under voltage. | Reduce AC load; Check AC wiring for short circuits; Allow inverter to cool down; Verify battery voltage иштөө диапазонунда. |
| Yellow LED illuminates, intermittent operation | Minor overload; Low battery voltage эскертүү; Жогорку температура жөнүндө эскертүү. | Reduce AC load; Recharge batteries; Ensure adequate ventilation. |
| No AC output, Green LED is on | AC output wiring issue; Faulty AC appliance. | Check AC output connections; Test with a different AC appliance. |
| Cooling fan runs constantly or loudly | High ambient temperature; Heavy load; Obstructed vents. | Ensure proper ventilation; Reduce load if possible; Clean vents. |
8. Техникалык шарттар
The following table details the technical specifications for the COTEC SP-4000-148 Pure Sine Wave Inverter.

Figure 8.1: Detailed technical specifications for the COTEC SP-4000 series, including input, output, protection, and environmental parameters.
| Спецификация | Нарк |
|---|---|
| Бренд | COTEK |
| Модель аты | SP сериясы |
| Ватtage | 4000 ватт |
| Киргизүү көлөмүtage | 48 вольт DC |
| Чыгуу күчү | 4000 Ватт |
| Чыгуу жыштыгы | 60 Hz (Selectable) |
| Жалпы электр розеткалары | 1 (Hardwire) |
| Standby Power Shutoff | High Efficiency (Adjustable) |
| Короонун түрү | Type 1 Indoor Aluminum Enclosure |
| Бекитүүлөр | E13 / UL / CE / FCC |
| UPC | 648152674771 |
| Mfr Part Number | SP-4000-148 |
Механикалык чиймелер:

Figure 8.2: Mechanical drawings providing dimensions for the COTEC SP-4000 series inverter, useful for installation planning.
9. Кепилдик жана колдоо
COTEK products are manufactured to high-quality standards. This product is covered by a manufacturer's warranty against defects in materials and workmanship. Please refer to the warranty card included with your product or visit the official COTEC webдеталдуу кепилдик шарттары жана шарттары үчүн сайт.
Кардарларды колдоо:
For technical assistance, troubleshooting, or warranty claims, please contact COTEC customer support through their official channels. Have your product model number (SP-4000-148) and purchase information ready when contacting support.
- Webсайт: www.cotek.com.tw (Чыгample, расмий ырастаңыз webсайт)
- Электрондук почта: support@cotek.com (Exampле)
- Телефон: +1-XXX-XXX-XXXX (Exampле)