
1. Коопсуздук маалыматы
Please read this manual carefully before using the device to ensure proper operation and to prevent damage. Keep this manual for future reference.
- Түзмөктү өтө жогорку температурага, узак убакыт бою түз күн нуруна же жогорку нымдуулукка дуушар кылбаңыз.
- Түзмөктүн бекем орнотулганын жана айдоочунун кыймылына тоскоол болбогонун текшериңиз view же транспорт каражаттарын башкарууга тоскоолдук кылуу.
- Use only the provided power adapter to prevent damage to the device and vehicle electrical system.
- Аппаратты өз алдынча бөлүүгө же оңдоого аракет кылбаңыз. Жардам алуу үчүн квалификациялуу тейлөө кызматкерлерине кайрылыңыз.
- Insert and remove the microSD card only when the device is powered off to prevent data corruption.
2. Пакеттин мазмуну
Пакетте бардык буюмдар бар экенин текшериңиз:
- FOREVER VR-110 Dash Camera
- Сорох кубогын таһыгар
- Унаа кубаттагыч (USB кубат адаптери)
- USB кабели
- User Manual
3. Продукт бүтүп калдыview
Familiarize yourself with the components of your VR-110 dash camera.
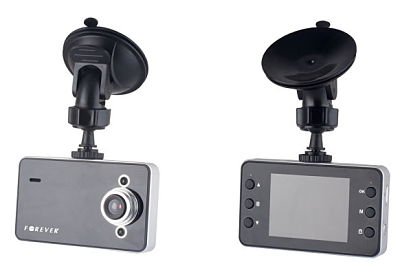
3.1-сүрөт: Фронт view of the FOREVER VR-110 Dash Camera attached to its suction cup mount. The camera features a screen on the front face and control buttons on the sides.
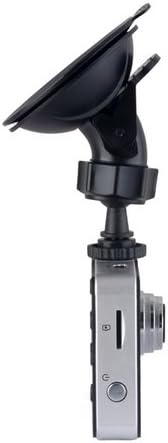
3.2-сүрөт: Side view of the FOREVER VR-110 Dash Camera, showing the microSD card slot and the power button. The lens is visible on the opposite side.
3.1. Түзмөктүн жайгашуусу
- Объектив: Video foo жаздыратtage.
- 2.4" Display Screen: Shows live view, recorded videos, and menu options.
- Башкаруу баскычтары: Navigate menus, start/stop recording, and access functions. (Specific button functions will be detailed in the Operating section).
- MicroSD картасынын уячасы: For inserting the memory card (up to 32GB, not included).
- USB порт: For power supply and data transfer.
- Монтаждоо пункту: Connects to the suction cup mount.
4. Орнотуу
4.1. MicroSD картасын салуу
- Панель камерасынын өчүрүлгөнүн текшериңиз.
- Locate the microSD card slot on the side of the device (refer to Figure 3.2).
- Gently insert the microSD card with the gold contacts facing the back of the camera until it clicks into place.
- Чыгаруу үчүн картаны сыртка чыкканга чейин бир аз түртүңүз.
Эскертүү: A Class 10 or higher microSD card (up to 32GB) is recommended for reliable recording. Format the card in the camera's settings before first use.
4.2. Камераны орнотуу
- Айнегиңиздин каалаган жерин жакшылап тазалаңыз.
- Attach the suction cup mount to the dash camera's mounting point.
- Сорулгону алдынкы айнекке бекем басып, аны бекитүү үчүн рычагды которуңуз.
- Тунук болушу үчүн камеранын бурчун тууралаңыз view of the road ahead, without obstructing your driving visibility.

4.1-сүрөт: The FOREVER VR-110 Dash Camera mounted on a car windshield, showing its position relative to the dashboard and road view.
4.3. Аппаратты кубаттоо
- Connect the car charger to the USB port on the dash camera.
- Унаа кубаттагычтын экинчи учун унааңыздын 12V электр розеткасына (тамеки от алгычтын розеткасына) сайыңыз.
- The camera will typically power on automatically when the vehicle's ignition is turned on and begin recording.
5. Operating the Dash Camera
5.1. Негизги жаздыруу
Once powered on, the VR-110 will automatically start recording. A red indicator or icon on the screen will confirm recording is active.
- Жазууну баштоо/Токтотуу: Press the designated button (usually 'OK' or a record icon) to manually start or stop recording if auto-record is off.
- Цикл жаздыруу: The camera records video in segments (e.g., 1, 3, or 5 minutes). When the memory card is full, the oldest unlocked files are overwritten. This ensures continuous recording.
5.2. G-сенсор функциясы
The built-in G-sensor detects sudden impacts or rapid acceleration/deceleration. When triggered, it automatically locks the current video segment, preventing it from being overwritten by loop recording. This protects important footagд авария болгон учурда.
- Сезимталдыкты жөндөө: The G-sensor sensitivity can usually be adjusted in the camera's settings menu (e.g., Low, Medium, High, Off). A higher sensitivity will trigger the lock function more easily.
5.3. Меню навигациясы
Use the control buttons on the device to navigate through the settings menu.
- Меню баскычы: Негизги менюга кирүү үчүн басыңыз.
- Өйдө/ылдый баскычтары: Меню параметрлери аркылуу жылдырыңыз.
- OK баскычы: Опцияны тандаңыз же жөндөөнү ырастаңыз.
- Режим баскычы: Switch between video recording, photo mode, and playback mode.
5.4. Video Resolution Settings
The VR-110 supports the following video resolutions:
- 1280 x 720 (HD): Provides higher detail.
- 640 x 480: Standard definition, uses less storage space.
You can select your preferred resolution in the camera's video settings menu.
6. Техникалык тейлөө
6.1. Аспапты тазалоо
- Камеранын корпусун жана экранын тазалоо үчүн жумшак, кургак чүпүрөктү колдонуңуз.
- For the lens, use a specialized lens cleaning cloth to avoid scratches.
- Суюк тазалагычтарды же абразивдүү материалдарды колдонбоңуз.
6.2. MicroSD картасын башкаруу
- Форматтоо: It is recommended to format the microSD card regularly (e.g., once a month) using the camera's format function to ensure optimal performance and prevent data corruption. Formatting will erase all data on the card.
- Сактагыч: If not using the camera for an extended period, remove the microSD card and store it safely.
7. Кыйынчылыктарды
If you encounter issues with your VR-110 dash camera, refer to the following common problems and solutions:
| Көйгөй | Мүмкүн себеп | Чечим |
|---|---|---|
| Камера күйбөйт. | Электр менен камсыздоо жок; унаанын кубаттагычы бузук; байланышы бош. | Check car charger connection; ensure vehicle's 12V outlet is working; try a different USB cable/charger. |
| Camera stops recording or shows 'Card Error'. | MicroSD card full; card not formatted; faulty card; slow card speed. | Format the microSD card; replace with a new Class 10 or higher card; check for physical damage to the card. |
| Video footage бүдөмүк. | Protective film on lens; dirty lens; incorrect focus (rare). | Линзадан коргоочу пленканы алып салыңыз; линзаны жумшак чүпүрөк менен сүртүңүз. |
| G-сенсор өтө сезгич/жетиштүү сезимтал эмес. | G-sensor sensitivity setting is inappropriate. | Adjust G-sensor sensitivity in the camera's settings menu. |
8. Техникалык шарттар
- Модель аты: VR-110
- Дисплей өлчөмү: 2.4 дюйм
- Видеонун чечилиши: 1280 x 720 (HD), 640 x 480 / 30 fps
- File Форматтары: AVI (Video), JPEG (Photo)
- Өзгөчөлүктөр: G-sensor, Loop Recording
- Эстутум картасынын слоту: MicroSD (up to 32GB, Class 10 recommended)
- Байланыш: USB
- Монтаж түрү: Сорох кубогын таһыгар
- Түсү: Боз
9. Кепилдик жана колдоо
Кепилдик маалыматы жана техникалык колдоо үчүн, сатып алуу учурунда берилген документтерди караңыз же сатуучуга кайрылыңыз. Ар кандай кепилдик дооматтары үчүн сатып алганыңыздын далилин сактаңыз.