
1. Киришүү
Thank you for choosing the OSD Audio PRE-1 High Definition Preamplifier. This unit is designed to enhance your audio experience by providing versatile source selection and precise audio control. The PRE-1 acts as a central hub for various audio components, including turntables, CD/DVD players, and tape decks, delivering a clean and powerful signal to your main ampөмүрлүү.
This manual provides detailed instructions for the proper setup, operation, and maintenance of your PRE-1 preamplifier. Please read this manual thoroughly before operating the unit to ensure optimal performance and longevity.
2. Коопсуздук боюнча маанилүү маалымат
- Кубат булагы: Агрегатты белгилөө белгисинде көрсөтүлгөн кубат булагынын түрүнө гана туташтырыңыз.
- Вентиляция: Ensure adequate ventilation. Do not block any ventilation openings. Install in accordance with the manufacturer’s instructions.
- Суу жана ным: Бул аппаратты суунун жанында колдонбоңуз же аны тамчылап же чачыратып жибербеңиз.
- Жылуулук: Радиаторлор, жылуулук регистрлери, мештер же башка аппараттар (анын ичинде) сыяктуу жылуулук булактарынын жанына орнотпоңуз ampкөтөргүчтөр) жылуулукту пайда кылуучу.
- Тазалоо: Кургак чүпүрөк менен гана тазалаңыз.
- Тейлөө: Бул продуктту өзүңүз тейлөөгө аракет кылбаңыз. Бардык тейлөөнү квалификациялуу тейлөө кызматкерлерине тапшырыңыз.
- Негиздөө: Бул агрегат туура жерге туташтырылышы керек.
3. Пакеттин мазмуну
Сураныч, сиздин пакетиңизде төмөнкү заттар бар экенин текшериңиз:
- OSD Audio PRE-1 High Definition Preampөмүрлүү
- Электр кабели
- Колдонуучунун Колдонмосу (бул документ)
4. Продукт бүтүп калдыview
4.1. Алдыңкы панель
The front panel provides access to all primary controls and a microphone input for convenient use.

This image displays the front panel of the OSD Audio PRE-1 Preamplifier, including its physical dimensions for installation planning.

А деталдуу view of the left side of the PRE-1's front panel, highlighting the Microphone Level, Bass, Midrange, and Treble adjustment knobs.

А деталдуу view of the right side of the PRE-1's front panel, showing the Loudness, Balance, and Volume controls, along with input selection and function buttons.
- Кубат баскычы: Агрегатты күйгүзөт же өчүрөт.
- Микрофон киргизүү: 1/4-inch jack for connecting a microphone.
- Микрофондун деңгээли: Микрофон киргизүүнүн үнүн тууралайт.
- Басс башкаруу: Төмөн жыштык чыгарууну тууралайт.
- Mid Control: Adjusts the mid-range frequency output.
- Үч ыргак башкаруу: Жогорку жыштык чыгарууну тууралайт.
- Үн: Engages or disengages a loudness contour for enhanced bass and treble at low volumes.
- Баланс: Сол/оң канал балансын тууралайт.
- Көлөмү: Master volume control for all outputs.
- Киргизүүнү тандоо: Rotary knob to choose between Phono, AUX1, AUX2, and CD/DVD inputs.
- Tape Button: Activates the Tape Monitor loop.
- Моно баскыч: Combines stereo signals into a monaural output.
- Төмөн чыпка: Engages a low-frequency cut-off filter.
- Үнсүз: Silences all audio output.
4.2. Арткы панель
The rear panel houses all the necessary input and output connections for your audio system.
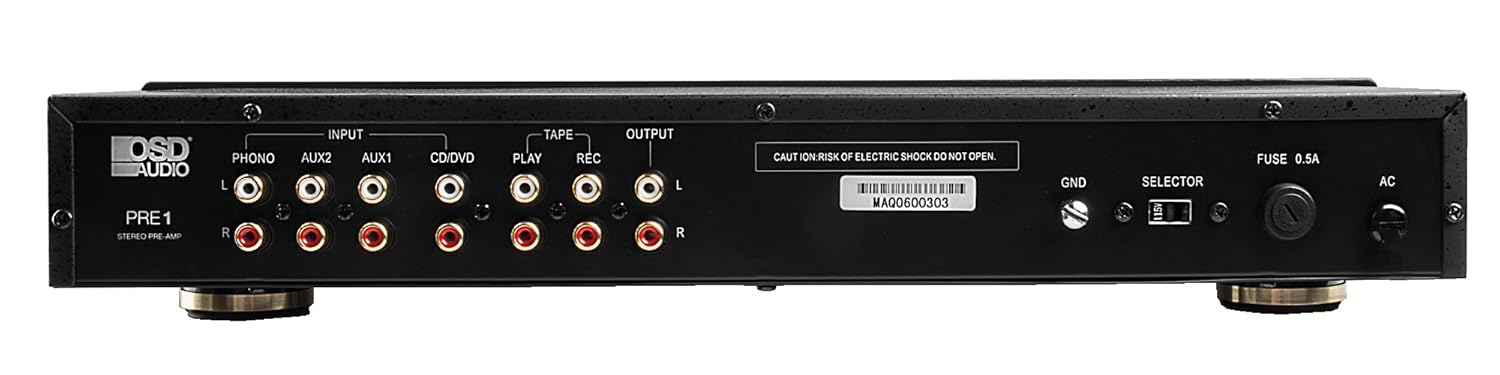
The rear panel of the PRE-1 Preamplifier, showing all input and output connections for various audio devices.
- Phono Input (L/R): RCA inputs for connecting a turntable. Includes a ground terminal.
- AUX1 Input (L/R): RCA inputs for general auxiliary devices.
- AUX2 Input (L/R): RCA inputs for a second auxiliary device.
- CD/DVD Input (L/R): RCA inputs for CD or DVD players.
- Tape Play (L/R): RCA inputs for the playback output of a tape deck or other recording device.
- Tape Rec (L/R): RCA outputs for connecting to the recording input of a tape deck or other recording device.
- Чыгаруу (сол/оң): RCA outputs to connect to your main power ampөмүрлүү.
- Жер үстүндөгү терминал (GND): Connects to the ground wire of your turntable to reduce hum.
- Тандоочу которгуч: For internal configuration (typically left in default position unless specified).
- Страховка: Replace only with the specified fuse type and rating.
- AC кубаттуулугун киргизүү: Connects to the supplied power cable.
5. Орнотуу жана байланыштар
Follow these steps to properly set up your OSD Audio PRE-1 Preampөмүр берүүчү:
- Жайгашкан жери: Place the PRE-1 on a stable, flat surface, ensuring adequate ventilation around the unit. Avoid placing it near heat sources or in direct sunlight.
- Өчүрүү: Ensure all audio components, including the PRE-1 and your main amplifier, are turned off before making any connections.
- Туташуу булактары:
- Айлануучу стол: Connect the RCA cables from your turntable to the Phono Input (L/R) on the PRE-1. Connect the turntable's ground wire to the GND terminal on the PRE-1.
- CD/DVD ойноткуч: Connect the RCA cables from your CD/DVD player to the CD/DVD Input (L/R).
- Other Devices (e.g., Streamer, Tuner): Connect RCA cables from these devices to the AUX1 Input (L/R) or AUX2 Input (L/R).
- Tape Deck: Connect the playback outputs of your tape deck to the Tape Play (L/R) inputs. Connect the recording inputs of your tape deck to the Tape Rec (L/R) чыгуулар.
- туташуу Ampөмүр берүүчү: туташтыруу Output (L/R) RCA jacks on the PRE-1 to the input jacks of your main power ampөмүрлүү.
- Кубат туташуу: Берилген электр кабелин туташтырыңыз AC кубаттуу киргизүү on the rear panel of the PRE-1, then plug it into a suitable wall outlet.
- Баштапкы күйгүзүү: Turn on your main power amplifier first, then turn on the PRE-1. When powering off, turn off the PRE-1 first, then your main ampөмүрлүү.
6. Иштөө нускамалары
Once your PRE-1 is connected, follow these steps for basic operation:
- Киргизүүнү тандоо: колдонуу Киргизүү Тандоо rotary knob on the front panel to choose the desired audio source (Phono, AUX1, AUX2, CD/DVD).
- Үндү тууралоо: менен баштоо Көлөм knob at its minimum setting. Begin playing your selected audio source and slowly increase the volume to a comfortable listening level.
- Тон көзөмөлү: колдонуу Бас, Орто, жана Үч эсе knobs to adjust the tonal characteristics of your audio. Turn clockwise to increase, counter-clockwise to decrease.
- Баланс көзөмөлдөө: тууралаңыз Баланс knob to fine-tune the left and right channel output for optimal stereo imaging.
- Үн: басыңыз Үн катуулугу button to activate a contour that boosts bass and treble frequencies, which can be beneficial at lower listening volumes. Press again to deactivate.
- Төмөн чыпка: басыңыз Төмөн Чыпка button to engage a filter that reduces very low frequencies. This can help eliminate rumble from turntables or other unwanted low-frequency noise. Press again to deactivate.
- Моно: басыңыз Моно button to combine the left and right stereo channels into a single monaural signal. This is useful for playing mono recordings. Press again for stereo.
- Үнсүз: басыңыз Үнсүз button to instantly silence the audio output. Press again to restore sound.
- Микрофонду колдонуу: Plug a microphone into the Микрофон киргизүү. Adjust the microphone's volume using the Микрофондун деңгээли баскыч.
- Tape Monitoring/Recording: If you have a tape deck connected, select the appropriate input for playback. To record, ensure your tape deck is set to record and the PRE-1 is passing the desired source through the Tape Rec outputs.
7. Техникалык тейлөө
Proper care and maintenance will ensure the longevity and optimal performance of your PRE-1 Preampөмүрлүү.
- Тазалоо: Use a soft, dry cloth to clean the exterior of the unit. Do not use liquid cleaners, aerosols, or harsh chemicals, as they may damage the finish or internal components.
- Вентиляция: Periodically check that the ventilation openings are free from dust and obstructions.
- Байланыштары: Occasionally check all cable connections to ensure they are secure. Loose connections can lead to signal loss or interference.
- Сактагыч: Эгерде түзмөктү көпкө сактасаңыз, аны розеткадан сууруп, салкын, кургак жерде, күн нуру түз тийбеген жана өтө жогорку температурадан алыс сактаңыз.
8. Кыйынчылыктарды
If you experience issues with your OSD Audio PRE-1, refer to the following common problems and solutions:
| Көйгөй | Мүмкүн себеп | Чечим |
|---|---|---|
| Күч жок | Power cable not connected; Power outlet not active; Blown fuse | Ensure power cable is securely connected. Test the outlet with another device. Check and replace the fuse if necessary (refer to specifications for fuse type). |
| Үн чыгышы жок | Incorrect input selected; Volume too low; Mute engaged; Loose audio cables; Main amplifier off or incorrect input selected | Select the correct input source. Increase the volume. Disengage Mute. Check all RCA cable connections. Ensure your main amplifier is on and set to the correct input. |
| Бурмаланган үн | Volume too high (clipping); Incorrect tone control settings; Faulty cables | Reduce the volume. Adjust Bass, Mid, and Treble controls to neutral or desired settings. Try replacing audio cables. |
| Ызы-чуу же ызы-чуу | Ground loop; Loose ground wire (Phono); Interference from other electronics | Ensure turntable ground wire is connected to the PRE-1's GND terminal. Try moving the PRE-1 or other audio components away from power cables or other electronic devices. Use a ground loop isolator if necessary. |
| Микрофон иштебей жатат | Mic not connected; Mic Level too low; Faulty microphone | Ensure microphone is securely plugged into the Mic Input. Increase the Mic Level. Test with another microphone if available. |
9. Техникалык шарттар
Below are the technical specifications for the OSD Audio PRE-1 Preampөмүр берүүчү:
| Өзгөчөлүк | Спецификация |
|---|---|
| Модел | PRE-1 |
| Бренд | OSD аудио |
| Каналдардын саны | 2 |
| Монтаж түрү | Surface Mount |
| UPC | 819603012446 |
| ASIN | B01MPYJLPX |
| Өндүрүүчү | OSD аудио |
10. Кепилдик жана колдоо
OSD Audio products are designed for reliability and performance. For specific warranty details and terms, please refer to the warranty card included with your product or visit the official OSD Audio website. If you require technical assistance or have questions not covered in this manual, please contact OSD Audio customer support.
OSD Audio Customer Support: Please visit the OSD Audio webбайланыш маалыматы жана колдоо булактары үчүн сайт.