Introduction
This manual provides comprehensive instructions for the setup, operation, and maintenance of your GPX Digital AM/FM Clock Radio, model C224B. Please read this manual thoroughly before using the device to ensure proper functionality and to maximize your user experience. Keep this manual for future reference.
Продукт бүттүview
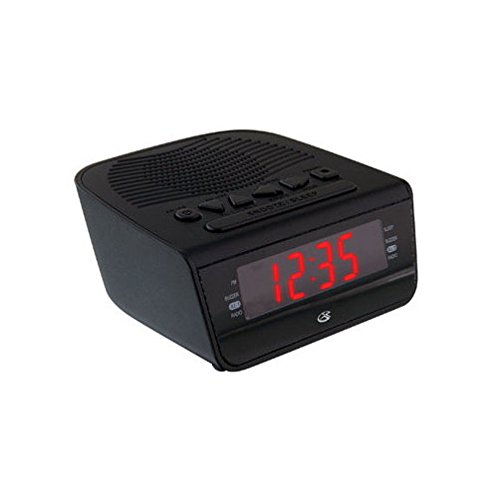
1-сүрөт: Фронт view of the GPX Digital AM/FM Clock Radio. This image shows the compact black unit with its digital display and control buttons.
The GPX Digital AM/FM Clock Radio (C224B) is designed for reliable timekeeping and audio entertainment. Key features include a clear multi-display clock, AM/FM radio tuner, dual alarm functionality, and a battery backup option to ensure continuous operation during power interruptions. Its compact and modern design makes it suitable for various indoor settings.
Жайгашуу
1. таңгактан чыгаруу
Carefully remove the clock radio from its packaging. Ensure all components are present: the clock radio unit and the power adapter.
2. Power Connection
- Plug the power adapter into the DC input jack located on the back of the clock radio.
- Plug the other end of the power adapter into a standard wall outlet (AC 120V, 60Hz).
- The display will illuminate, indicating the unit is receiving power.
3. Батареянын камдык көчүрмөсүн орнотуу (милдеттүү эмес)
У учурунда резервдик күч үчүнtages, install batteries (not included).
- Аппараттын астындагы батарея отсегин табыңыз.
- Батарея уясынын капкагын ачыңыз.
- Insert the required batteries (e.g., 2 x AAA, check unit for specific type) according to the polarity markings (+ and -).
- Батарея уясынын капкагын бекем жабыңыз.
Эскертүү: Batteries are for backup only and will not power the display or radio functions continuously. They preserve time and alarm settings during a power interruption.
Иштөө нускамалары
1. Убакытты белгилөө
- басып, кармап туруңуз УБАКЫТТЫ ОРНОТУУ баскычы дисплей жарк этмейинче.
- колдонуу HOUR жана MINUTE убакытты тууралоо үчүн баскычтар.
- Басыңыз УБАКЫТТЫ ОРНОТУУ ырастоо жана убакыт орнотуу режиминен чыгуу үчүн кайра.
2. Ойготкучтарды орнотуу (ойготкуч 1 жана Ойготкуч 2)
This unit features dual alarms, allowing you to set two independent wake-up times.
- басып, кармап туруңуз ОЙГОЛГОН 1 СЕТ (же ОЙГОЛГОН 2 СЕТ) баскычын ойготкучтун убактысы күйүп-өчкөнгө чейин басыңыз.
- колдонуу HOUR жана MINUTE каалаган ойготкучтун убактысын тууралоо үчүн баскычтарды басыңыз.
- Басыңыз ОЙГОЛГОН 1 СЕТ (же ОЙГОЛГОН 2 СЕТ) again to confirm the time.
- Immediately after confirming the time, use the Сигнал режими button to select the alarm source: КОҢГУРОО or РАДИО.
- The alarm icon (e.g., AL1 or AL2) will appear on the display, indicating the alarm is active.
To turn off an alarm, press the corresponding ALARM 1 ON/OFF (же ALARM 2 ON/OFF) button. The alarm icon will disappear.
3. AM/FM радиосунун иштеши
- басыңыз РАДИО КҮЙГҮЗҮҮ/ӨЧҮРҮҮ радиону күйгүзүү үчүн баскыч.
- басыңыз БАНД AM жана FM диапазондорунун ортосунда которулуу үчүн баскычты басыңыз.
- колдонуу TUNE + or ОЮН - баскычтарды колдонуп, каалаган станцияга кол менен жөндөңүз.
- To automatically scan for the next available station, press and hold TUNE + or ОЮН - бир нече секундага.
- Үнүн колдонуп, үнүн жөндөңүз VOLUME + or Көлөмү - баскычтар.
- Радиону өчүрүү үчүн басыңыз РАДИО КҮЙГҮЗҮҮ/ӨЧҮРҮҮ кайра баскычын.
4. Тындырма функциясы
Ойготкуч чыкканда, басыңыз СОЮЗ Ойготкучту болжол менен 9 мүнөткө убактылуу басуу үчүн баскычты басыңыз. Ойготкуч тындыруу мезгилинен кийин кайра угулат.
5. Уйку функциясы
The sleep function allows the radio to play for a set duration before automatically turning off.
- Радио ойноп жатканда, баскычын басыңыз УЙКУ жеткиликтүү уйку убакыттары (мисалы, 90, 60, 30, 15 мүнөт, ӨЧҮРҮҮ) аркылуу айлануу үчүн баскычты кайра-кайра басыңыз.
- Тандалган убакыттан кийин радио автоматтык түрдө өчөт.
Техникалык тейлөө
1. Тазалоо
To clean the unit, wipe the exterior with a soft, slightly damp cloth. Do not use abrasive cleaners or solvents, as these may damage the finish. Ensure the unit is unplugged before cleaning.
2. Батареяны алмаштыруу
If the battery backup function is not working, or if the unit loses time during a power outage, the backup batteries may need replacement. Follow the "Battery Backup Installation" steps in the Setup section to replace them.
Проблемаларды чечүү
| Көйгөй | Мүмкүн себеп | Чечим |
|---|---|---|
| Түзмөк күйбөйт. | Кубат адаптери туташкан эмес же туура эмес розетка. | Кубат адаптери түзүлүшкө жана жумушчу розеткага бекем сайылганын текшериңиз. Башка розеткадан аракет кылып көрүңүз. |
| Ойготкуч угулбайт. | Ойготкуч коюлган эмес, ойготкучтун үнү өтө төмөн же ойготкуч өчүрүлгөн. | Verify alarm time and source (buzzer/radio) are set correctly. Ensure alarm is activated (icon visible). Increase radio volume if alarm source is radio. |
| Радио кабыл алуу начар. | Алсыз сигнал же тоскоолдук. | Adjust the position of the unit or the antenna (if external). Move away from other electronic devices that may cause interference. |
| Убакыт/жөндөөлөр өчүрүлгөндөн кийин жоголдуtage. | Камдык батареялар өлүп калган же орнотулган эмес. | Install fresh backup batteries or replace existing ones. |
Техникалык шарттар
- Модел: C224B
- Кубат булагы: AC 120V, 60Hz (main); Battery Powered (backup)
- Дисплей түрү: LED санарип дисплей
- Радио топтору: AM/FM
- Өлчөмдөрү (болжол менен): 5.12" W x 5.12" H
- Салмагы (болжол менен): 3 фунт
- Түсү: Кара
- Материал: Пластик
Кепилдик жана колдоо
For warranty information or technical support, please refer to the warranty card included with your product or visit the official GPX website. Do not attempt to repair this unit yourself, as this may void your warranty.
GPX Official Webсайт: www.gpx.com