
1. Киришүү
This manual provides comprehensive instructions for the installation, operation, and maintenance of your ASUS Prime Z270M-PLUS motherboard. Please read this manual thoroughly before installing or using the product to ensure correct setup and optimal performance.
2. Коопсуздук маалыматы
Монетардык платага зыян келтирбөө жана өзүңүзгө зыян келтирбөө үчүн төмөнкү коопсуздук чараларын сактаңыз:
- Компоненттерге тийүүдөн мурун ар дайым кубат шнурын розеткадан ажыратыңыз.
- Wear an anti-static wrist strap or frequently touch a grounded object to discharge static electricity before handling components.
- Сезимтал бөлүктөргө тийбеш үчүн компоненттерди четинен кармаңыз.
- Ашыкча ысып кетүүдөн сактануу үчүн компьютериңиздин ичинде туура желдетүүнү камсыз кылыңыз.
- Motherboard'ду нымдуулуктан жана экстремалдык температурадан алыс кармаңыз.
3. Пакеттин мазмуну
Пакетиңизде бардык буюмдар бар экенин текшериңиз:
- ASUS Prime Z270M-PLUS Motherboard
- SATA кабели(лери)
- User Manual
4. Продукт бүтүп калдыview
The ASUS Prime Z270M-PLUS is a micro-ATX motherboard designed for Intel LGA 1151 socket processors. It features robust hardware safeguards, advanced cooling controls, and high-speed connectivity options.
Негизги өзгөчөлүктөрү:
- 5X коргоо III: Hardware-level safeguards to ensure component longevity and reliability against electrical overloads.
- LED жарыктандыруу: Customizable lighting control for PCIe slots.
- Fan Xpert 4 Core: Advanced fan controls for optimized cooling and reduced noise.
- Dual Native M.2 and NVMe PCIe RAID Support: Provides high-speed storage solutions.
- USB Type-C: Convenient and reversible connectivity.
- DDR4 колдоо: Supports memory speeds up to 3866 MHz.
- Аудио: Realtek ALC887 8-channel high-definition audio.
- Көп GPU колдоо: Features AMD CrossFireX Technology.

4.1-сүрөт: жогорудан ылдыйга view of the ASUS Prime Z270M-PLUS motherboard, highlighting the CPU socket, RAM slots, and PCIe slots.

4.2-сүрөт: Бурчтуу view of the ASUS Prime Z270M-PLUS motherboard, showcasing its various components and heatsinks.
5. Орнотуу
5.1. CPU орнотуу
- LGA 1151 розеткасын энелик платадан табыңыз.
- CPU розеткасынын рычагын ачып, жүктөө пластинасын көтөрүңүз.
- CPUдагы алтын үч бурчтук розеткадагы үч бурчтукка дал келишин камсыз кылып, CPU менен розеткага кылдат тууралаңыз.
- Процессорду мажбурлабастан акырын розеткага салыңыз.
- Жүк ташуучу пластинаны жаап, рычагды ордуна бекитилгенче ылдый басыңыз.
5.2. Эстутум (RAM) орнотуу
The motherboard supports DDR4 memory up to 64GB with speeds up to 3866 MHz.
- DIMM уячасынын эки учундагы клиптерди ачыңыз.
- DDR4 эстутум модулундагы оюкту DIMM уячасындагы ачкыч менен тууралаңыз.
- Эстутумдун модулун уячага кыстаргычтар орнотулганча кыстарыңыз.
5.3. Сактагыч түзмөктү орнотуу
The motherboard supports SATA III devices and NVMe PCIe M.2 drives.
- SATA түзмөктөрү: Connect SATA data cables from your storage drives (HDDs/SSDs) to the SATA III ports on the motherboard. Connect power cables from your power supply to the drives.
- M.2 Түзмөктөр: Locate the M.2 slot. Insert the M.2 drive at an angle and secure it with the provided screw.
5.4. Кеңейтүү картасын орнотуу
The motherboard features PCIe 3.0 slots for graphics cards and other expansion cards.
- Align the expansion card with the appropriate PCIe slot.
- Press down firmly until the card is seated correctly and the retention clip locks.
- Картаны бурама менен PC корпусуна бекитиңиз.
5.5. Электр байланыштары
Кубат булагыңыздагы 24-пиндүү ATX кубат туташтыргычын жана 8-пиндүү ATX 12V кубат туташтыргычын энелик платадагы тиешелүү портторго туташтырыңыз.
5.6. Front Panel Connections
Connect the cables from your PC case's front panel (USB ports, audio jacks, power button, reset button, LED indicators) to the corresponding headers on the motherboard. Refer to the motherboard diagram in your physical manual for exact header locations.
5.7. Арткы I/O панели
Арткы I/O панели тышкы түзмөктөрдү туташтыруу үчүн ар кандай портторду камсыз кылат.
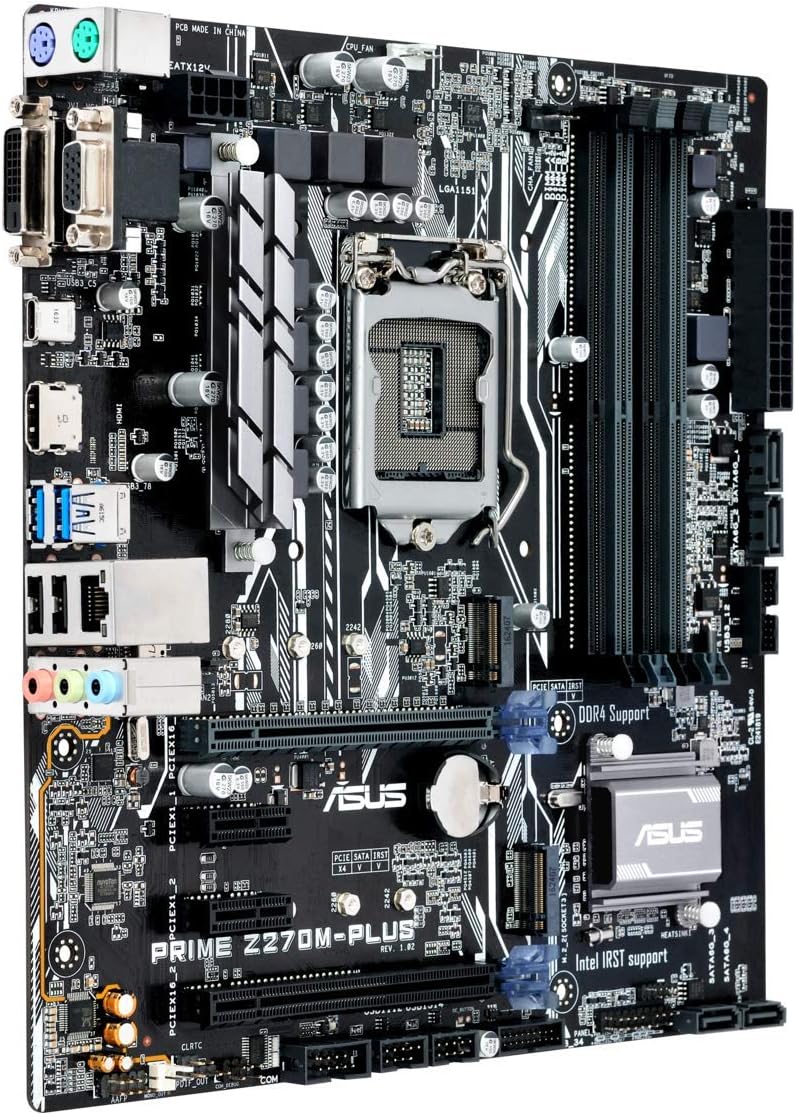
Figure 5.1: Rear I/O panel of the ASUS Prime Z270M-PLUS motherboard, showing various connectivity ports.
Common ports include:
- PS/2 Keyboard/Mouse Combo Port
- DVI-D порту
- VGA порту
- HDMI порту
- USB 3.0 порттору
- USB 2.0 порттору
- LAN (RJ-45) Port
- Audio Jacks (Line In, Line Out, Microphone)
6. Иштөө
6.1. Баштапкы жүктөө жана BIOS/UEFI орнотуу
Upon the first power-on, the system will typically enter the BIOS/UEFI setup utility. Here you can configure system settings, boot order, and monitor hardware status. Press the DEL key during startup to enter the BIOS/UEFI.
6.2. Драйверди орнотуу
After installing your operating system, install the necessary drivers for the motherboard components (chipset, audio, LAN, graphics, etc.). These drivers are typically provided on a support DVD or can be downloaded from the ASUS official webсайт.
6.3. System Boot
Once the operating system and drivers are installed, your system should boot normally. Ensure all peripherals are connected correctly.
7. Техникалык тейлөө
7.1. Тазалоо
Regularly clean your PC case and motherboard to prevent dust buildup, which can lead to overheating and component failure. Use compressed air to remove dust from fans, heatsinks, and other components. Ensure the system is powered off and unplugged before cleaning.
7.2. BIOS жаңыртуулары
Мезгил-мезгили менен ASUS колдоосун текшерип туруңуз website for BIOS updates. BIOS updates can improve system stability, add support for new hardware, or fix bugs. Follow the instructions provided by ASUS carefully when performing a BIOS update to avoid system damage.
8. Кыйынчылыктарды
Эгерде сиз энелик платаңызда көйгөйлөргө туш болсоңуз, анда төмөнкү жалпы көйгөйлөрдү чечүү кадамдарын карап көрүңүз:
- Кубат жок: Ensure all power cables (24-pin ATX, 8-pin CPU) are securely connected. Check your power supply unit (PSU) for functionality.
- Дисплей жок: Verify that your graphics card is properly seated and connected to the monitor. If using integrated graphics, ensure your monitor is connected to the motherboard's video output. Try reseating RAM modules.
- Системанын туруксуздугу/бузуулар: Check for overheating. Ensure all drivers are up to date. Test memory modules individually.
- Компонент аныкталган жок: Ensure the component (e.g., hard drive, expansion card) is correctly installed and all necessary cables are connected. Check BIOS settings to ensure the component is enabled.
- BIOS баштапкы абалга келтирүү: If system settings become unmanageable, you can clear the CMOS by removing the CMOS battery for a few minutes or using the Clear CMOS jumper (refer to your physical manual for location).
9. Техникалык шарттар
| Өзгөчөлүк | Спецификация |
|---|---|
| Модель аты | Prime Z270M-PLUS |
| CPU розетка | LGA 1151 |
| Шайкеш процессорлор | Celeron, Core i3, Core i5, Core i7, Pentium (14nm CPUs) |
| Чипсет | Intel Z270 |
| Эс тутум технологиясы | DDR4 |
| Max. Memory Capacity | 64 ГБ |
| Memory Clock Speed | 3866 МГц чейин |
| Сактагыч интерфейстери | SATA III, Dual Native M.2 (NVMe PCIe support) |
| Кеңейтүү уячалары | PCIe 3.0 |
| USB порттору | USB 3.0, USB 2.0, USB Type-C |
| Video Output | HDMI, DVI-D, VGA (via integrated graphics) |
| Аудио | Realtek ALC887 8-канал жогорку тактыктагы аудио |
| LAN | 1x Гигабит Ethernet |
| Форма фактору | mATX (23 x 20 x 2 cm) |
| Салмагы | 900 г |
| Өндүрүүчү моделдин номери | B990M80 |
10. Кепилдик маалыматы
The product warranty for the ASUS Prime Z270M-PLUS motherboard is not applicable as per the provided product information. Please refer to your point of purchase or local ASUS support for specific warranty terms and conditions that may apply in your region.
11. Колдоо
For further assistance, technical support, or driver downloads, please visit the official ASUS support webсайт. Ал жерден кошумча ресурстарды жана көп берилүүчү суроолорду таба аласыз.
ASUS расмий Webсайт: www.asus.com
ASUS Brand Store: ASUS Spain Store on Amazon