Introduction
Thank you for choosing the Ferm TDM1025 Bench Pillar Corded Electric Drill. This manual provides essential information for the safe and efficient operation, maintenance, and troubleshooting of your new drill. Please read these instructions carefully before use and keep them for future reference.
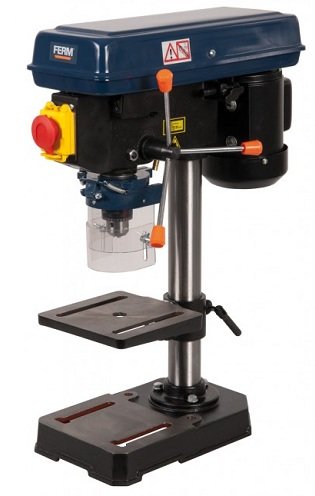
Image: Ferm TDM1025 Bench Pillar Corded Electric Drill. This image shows the complete drill press assembly, including the base, column, motor head, and work table.
Коопсуздук нускамалары
Электр шаймандарын иштетүүдө өрт, электр шок жана жеке жаракат алуу коркунучун азайтуу үчүн ар дайым негизги коопсуздук чараларын сактаңыз.
Жалпы коопсуздук эрежелери:
- Жумуш аймагынын коопсуздугу: Жумушчу жерди таза жана жакшы жарыктандырыңыз. Башаламан же караңгы жерлер кырсыкка чакырат.
- Электр коопсуздугу: Электр шаймандарын жамгыр же нымдуу шарттарга тийгизбеңиз. Жерге туташтырылган же жерге туташтырылган беттерге денеңиздин тийишинен алыс болуңуз.
- Жеке коопсуздук: Stay alert, watch what you are doing, and use common sense. Do not operate tools while tired or under the influence of drugs, alcohol, or medication.
- Жеке коргонуу каражаттары: Always wear eye protection. Use dust masks, non-skid safety shoes, hard hats, or hearing protection as appropriate for the conditions.
- Куралды колдонуу жана кам көрүү: Электр аспапты күчтөп албаңыз. Колдонмоңуз үчүн туура электр шайманын колдонуңуз. Кандайдыр бир тууралоолорду жасоодон, аксессуарларды алмаштыруудан же электр шаймандарын сактоодон мурда вилканы кубат булагынан ажыратыңыз.
- Коопсуз жумуш бөлүгү: Ар дайым clamp or secure the workpiece to prevent movement during drilling.
- Guard Usage: Ensure the transparent guard is always in place and properly adjusted for safe working.
Жайгашуу
Пакеттен чыгаруу:
Carefully remove all components from the packaging. Inspect for any damage that may have occurred during transit. Retain packaging materials for future transport or storage.
Ассамблея:
- Негизги жана мамыча: Securely attach the column to the cast iron base using the provided fasteners. Ensure it is stable and upright.
- Drill Head: Mount the drill head assembly onto the top of the column. Tighten all securing bolts.
- Жумуш столу: Slide the work table onto the column and secure it at a comfortable working height. Ensure the table locking mechanism functions correctly.
- Чак орнотуу: Insert the chuck into the spindle taper. Tap it firmly with a soft mallet to ensure a secure fit.
- Guard Attachment: Attach the transparent guard to the drill head, ensuring it can be easily adjusted and provides adequate protection.
Кубат туташуу:
Connect the drill to a standard 230V AC power outlet. Ensure the power switch is in the "OFF" position before plugging in the tool.
Иштөө нускамалары
Installing Drill Bits:
- Ensure the drill is unplugged.
- Патрон ачкычын колдонуп, патрондун ооздорун ачыңыз.
- Бургулоочу учту патронго киргизиңиз, анын борборго так жана толук орнотулганын текшериңиз.
- Патрондун жаактарын патрон ачкычы менен бекем тартыңыз. Патрондун ачкычын тарткандан кийин дароо алып салыңыз.
Adjusting Work Table:
- Бийиктигин тууралоо: Loosen the table locking handle, adjust the table to the desired height, and then firmly tighten the handle.
- Бурчту тууралоо: The table can be tilted from 0 to 45 degrees. Loosen the tilt locking bolt, set the desired angle, and re-tighten the bolt.
Ылдамдык жөндөөлөрү:
The drill features 5 speed settings (580-2650 RPM) for optimal performance across various materials. Adjust the belt position on the pulleys inside the drill head to change the speed. Refer to the speed chart inside the pulley cover for recommended settings.
Laser Guidance:
Activate the cross laser guidance system for precise drilling alignment. The laser projects a crosshair onto the workpiece, indicating the exact drilling point.
Drilling Procedure:
- Secure the workpiece firmly to the work table using clamps.
- Adjust the table height and angle as needed.
- Select the appropriate drilling speed.
- Turn on the drill.
- Slowly lower the drill bit into the workpiece using the feed handle, applying steady, even pressure.
- Once drilling is complete, retract the drill bit from the workpiece before turning off the drill.
Техникалык тейлөө
Үзгүлтүксүз тейлөө бургулоонун узак мөөнөттүү жана коопсуз иштешин камсыздайт.
- Тазалоо: After each use, clean the drill thoroughly to remove dust, chips, and debris. Use a soft brush or compressed air. Do not use solvents that may damage plastic parts.
- Майлоо: Periodically apply a light machine oil to moving parts, such as the column and spindle, to ensure smooth operation.
- Шнур текшерүү: Электр шнурунда бузулуу, кесүү же эскирүү белгилерин дайыма текшерип туруңуз. Бузулган шнурларды дароо алмаштырыңыз.
- Чакты тейлөө: Keep the chuck jaws clean and free of debris to ensure proper grip on drill bits.
- Кур чыңалуу: Check the drive belt tension periodically. Adjust if necessary to prevent slippage and ensure consistent speed.
Проблемаларды чечүү
| Көйгөй | Мүмкүн себеп | Чечим |
|---|---|---|
| Бургулоо башталбайт. | Электр энергиясы жок. Кубат өчүргүч өчүрүлгөн. Бузулган электр зымы. | Электр розеткасын жана өчүргүчтү текшериңиз. Кубат которгучун "ON" абалына коюңуз. Inspect and replace power cord if damaged. |
| Иш учурунда ашыкча титирөө. | Loose drill bit. Unbalanced workpiece. Бош монтаждоо болттору. | Ensure drill bit is securely tightened in chuck. Secure workpiece firmly. Бардык чогултуучу болтторду текшерип, бекемдеңиз. |
| Poor drilling performance or burning wood. | Жалгыз бургу. Ылдамдыкты туура эмес орнотуу. Insufficient feed pressure. | Replace or sharpen drill bit. Adjust speed according to material. Apply steady, appropriate feed pressure. |
| Laser guidance not working. | Laser switch off. Batteries (if applicable) depleted. | Ensure laser switch is on. Зарыл болсо, батарейкаларды текшерип, алмаштырыңыз. |
Техникалык шарттар
| Модель номери | TDM1025 |
| Бренд | Ферм |
| Power Source | Электр зымдары |
| Тtage | 230 V |
| Ampөчүрүү | 6 Amps |
| Жүктөө ылдамдыгы жок | 580-2650 RPM (5 settings) |
| Чак кубаттуулугу | 13 мм |
| Өзгөчө өзгөчөлүк | Variable Speed, Laser Guidance |
| Work Table Adjustment | Height adjustable, 0-45 degree angle adjustment |
Кепилдик жана колдоо
Кепилдик маалыматы:
Ferm products are manufactured to high quality standards and are guaranteed against defects in materials and workmanship. Please refer to the warranty card included with your product for specific terms and conditions, including warranty period and coverage details. Keep your purchase receipt as proof of purchase.
Кардарларды колдоо:
For technical assistance, spare parts, or warranty claims, please contact your local Ferm dealer or authorized service center. You can also visit the official Ferm webкөбүрөөк маалымат жана колдоо булактары үчүн сайт.
Note: Specific contact details are not provided in this manual. Please refer to your product packaging or the manufacturer's webакыркы колдоо маалымат үчүн сайт.