
1. Киришүү
This manual provides detailed instructions for the setup, operation, and maintenance of your Epson Expression 12000XL-GA Flatbed Scanner. Designed for graphic arts applications, this scanner offers professional-quality large-format scanning capabilities. Please read this manual thoroughly before using the product to ensure correct and safe operation.
2. Коопсуздук маалыматы
Observe the following safety precautions to prevent damage to the scanner or injury to yourself.
- Сканерди ар дайым жерге туташтырылган розеткага туташтырыңыз.
- Do not place the scanner in an unstable location where it could fall.
- Avoid exposing the scanner to direct sunlight, excessive heat, or moisture.
- Сканерди бөлүктөргө бөлүүгө же өзгөртүүгө аракет кылбаңыз. Бардык тейлөө иштерин квалификациялуу адистерге тапшырыңыз.
- Keep hands clear of the scanner's moving parts during operation.
- Сканер менен кошо берилген кубат адаптерин гана колдонуңуз.
3. Пакеттин мазмуну
Төмөндө тизмеленген нерселердин баары пакетиңизге камтылганын текшериңиз:
- Epson Expression 12000XL Graphic Arts color scanner
- LaserSoft Imaging SilverFast Ai software and 2x IT8 targets
- Hi-Speed USB cable
- Электр кабели
- Бул жерден баштаңыз плакат
4. Физикалык бүтүрүүview
Familiarize yourself with the scanner's components.

4.1-сүрөт: Фронт view of the Epson Expression 12000XL-GA Flatbed Scanner. This image displays the scanner's overall design, including the main body and the lid, with the Epson logo visible on the front panel.

4.2-сүрөт: Close-up of the scanner's control panel. This image highlights the "Ready" and "Error" indicator lights, along with a button for initiating scans.
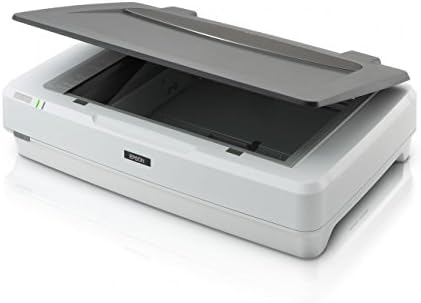
4.3-сүрөт: The Epson Expression 12000XL-GA Flatbed Scanner with its lid open, revealing the scanning platen. This view demonstrates the large scanning area available for documents and artwork.
5. Орнотуу
5.1. Аппараттык туташуу
- Сканерди таңгактан чыгаруу: Carefully remove the scanner from its packaging. Remove all protective materials and tape.
- Place the Scanner: Position the scanner on a stable, flat surface with adequate space for operation and ventilation.
- Кубат кабелин туташтыруу: Plug the power cable into the scanner's power port, then into a grounded electrical outlet.
- USB кабелин туташтыруу: Connect one end of the supplied Hi-Speed USB cable to the scanner's USB port and the other end to an available USB port on your computer.
- Күйгүзүү: Press the power button on the scanner. The "Ready" indicator light should illuminate.
5.2. Программалык камсыздоону орнотуу
To operate the scanner, you must install the necessary software on your computer.
- Insert Software CD/DVD: If provided, insert the software installation CD/DVD into your computer's optical drive.
- Download Software (Alternative): If no CD/DVD is available, or for the latest versions, visit the official Epson support website for the Expression 12000XL-GA model to download drivers and software, including Epson Scan utility and LaserSoft Imaging SilverFast Ai.
- Экрандагы нускамаларды аткарыңыз: Run the installer and follow the prompts to complete the software installation. This typically includes drivers, Epson Scan utility, and SilverFast Ai.
- Компьютерди кайра иштетүү: After installation, it is recommended to restart your computer to ensure all drivers are properly loaded.
6. Сканерди иштетүү
6.1. Сканерлөөнүн негизги жол-жобосу
- Документти даярдоо: Open the scanner lid and place the document or image face-down on the scanner glass, aligning it with the corner guide. Close the lid gently.
- Скандоочу программаны ишке киргизиңиз: Open the Epson Scan utility or LaserSoft Imaging SilverFast Ai software on your computer.
- Сканерлөө жөндөөлөрүн тандаңыз:
- Choose the scan mode (e.g., Professional Mode for detailed control).
- Set the resolution (e.g., 300 dpi for general documents, higher for detailed images). The scanner supports up to 2400 x 4800 dpi.
- Select the document type (e.g., color document, grayscale photo).
- Specify the scan area if not scanning the entire platen.
- Preview Scan (Optional): Click the "Preview" button to see a preliminary scan and make any necessary adjustments to the scan area or settings.
- Скандоону баштоо: Click the "Scan" button. The scanner will begin scanning the document.
- Сактоо File: After the scan is complete, a dialog box will appear, allowing you to choose the file format (e.g., JPEG, TIFF, PDF) and destination folder for your scanned image.
6.2. Өркүндөтүлгөн функциялар
- Large-Format Scanning: The scanner accommodates reflective media up to 12.2" x 17.2", ideal for large documents, artwork, and photographs.
- Жогорку чечим: Utilize the 2400 x 4800 dpi resolution and 3.8 Dmax for capturing fine details and a wide dynamic range.
- ColorTrue II Imaging System: This system enhances color accuracy and registration through superior image processing, a fast warm-up LED lamp, and Epson MatrixCCD technology.
- Easy Photo Fix Technology: For restoring faded color photos and negatives, this feature provides one-touch restoration and automatic dust removal.
- Пакеттик сканерлөө: Scan multiple printed images simultaneously and save them as individual files, improving workflow efficiency.
- SilverFast Ai Software: The included LaserSoft Imaging SilverFast Ai software offers advanced controls for professional-level image manipulation and color management. Refer to the SilverFast documentation for detailed usage.
7. Техникалык тейлөө
7.1. Сканерди тазалоо
Regular cleaning helps maintain optimal scan quality.
- Сырткы: Сканердин сыртын жумшак, d менен сүртүңүзamp кездеме. Абразивдүү тазалагычтардан же эриткичтерден качыңыз.
- Сканер айнек: Gently clean the scanner glass with a soft, lint-free cloth moistened with a small amount of glass cleaner. Do not spray cleaner directly onto the glass. Ensure the glass is dry before closing the lid or scanning.
- Чаңды тазалоо: Жетүү кыйын болгон жерлерден чаңды кетирүү үчүн кысылган аба баллонун колдонуңуз, күйүүчү майдын агып чыгышын алдын алуу үчүн баллонду тик кармап туруңуз.
Абайлаңыз: Тазалоодон мурун сканерди ар дайым өчүрүп, розеткадан ажыратыңыз.
8. Кыйынчылыктарды
Бул бөлүм сиз кабылышы мүмкүн болгон жалпы көйгөйлөрдү карайт.
8.1. Scanner Not Connecting or Not Recognized
- Кабелдерди текшерүү: USB кабелинин сканерге да, компьютерге да бекем туташтырылганын текшериңиз. Компьютериңиздеги башка USB портун колдонуп көрүңүз.
- Power Cycle: Turn off the scanner and your computer, then restart both.
- Драйверлерди кайра орнотуу: If the issue persists, uninstall and then reinstall the scanner drivers and software from the Epson support webсайт.
- Test USB Cable: If possible, try a different USB cable to rule out a faulty cable.
8.2. Скандоо сапаты начар
- Сканер айнегин тазалоо: Dust or smudges on the scanner glass can cause lines or blurry images. Refer to Section 7.1 for cleaning instructions.
- Орнотууларды тууралоо: Ensure the correct resolution, document type, and color settings are selected in your scanning software. Higher resolutions generally yield better quality but result in larger file өлчөмдөрү.
- Original Document Quality: The quality of the original document directly impacts the scan output.
8.3. Scanner Makes Unusual Noises
- Тоскоолдуктарды текшерүү: Ensure no foreign objects are inside the scanner.
- Кадимки операция: Some operational noises, such as the fan or scanning mechanism, are normal. Refer to the specifications for expected noise levels.
9. Техникалык шарттар
| Өзгөчөлүк | Спецификация |
|---|---|
| Модель аты | Epson Expression 12000XL-GA |
| Сканер түрү | Flatbed, Photo/Graphic Arts |
| оптикалык токтому | 2400 x 4800 dpi |
| Максималдуу скандоо аянты | 12.2" x 17.2" |
| Түс тереңдиги | 48 bits (input/output) |
| Байланыш | USB |
| Продукциянын өлчөмдөрү (D x W x Y) | 18" x 25.8" x 6.2" |
| Элемент Салмагы | 31.5 фунт |
| Энергияны керектөө | 55 ватт (иштетүү) |
| Биринчи жеткиликтүү күн | 24-январь, 2017-жыл |
10. Кепилдик жана колдоо
Кепилдик жөнүндө толук маалымат алуу үчүн, өнүмүңүз менен кошо берилген кепилдик картасын караңыз же расмий Epson дүкөнүнө баш багыңыз website. Epson provides technical support and customer service for its products.
- Онлайн колдоо: Visit Epson колдоо драйверлер, көп берилүүчү суроолор жана мүчүлүштүктөрдү оңдоо боюнча колдонмолор үчүн.
- Колдоо кызматы менен байланышуу: Refer to the Epson webсиздин аймагыңыздагы байланыш номерлери жана кызмат көрсөтүү мүмкүнчүлүктөрү үчүн сайт.