
1. Киришүү
This manual provides detailed instructions for the installation, operation, and maintenance of your ASRock AB350M-HDV MicroATX Motherboard. The ASRock AB350M-HDV is designed to support AMD Socket AM4 A-Series APUs (Bristol Ridge) and Ryzen Series CPUs (Summit Ridge), featuring a Digi Power design and 7 Power Phase design for stable performance. It supports DDR4 memory and offers various connectivity options including SATA3, USB 3.0, and an Ultra M.2 slot.
2. Продукт бүтүп калдыview
The ASRock AB350M-HDV motherboard is a MicroATX form factor board, ideal for compact PC builds. It features essential components for a modern computing system.

2.1-сүрөт: Бурчтуу view of the ASRock AB350M-HDV Motherboard, showcasing its compact MicroATX design and various components.
Негизги өзгөчөлүктөрү:
- Supports AMD Socket AM4 A-Series APUs (Bristol Ridge) and Ryzen Series CPUs (Summit Ridge).
- DDR4 memory support up to 3200+ (OC) for Ryzen CPUs and 2400 for A-series APUs.
- 1 PCIe 3.0 x16 slot and 1 PCIe 2.0 x1 slot for expansion cards.
- 4 SATA3 ports and 1 Ultra M.2 (PCIe Gen3 x4 & SATA3) slot for storage.
- 6 USB 3.0 ports (2 front, 4 rear) and 2 USB 2.0 ports for peripheral connectivity.
- Integrated Gigabit Ethernet for network connectivity.
- Video outputs: VGA, DVI, HDMI.

2.2-сүрөт: жогорудан ылдыйга view of the ASRock AB350M-HDV Motherboard, highlighting the CPU socket, RAM slots, M.2 slot, and PCIe slots.
3. Орнотуу жана орнотуу
Follow these steps carefully to install your ASRock AB350M-HDV motherboard and its components.
3.1 CPU орнотуу
- Motherboard AM4 CPU розеткасын табыңыз.
- Розетка капталындагы жүктөө рычагын көтөрүңүз.
- CPUдагы үч бурчтук белгини розеткадагы тиешелүү белги менен тууралаңыз. Процессорду мажбурлабастан розеткага этияттык менен салыңыз.
- CPUну ордуна коюу үчүн жүктөө рычагын түшүрүңүз.
- CPU муздаткычын өндүрүүчүнүн көрсөтмөлөрүнө ылайык орнотуңуз.
3.2 RAM (Memory) Installation
- Locate the DDR4 DIMM slots. This motherboard has 4 slots.
- DIMM уячасынын эки учундагы клиптерди ачыңыз.
- RAM модулундагы оюкту DIMM уячасындагы ачкыч менен тууралаңыз.
- Insert the RAM module firmly into the slot until the clips snap into place. Ensure both clips are closed.
3.3 Storage Device Installation (SATA & M.2)
SATA дисктери:
- SATA маалымат кабелинин бир учун энелик платадагы SATA3 портуна туташтырыңыз.
- Connect the other end of the SATA data cable to your hard drive or SSD.
- Кубат берүүчү блоктон (PSU) SATA кубат кабелин сактоочу түзмөгүңүзгө туташтырыңыз.
M.2 SSD:
- Locate the Ultra M.2 slot on the motherboard.
- Remove the M.2 screw and standoff from the slot.
- M.2 SSDди уячага 30 градустук бурч менен салыңыз.
- Push the M.2 SSD down and secure it with the screw and standoff.
3.4 Кубат туташтыруу
- 24-пин ATX кубат туташтыргычын PSUңуздан энелик платадагы 24-пин электр розеткасына туташтырыңыз.
- Connect the 8-pin (or 4-pin) ATX 12V power connector from your PSU to the corresponding socket near the CPU.
3.5 Front Panel Connections
Connect the cables from your PC case (Power Button, Reset Button, HDD LED, Power LED, USB, Audio) to the corresponding headers on the motherboard. Refer to the motherboard layout diagram in your physical manual for exact header locations.
3.6 Графикалык картаны орнотуу
- PCIe 3.0 x16 уячасын табыңыз.
- Тийиштүү кеңейтүү уячасынын капкагын компьютериңиздин корпусунан алып салыңыз.
- Align the graphics card with the PCIe slot and press it down firmly until it clicks into place.
- Графикалык картаны бурама менен корпуска бекитиңиз.
- Connect any required PCIe power cables from your PSU to the graphics card.
4. Иштөө нускамалары
4.1 Биринчи жүктөө жана BIOS/UEFI орнотуу
- Бардык компоненттерди чогулткандан кийин, мониторуңузду, клавиатураңызды жана чычканыңызды туташтырыңыз.
- Системаңызды күйгүзүңүз.
- Ишке киргизүү учурунда баскычты кайра-кайра басыңыз DEL or F2 BIOS/UEFI орнотуу программасына кирүү үчүн баскыч.
- In the BIOS, you can configure boot order, system time, and other advanced settings. Save changes and exit to boot into your operating system installation media.
4.2 Драйверди орнотуу
After installing your operating system, install the necessary drivers for the motherboard components. These typically include chipset drivers, audio drivers, LAN drivers, and any specific utility drivers. Drivers can be found on the ASRock official webсиздин белгилүү бир энелик плата моделиңиз үчүн сайт.
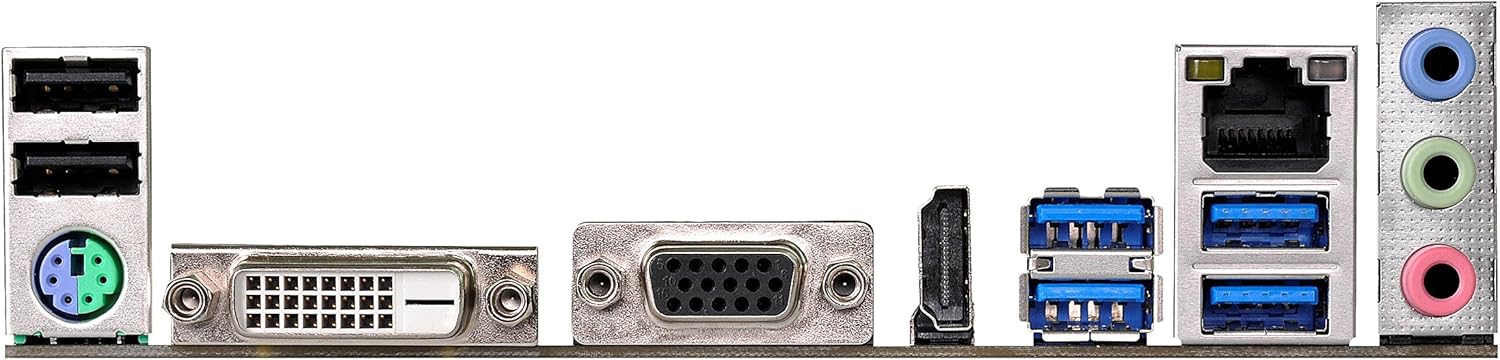
Figure 4.1: Rear I/O panel of the ASRock AB350M-HDV Motherboard, showing USB ports, video outputs (VGA, DVI, HDMI), LAN port, and audio jacks.
5. Техникалык тейлөө
Туура тейлөө сиздин Motherboard узак жана оптималдуу иштешин камсыз кылат.
5.1 Тазалоо
- Кысылган абаны колдонуп, энелик платадан жана компоненттерден чаңды дайыма тазалап туруңуз.
- Тазалоодон мурун системанын өчүрүлгөнүн жана розеткадан ажыратылганын текшериңиз.
- Суюк тазалагычтарды түздөн-түз компоненттерге колдонуудан алыс болуңуз.
5.2 BIOS/UEFI жаңыртуулары
ASRockту мезгил-мезгили менен текшерип туруңуз website for BIOS/UEFI updates. Updates can improve compatibility, stability, and performance. Follow the instructions provided by ASRock carefully when performing a BIOS update to avoid system damage.
6. Кыйынчылыктарды
Бул бөлүмдө сиз кабылышы мүмкүн болгон жалпы маселелерди чечүү жолдору каралган.
6.1 Кубат жок / POST жок (Күчтү иштетүү өзүн-өзү сыноо)
- Электр байланыштарын текшерүү: Ensure the 24-pin and 8-pin (or 4-pin) CPU power connectors are securely seated.
- Электр кубатын текшерүү: Test your power supply unit (PSU) to ensure it is functional and providing adequate power.
- Reseat компоненттери: Remove and re-install the CPU, RAM, and graphics card to ensure they are properly seated.
- CMOS тазалоо: Refer to your physical manual for instructions on how to clear the CMOS (Complementary Metal-Oxide-Semiconductor) settings, which can resolve boot issues.
6.2 Display Output жок
- Монитор туташуу: Ensure your monitor is correctly connected to the graphics card or motherboard (if using an APU with integrated graphics).
- Графикалык карта: If using a dedicated graphics card, ensure it is properly installed and has sufficient power. Test with another graphics card if possible.
- APU Compatibility: If using an AMD A-Series APU, ensure your monitor is connected to the motherboard's video outputs (VGA, DVI, HDMI). Ryzen CPUs without integrated graphics require a dedicated graphics card.
6.3 Operating System Not Booting
- Жүктөө тартиби: Check the BIOS/UEFI settings to ensure the correct boot device (e.g., SSD/HDD with OS) is prioritized.
- Сактагыч түзмөк: Verify that your storage device is detected in the BIOS.
- ОС орнотуу: If the OS is newly installed, ensure the installation process completed successfully.
7. Техникалык шарттар
| Бренд | ASRock |
| Модель аты | AB350M-HDV |
| CPU розетка | Розетка AM4 |
| Чипсет түрү | AMD Promontory B350 |
| Шайкеш процессорлор | AMD A-Series APUs (Bristol Ridge), Ryzen Series CPUs (Summit Ridge) |
| RAM эс технологиясы | DDR4 |
| Memory Clock Speed | 2133 MHz (Base), up to 3200+ (OC) for Ryzen CPU |
| Эстутум Slots Жеткиликтүү | 4 |
| Графикалык карта интерфейси | PCI Express (1x PCIe 3.0 x16, 1x PCIe 2.0 x1) |
| Total SATA Ports | 4 (SATA3) |
| M.2 Slot | 1 (Ultra M.2, PCIe Gen3 x4 & SATA3) |
| Жалпы USB порттору | 8 (6x USB 3.0, 2x USB 2.0) |
| Video Outputs | VGA, DVI, HDMI |
| Негизги электр туташтыргычынын түрү | 24-пин ATX |
| Форма фактору | MicroATX |
| Элемент Салмагы | 1.3 фунт |
8. Кепилдик маалыматы
The ASRock AB350M-HDV Motherboard comes with a 1 жылдык кепилдик. For specific terms and conditions, please refer to the warranty card included with your product or visit the official ASRock webсайт.
9. Колдоо
For further assistance, technical support, or driver downloads, please visit the official ASRock webсайт:
You can also find contact information for customer service and support resources on their webсайт.