NEWTRY 6108
NEWTRY Pneumatic Rivet Nut Setting Kit 6108 User Manual
Model: 6108 (M6, M8, M10 Heads)
1. Киришүү
Thank you for choosing the NEWTRY Pneumatic Rivet Nut Setting Kit Model 6108. This tool is designed for efficient and reliable installation of rivet nuts in various applications. This manual provides essential information for the safe and effective operation, maintenance, and troubleshooting of your pneumatic rivet nut setter. Please read this manual thoroughly before use and retain it for future reference.

Сүрөт 1: Бүттүview of the NEWTRY Pneumatic Rivet Nut Setting Kit 6108, showing the main tool, M6, M8, M10 heads, and a wrench.
2. Коопсуздук нускамалары
Жеке жаракат алуу жана шаймандын бузулуу коркунучун азайтуу үчүн ар дайым негизги коопсуздук чараларын сактаңыз. Бул көрсөтмөлөрдү аткарбоо олуттуу жаракатка алып келиши мүмкүн.
- Көздү коргоону кийүү: Ар дайым ANSI тарабынан бекитилген коргоочу көз айнекти же каптал калканчтары бар коргоочу көз айнекти тагыныңыз.
- Угуу коргоочу аппаратты кийүү: Узакка созулган ызы-чуу угууга зыян келтириши мүмкүн.
- Колду коргоо үчүн кийим кийиңиз: Use appropriate gloves to protect hands from injury.
- Таза иш аянтын сактоо: Башаламан жерлер кырсыкка чакырат.
- Ашыкча жетпе: Ар дайым туура бутту жана тең салмактуулукту сактаңыз.
- Аба менен камсыздоону өчүрүү: Always disconnect the air supply before making adjustments, changing accessories, or servicing the tool.
- Туура аба басымын колдонуу: Ensure the air supply pressure does not exceed the maximum recommended pressure for the tool.
- Колдонуудан мурун куралды текшериңиз: Check for damaged parts, misalignment, or any other condition that may affect its operation.
- Балдарды алыс кармаңыз: Балдарга же үйрөтүлбөгөн адамдарга аспапты иштетүүгө уруксат бербеңиз.
3. Продукциянын компоненттери жана түзүмү
Familiarize yourself with the various parts of your NEWTRY pneumatic rivet nut setting tool for proper operation and maintenance.

Image 2: Detailed diagram illustrating the main components of the pneumatic rivet nut tool.
- Frosted Alloy Steel Shell: Provides a durable and ergonomic grip.
- Polished Alloy Steel Shell: Ички механизмдерди камтыйт.
- Которуштурууну баштоо: Activates the tool's operation.
- Air Regulating Valve: Controls the air flow and pressure.
- 1/4 Gas Pipe Joint: Connection point for the air supply hose.
- Чыгаруучу клапан: Releases air during operation.
- Gun Heads (M6, M8, M10): Interchangeable heads for different rivet nut sizes.
- Hexagon Wrench: Used for changing gun heads.

Сүрөт 3: Жарылып кеткен view of the gun head assembly, detailing internal components like the pull rod, bearings, and gaskets.
4. Setup and Head Installation
Before operating the tool, ensure the correct rivet nut head is installed and the air supply is properly connected.
4.1 Аба менен камсыздоону туташтыруу
- Ensure the air compressor is off and depressurized.
- Connect a 1/4-inch air hose to the 1/4 Gas Pipe Joint on the tool.
- Set the air compressor pressure to the recommended operating range (refer to specifications).
- Аба компрессорун күйгүзүңүз.
4.2 Changing Rivet Nut Heads
The NEWTRY 6108 kit includes M6, M8, and M10 self-locking gun heads for quick replacement.
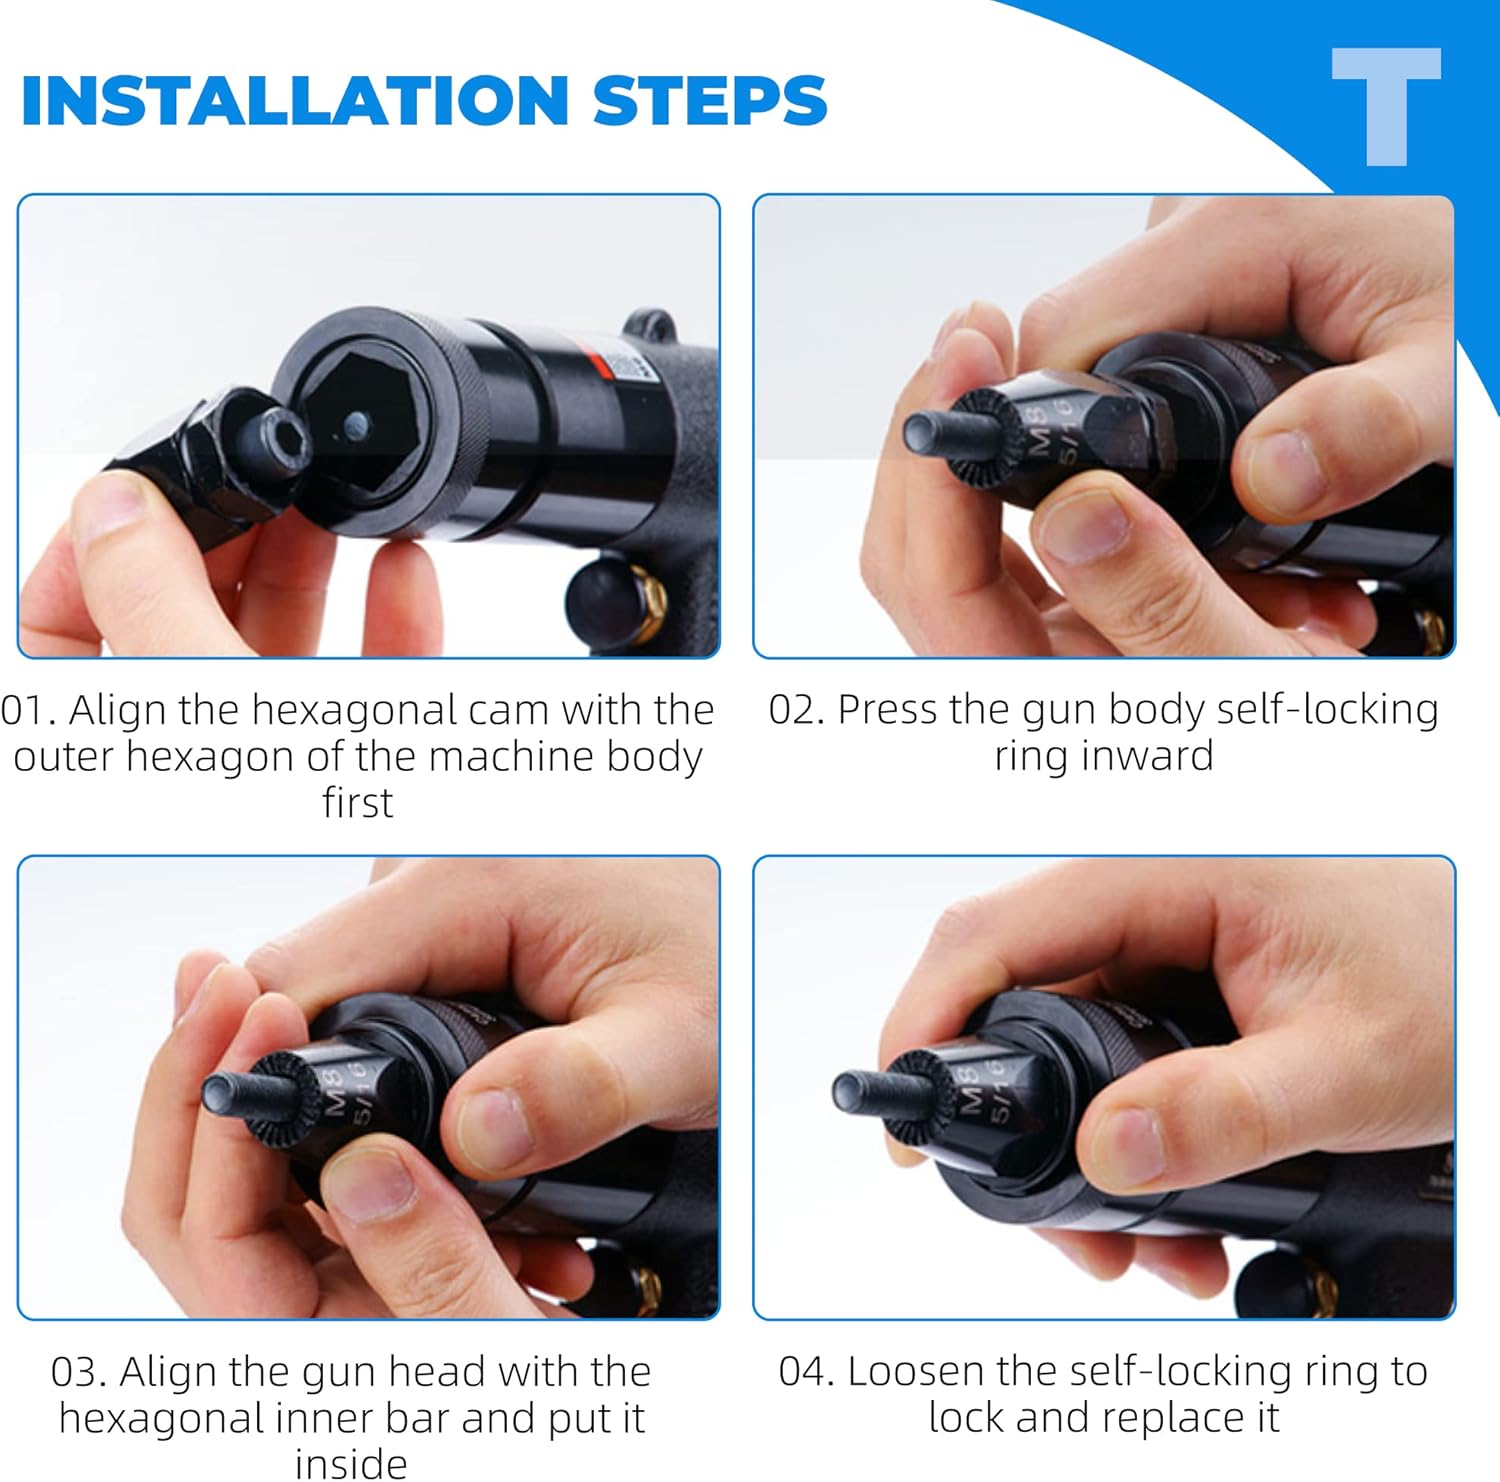
Image 4: Step-by-step guide for installing or changing the rivet nut gun head.
- Аба менен камсыздоону өчүрүү: Always disconnect the air hose from the tool before changing heads.
- Remove Current Head (if applicable): If a head is already installed, press the gun body's self-locking ring inward and unscrew the head.
- Align Hexagonal Cam: Align the hexagonal cam of the desired gun head (M6, M8, or M10) with the outer hexagon of the machine body.
- Press Self-Locking Ring: Press the gun body's self-locking ring inward.
- Insert Gun Head: Align the gun head with the hexagonal inner bar and push it firmly into place.
- Коопсуз баш: Loosen the self-locking ring to lock the gun head securely. Ensure it is fully seated and cannot be easily pulled out.
5. Иштөө нускамалары
Follow these steps for effective and safe operation of your pneumatic rivet nut setter.

Image 5: The tool in action, demonstrating its ease of use and automatic retraction feature.
- Select Correct Head: Ensure the appropriate M6, M8, or M10 head is installed for your rivet nut size.
- Thread Rivet Nut: Thread the rivet nut onto the mandrel of the installed gun head.
- Insert into Workpiece: Insert the rivet nut into the pre-drilled hole in your workpiece.
- Куралды активдештирүү: Press the start switch to activate the tool. The tool will pull the rivet nut, deforming it to create a secure thread in the material.
- Автоматтык баш тартуу: After the rivet nut is fully deformed and set, the rod will automatically retract, releasing the tool from the installed rivet nut.
- Орнотууну текшерүү: Verify that the rivet nut is securely fastened and properly set.
5.1 Колдонуу сценарийлери
This tool is suitable for various applications including home construction, decoration, assembly, automotive parts, box manufacturing, and aviation riveting.
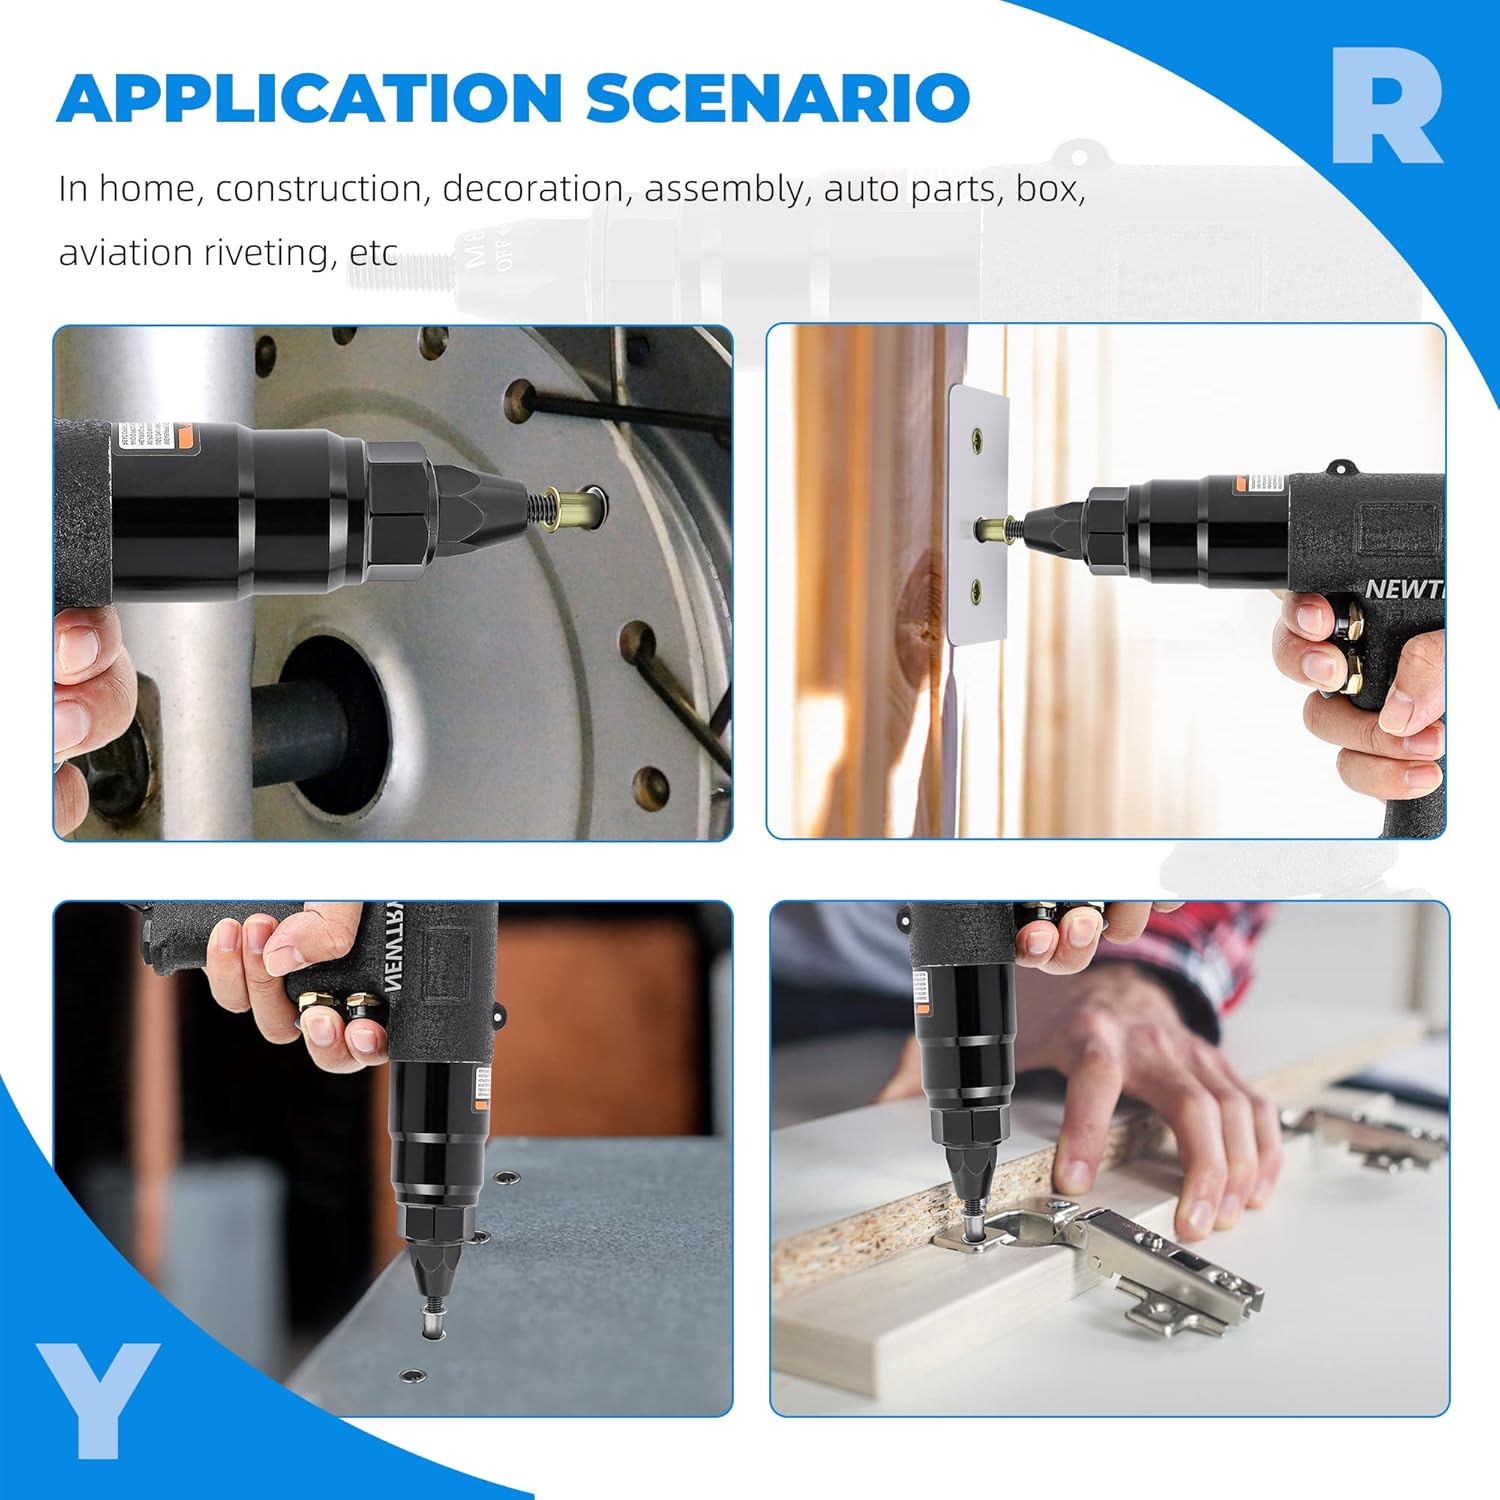
Сүрөт 6: Мисamples of where the pneumatic rivet nut tool can be effectively used.
6. Техникалык тейлөө
Үзгүлтүксүз техникалык тейлөө куралыңыздын узак мөөнөттүү жана оптималдуу иштешин камсыз кылат.
- Майлоо: Apply a few drops of pneumatic tool oil into the air inlet before and after each use.
- Тазалоо: Куралды таза жана таштандылардан таза кармаңыз. Сыртын таза чүпүрөк менен сүртүңүз.
- Сактагыч: Store the tool in a dry, clean environment away from direct sunlight and extreme temperatures.
- Inspect Air Hose: Regularly check the air hose for wear, cuts, or leaks. Replace if damaged.
- Check Gun Heads: Inspect gun heads for wear or damage. Replace worn heads to ensure proper rivet nut setting.
7. Кыйынчылыктарды
Жалпы маселелер жана алардын чечимдери үчүн бул бөлүмдү караңыз.
| Көйгөй | Мүмкүн себеп | Чечим |
|---|---|---|
| Курал иштебейт же начар иштейт. | Low air pressure; air leak; clogged air inlet; insufficient lubrication. | Check air compressor pressure; inspect air hose connections; clean air inlet; lubricate tool. |
| Rivet nut not setting properly or spinning. | Incorrect gun head size; worn gun head; low air pressure; poor quality rivet nut. | Ensure correct head for rivet nut size; replace worn head; check air pressure; use high-quality rivet nuts. |
| Аспаптан аба агып жатат. | бош байланыштар; бузулган O-шакекчелер же пломбалар. | Tighten connections; inspect and replace damaged seals. |
If problems persist after attempting these solutions, please contact NEWTRY customer support.
8. Техникалык шарттар
| Өзгөчөлүк | Деталь |
|---|---|
| Модел | 6108 (YX-306) |
| Applicable Rivet Nut Sizes | М6, М8, М10 |
| Аба керектөө | 5 CFM (approximate, for similar models) |
| Rotation Speed (6108) | 400 RPM |
| Пакеттин өлчөмдөрү | 26 x 23 x 6.7 см |
| Салмагы | 1.94 кг |
| Өндүрүүчү | NEWTRY |
Эскертүү: Техникалык мүнөздөмөлөр продуктуну жакшыртуу үчүн эскертүүсүз өзгөртүлүшү мүмкүн.
9. Кепилдик маалыматы
NEWTRY products are manufactured to high-quality standards. For specific warranty details, including coverage period and terms, please refer to the warranty card included with your purchase or visit the official NEWTRY webсайт. Ар кандай кепилдик дооматтары үчүн сатып алганыңыздын далилин сактаңыз.
10. Кардарларды колдоо кызматы
For technical assistance, spare parts, or any inquiries regarding your NEWTRY Pneumatic Rivet Nut Setting Kit, please contact NEWTRY customer service. Contact information can typically be found on the product packaging, the official NEWTRY webсайт, же сатып алуу пункту аркылуу.
зыярат кылыңыз NEWTRY Store on Amazon көбүрөөк өнүмдөр жана маалымат үчүн.
Ask a question about this manual
Ask about setup, troubleshooting, compatibility, parts, safety, or missing instructions. Manuals+ will review the question and use this page’s manual context to help answer it.