
1. Киришүү
This manual provides detailed instructions for the installation, operation, and maintenance of the Fanvil I12 SIP Audio Intercom. The Fanvil I12 series SIP intercom devices integrate IP technology with industrial intercom functionalities, making them suitable for various application scenarios such as banks, schools, mining facilities, and urban environments.
2. Продукт бүтүп калдыview
The Fanvil I12 is a robust SIP audio intercom designed for reliable communication and security applications. It features a durable build and supports standard SIP protocols for easy integration into existing IP communication systems.
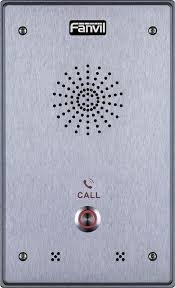
Сүрөт 1: Алдыңкы view of the Fanvil I12 SIP Audio Intercom, showing the speaker and microphone grille.
3. Негизги өзгөчөлүктөрү
- Supports two output short circuits for video surveillance and alarm light integration.
- Includes two input short circuits for connecting a door phone button and an emergency button.
- Features a REC out connect port for audio input to cameras or digital recording equipment, enabling 24-hour monitoring.
- Allows connection to an active speaker or loudspeaker for broadcasting messages or music.
- Designed with the SIP communication protocol for broad compatibility and flexible system integration.
- Suitable for diverse environments and application scenarios.
4. Орнотуу жана орнотуу
Before beginning installation, ensure all components are present and the installation environment meets the product's requirements.
4.1. Пакеттин мазмуну
Verify that your package contains the Fanvil I12 unit, mounting hardware, and any included documentation.
4.2. Аппаратты орнотуу
- Choose a suitable mounting location, ensuring it is secure and provides clear audio transmission.
- Use the provided mounting template (if applicable) to mark drilling points on the wall or surface.
- Тешиктерди бургула жана зарыл болсо, дубал анкерлерин салгыла.
- Secure the mounting bracket (if separate) to the surface.
- Attach the Fanvil I12 unit to the mounting bracket or directly to the surface using the appropriate screws.
4.3. Зымдар жана байланыштар
- Тармак туташуусу: Connect an Ethernet cable from your network switch or router to the LAN port on the I12. Ensure Power over Ethernet (PoE) is available if not using a separate power adapter.
- Электр камсыздоо: If PoE is not used, connect a compatible DC power adapter (not included) to the power input port.
- Short Circuit Outputs: Connect surveillance cameras or alarm lights to the designated output short circuit terminals as required.
- Short Circuit Inputs: Connect a door phone button or emergency button to the input short circuit terminals.
- REC Out: Connect to the audio input of a camera or digital recorder for continuous monitoring.
- Тышкы баяндамачы: Connect an active speaker or loudspeaker to the appropriate audio output terminals for public address functionality.
4.4. Баштапкы конфигурация
- Once powered on and connected to the network, the device will obtain an IP address (via DHCP by default).
- Use a network scanner tool or check your router's DHCP client list to find the IP address of the I12.
- ачуу а web browser and enter the IP address to access the device's web- негизделген башкаруу интерфейси.
- Log in using the default username and password (refer to the separate quick installation guide or manufacturer's website for default credentials).
- Configure SIP account details, network settings, and any specific intercom functionalities as per your system requirements.
5. Иштөө нускамалары
5.1. Чалуу
To initiate a call from the Fanvil I12, press the designated call button (if configured). The intercom will dial the pre-programmed SIP extension or number. Wait for the recipient to answer.
5.2. Чакырууну кабыл алуу
When an incoming call is received, the intercom will ring or provide an audio alert. The call is typically answered automatically or by pressing the call button again, depending on configuration.
5.3. Door Control (if configured)
If the I12 is integrated with a door access system, a DTMF code can be entered during an active call to remotely unlock a door. Consult your system administrator for the specific DTMF code.
5.4. Public Address (PA) Function
If connected to an external loudspeaker, the I12 can be used for public address announcements. This functionality is typically initiated from a connected SIP phone or control system by dialing a specific extension associated with the I12's PA feature.
6. Техникалык тейлөө
6.1. Тазалоо
Regularly clean the exterior of the intercom with a soft, dry cloth. Do not use abrasive cleaners or solvents, as these can damage the finish. Ensure no liquids enter the device.
6.2. Микропрограмманы жаңыртуу
Мезгил-мезгили менен Fanvil кызматкерин текшерип туруңуз webмикропрограммалык камсыздоону жаңыртуу сайты. Микропрограммалык камсыздоону жаңыртуу жаңы функцияларды, иштин натыйжалуулугун жакшыртууларды жана коопсуздукту жакшыртууларды камсыз кыла алат. Always follow the manufacturer's instructions precisely when performing firmware updates to avoid damaging the device.
6.3. Экологиялык эске алуулар
Ensure the intercom is operating within its specified temperature and humidity ranges. Protect the device from direct sunlight, excessive moisture, and extreme temperatures.
7. Кыйынчылыктарды
- Кубат жок: Check the power connection. If using PoE, ensure the network switch port provides PoE. If using a power adapter, verify it is correctly plugged in and functional.
- Тармакка туташуу жок: Verify the Ethernet cable is securely connected. Check network switch status and ensure the device has a valid IP address. Try restarting the device and the network switch.
- Чалууларды кабыл алуу/кабыл алуу мүмкүн эмес: Confirm SIP registration status in the web interface. Check SIP account credentials and network firewall settings. Ensure the SIP server is reachable.
- Начар аудио сапаты: Check microphone and speaker for obstructions. Ensure network bandwidth is sufficient for VoIP traffic.
- Баскычтар жооп бербейт: Perform a soft reboot of the device. If the issue persists, check for physical damage or contact support.
If problems persist after attempting these troubleshooting steps, contact Fanvil technical support or your system integrator.
8. Техникалык шарттар
| Өзгөчөлүк | Деталь |
|---|---|
| Продукциянын өлчөмдөрү | 5.91 x 5.91 x 3.15 дюйм |
| Элемент Салмагы | 1.32 фунт |
| Элемент моделинин номери | I12 |
| ASIN | B07CM7MF5H |
| Өндүрүүчү | Fanvil |
| Дата биринчи жеткиликтүү | 24-апрель, 2018-жыл |
9. Кепилдик жана колдоо
Кепилдиктин толук маалыматын алуу үчүн продуктуңузга кошулган кепилдик картасын караңыз же расмий Fanvilге баш багыңыз webсайт. Кепилдиктин шарттары аймакка жана сатуучуга жараша өзгөрүшү мүмкүн.
For technical support, product inquiries, or service requests, please contact Fanvil customer support through their official webсайт же продукт документациясында көрсөтүлгөн байланыш маалыматы.
Фанвилдин расмий өкүлү Webсайт: www.fanvil.com