
Introduction
This manual provides comprehensive instructions for the safe and efficient operation of your Uten 16-Stitch Electric Sewing Machine, Model FR machine a coudre 508. Designed for both beginners and experienced users, this portable machine offers 16 built-in stitch patterns, double thread, and double speed functionality for a variety of sewing projects. Please read this manual thoroughly before first use and keep it for future reference.
Маанилүү коопсуздук нускамалары
- Always unplug the sewing machine from the electrical outlet immediately after use and before cleaning, servicing, or removing any parts.
- Keep fingers away from the needle, hand wheel, and other moving parts during operation.
- Never operate the machine with any air openings blocked. Keep ventilation openings of the sewing machine free from lint, dust, and loose cloth.
- Use only the power adapter supplied with the machine.
- Балдарга машинаны көзөмөлсүз иштетүүгө жол бербеңиз.
- Эч качан эч кандай тешикке эч кандай нерсени түшүрбөңүз же салбаңыз.
- Сыртта колдонбоңуз.
- Аэрозоль (спрей) продуктулары колдонулган же кычкылтек берилип жаткан жерде иштебеңиз.
- Өчүрүү үчүн бардык башкаруу элементтерин өчүк абалына буруңуз, андан соң сайгычты розеткадан чыгарыңыз.
Продукт компоненттери
Familiarize yourself with the various parts of your sewing machine before operation.
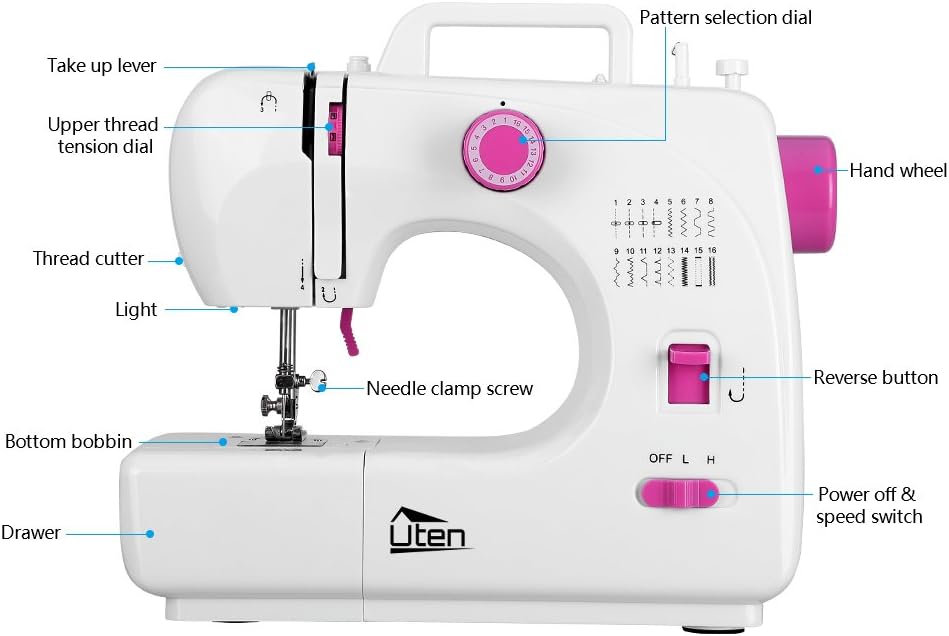
Figure 1: Front Components Overview
This image highlights the main operational parts on the front of the sewing machine, including the take-up lever, thread tension dial, thread cutter, light, needle clamp screw, bottom bobbin area, accessory drawer, pattern selection dial, hand wheel, reverse button, and power/speed switch.

Figure 2: Top and Rear Components Overview
This image shows the components located on the top and rear of the sewing machine, such as the bobbin winder pin, bobbin winder stop, bobbin winder tension disk, presser foot lifter, presser foot, foot pedal input, and DC power input.
Жайгашуу
1. Power Connection
- Ensure the machine is switched off (Power off & speed switch in 'OFF' position).
- Connect the foot pedal cable to the 'FOOT PEDAL' input on the side of the machine.
- Connect the power adapter cable to the 'DC 12V 1.5A' input.
- Кубат адаптерин ылайыктуу электр розеткасына сайыңыз.

Figure 3: Power and Foot Pedal Connection
This image illustrates how to connect the foot pedal and the DC power adapter to the respective input ports on the side of the sewing machine.
2. Бобин орогусу
- Спулдун төөнөгүчтүн үстүнө жиптин катушкасын коюңуз.
- Guide the thread through the bobbin winder tension disk.
- Бобин орогучтун төөнөгүчүнө бош бобинди коюңуз.
- Wind the thread clockwise around the bobbin a few times manually.
- Push the bobbin winder pin to the right.
- Turn on the machine and press the foot pedal (or use the speed switch) to start winding. Stop when the bobbin is full.
- Cut the thread and push the bobbin winder pin back to the left. Remove the wound bobbin.
3. Upper Threading
- Басуучу бут көтөргүчтү көтөрүңүз.
- Raise the needle to its highest position by turning the hand wheel towards you.
- Спулдун төөнөгүчтүн үстүнө жиптин катушкасын коюңуз.
- Жипти биринчи жип багыттоочусу аркылуу өткөрүңүз.
- Pass the thread down through the tension control assembly.
- Guide the thread up and through the take-up lever from right to left.
- Жипти калган жип багыттагычтары аркылуу ылдый карай өткөрүңүз.
- Thread the needle from front to back. Pull about 15 cm (6 inches) of thread through the needle eye.
4. Lower Bobbin Insertion
- Бобин капкагын ачыңыз.
- Оролгон катушканы катушканын кутусуна салып, жип саат жебесине каршы тараганын текшериңиз.
- Pull the thread through the small slot in the bobbin case.
- Hold the upper thread lightly with one hand. Turn the hand wheel towards you to lower and raise the needle. The needle will catch the bobbin thread and bring it up through the needle plate.
- Pull both upper and lower threads to the back under the presser foot.
- Бобин капкагын жабыңыз.
Иштөө нускамалары
1. Turning On/Off and Speed Selection
- To turn on the machine, slide the 'Power off & speed switch' to 'L' (Low speed) or 'H' (High speed).
- To turn off the machine, slide the switch to 'OFF'.
- The machine can be operated either by the foot pedal or by the speed switch. When using the foot pedal, ensure the speed switch is in 'OFF' position.
2. Stitch Pattern Selection
- Turn the 'Pattern selection dial' to choose one of the 16 available stitch patterns.
- Ensure the needle is in its highest position before changing stitch patterns to prevent needle breakage.

Figure 4: Stitch Pattern Selection
This image displays the stitch pattern selection dial and a visual guide to the 16 built-in stitch patterns available on the machine.
3. Тескери тигүү
- To reinforce the beginning and end of a seam, press and hold the 'Reverse button'. The machine will sew backward.
- Release the button to resume forward sewing.
4. Тигүү негиздери
- Кездемени басуучу буттун астына кой.
- Басуучу бут көтөргүчтү түшүрүңүз.
- Slowly press the foot pedal or slide the speed switch to 'L' or 'H' to start sewing.
- Guide the fabric gently with both hands, keeping it flat. Do not pull or push the fabric forcefully.
- Бүткөндөн кийин, ийнени эң жогорку абалга көтөрүңүз, басуучу бутту көтөрүңүз жана кездемени акырын тартып алыңыз.
- Use the 'Thread cutter' on the side of the machine to cut the threads.
5. Using the Sewing Light
- The built-in light illuminates the sewing area for better visibility. It turns on automatically when the machine is powered on.
Техникалык тейлөө
1. Тазалоо
- Тазалоодон мурун ар дайым машинаны розеткадан ажыратыңыз.
- Жумшак щетканы колдонуңуз, бобин аянтындагы түктөрдү жана чаңды тазалаңыз жана иттерге тамак бериңиз.
- Машинанын сыртын жумшак менен сүртүңүз, гamp кездеме. Катуу химиялык заттарды колдонбоңуз.
2. Ийне алмаштыруу
- Машинанын розеткадан ажыратылганын текшериңиз.
- Ийне клинасын бошотуңузamp screw by turning it counter-clockwise.
- Эски ийнени алып салыңыз.
- Жаңы ийнени жалпак тарабын машинанын артына каратып, мүмкүн болушунча өйдө түртүңүз.
- Ийне clamp коопсуз бураңыз.
3. Presser Foot Replacement
- Машинанын розеткадан ажыратылганын текшериңиз.
- Басуучу бут көтөргүчтү көтөрүңүз.
- Press the presser foot release lever (usually located at the back of the presser foot holder) to detach the current presser foot.
- Align the new presser foot with the presser foot holder and lower the presser foot lifter until it snaps into place.
Проблемаларды чечүү
| Көйгөй | Мүмкүн себеп | Чечим |
|---|---|---|
| Машина иштебейт | Power not connected; Speed switch in 'OFF' position; Foot pedal not connected or faulty. | Check power adapter and foot pedal connections. Ensure speed switch is set to 'L' or 'H' (if not using foot pedal) or 'OFF' (if using foot pedal). |
| Өткөрүлгөн тигиштер | Incorrect needle size or type; Needle bent or dull; Incorrect threading; Fabric too thick. | Replace needle with correct type/size. Re-thread the machine carefully. Use appropriate needle for fabric thickness. |
| Жип үзүлөт | Incorrect thread tension; Poor quality thread; Needle bent or dull; Incorrect threading. | Adjust upper thread tension. Use good quality thread. Replace needle. Re-thread the machine. |
| Fabric puckering | Thread tension too high; Stitch length too short for fabric. | Reduce upper thread tension. Increase stitch length. |
| Bobbin thread tangles | Bobbin incorrectly inserted; Upper thread tension too loose. | Re-insert bobbin correctly, ensuring thread unwinds counter-clockwise. Increase upper thread tension. |
Техникалык шарттар
- Бренд: Uten
- Модел: FR machine a coudre 508
- Түсү: Ак
- Материал: Дат баспас болоттон жасалган, пластик
- Продукт Салмагы: 7.5 фунт (болжол менен 3.4 кг)
- Кубат булагы: Electric (Cable)
- Тигүү үлгүлөрү: 16 камтылган
- Өзгөчөлүктөрү: Double thread, Double speed, Reverse sewing, Built-in light, Replaceable presser foot
Кепилдик жана колдоо
Information regarding product warranty and customer support was not provided in the product details. Please refer to your purchase documentation or contact the retailer for specific warranty terms and support options.