1. Киришүү
This manual provides detailed instructions for the installation, configuration, operation, and maintenance of the TP-Link CPE610 5GHz 300Mbps 23dBi Outdoor CPE/Access Point. The CPE610 is designed for outdoor wireless networking applications, offering excellent beam directivity, improved latency, and noise immunity with its high-gain directional 2x2 MIMO cassegrain antenna and dedicated metal reflector.
Proper setup, grounding, and cable shielding are essential for protection against lightning and electrostatic discharge. Consult an IT professional for assistance if needed.
2. Пакеттин мазмуну
Төмөндө көрсөтүлгөн бардык буюмдар таңгагыңызда бар экенин текшериңиз. Эгерде кандайдыр бир буюм жок болсо же бузулуп калса, сатуучуга кайрылыңыз.
- TP-Link CPE610 Outdoor CPE Unit
- 24V 0.5A пассивдүү PoE адаптери
- AC Power Cord
- Уюлдук монтаждоо кайыштары
- Орнотуу боюнча колдонмо
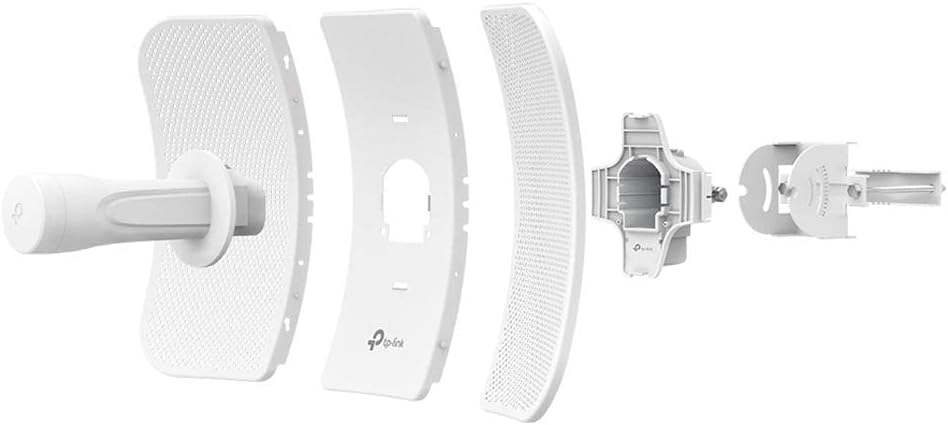
This image displays the individual components of the TP-Link CPE610, including the main antenna unit, the reflector panels, and the mounting bracket with its associated hardware.
3. Орнотуу жана орнотуу
Follow these steps for proper installation and initial setup of your CPE610.
3.1 Аппараттык камсыздоону орнотуу
- Assemble the CPE Unit: Attach the reflector panels to the main CPE unit. Ensure all parts are securely fastened.
- Монтаждоо: Use the provided pole mounting straps to secure the CPE610 to a pole or mast. Ensure the device is positioned for clear line-of-sight to the target area.
- PoE адаптерин туташтырыңыз: Connect an Ethernet cable from the CPE610's Ethernet port to the "PoE" port on the 24V 0.5A Passive PoE Adapter.
- Тармакка туташуу: Connect another Ethernet cable from the "LAN" port on the PoE Adapter to your computer or network switch/router.
- Күйгүзүү: Connect the AC power cord to the PoE Adapter and then to a power outlet. The device will power on.

This image shows the TP-Link CPE610 with its adjustable mounting bracket, illustrating how it attaches to a pole for outdoor deployment.
3.2 Initial Configuration (PharOS Web Интерфейс)
The CPE610 is managed via the PharOS web интерфейс.
- Prepare your Computer: Before connecting, set your computer's IP address manually to
192.168.0.10ички түйүн маскасы менен255.255.255.0. - Access PharOS: ачуу а web браузер жана багыттоо
http://192.168.0.254. - Кирүү: The default username and password are
admin. You will be prompted to change the password upon first login. - Ыкчам орнотуу: Use the Quick Setup wizard to configure the device.
- Select the desired operating mode (e.g., Access Point, Client, Repeater, Bridge).
- Configure wireless settings such as SSID, security type (WPA2-PSK recommended), and password.
- Adjust network settings, including IP address, subnet mask, and gateway, to match your network infrastructure.
- Жөндөөлөрдү сактоо: Apply and save all configurations.
- Restore Computer IP: Change your computer's IP address back to DHCP (automatic) or its original static IP.
Эскертүү: For client mode setup, especially with mesh networks like Google Wifi, it may be necessary to disable WDS (Wireless Distribution System) in the CPE610's settings for proper connectivity.
4. Operating the CPE610
Once configured, the CPE610 operates autonomously. You can monitor its status and adjust settings via the PharOS web интерфейс.
4.1 Мониторингдин абалы
- Статус барагы: The PharOS Status page provides real-time information on wireless connection, network traffic, and system logs.
- Сигнал күчү: Regularly check the signal strength indicators to ensure optimal performance, especially after initial installation or environmental changes.
4.2 Өркүндөтүлгөн жөндөөлөр
The PharOS interface offers advanced options for fine-tuning performance:
- Өткөргүч кубаттуулугу: Adjust the transmission power (0 to 27dBm/500mW) to comply with local regulations and optimize range.
- Pharos MAXtream TDMA: Enable this technology for improved throughput, capacity, and reduced latency in Point-to-MultiPoint (PtMP) applications.
- Канал тандоо: Select appropriate 5GHz channels to avoid interference.
- Орнотулган программаны жаңыртуу: Periodically check for and install firmware updates from the TP-Link website to enhance features and security.
5. Техникалык тейлөө
Regular maintenance ensures the longevity and optimal performance of your CPE610.
- Физикалык текшерүү: Periodically inspect the device and cabling for any signs of wear, damage, or corrosion, especially in harsh outdoor environments.
- Тазалоо: Gently clean the exterior of the unit with a soft, dry cloth. Do not use liquid cleaners or aerosols.
- Программалык камсыздоонун жаңыртуулары: Keep the device firmware updated to the latest version available from the official TP-Link website. This can improve stability, performance, and security.
- Негиздөө: Ensure proper grounding and cable shielding are maintained to protect against lightning and electrostatic discharge.
- Remote Reset: The Passive PoE adapter allows for remote resetting of the device. Refer to the installation guide for specific instructions.
6. Кыйынчылыктарды
This section addresses common issues you might encounter with the CPE610.
6.1 No Power/Device Not Responding
- Электр байланыштарын текшерүү: Ensure the AC power cord is securely connected to the PoE adapter and a working power outlet.
- Verify Ethernet Cable: Confirm the Ethernet cable from the CPE to the PoE adapter's "PoE" port is properly connected and undamaged.
- PoE Adapter Functionality: Test the PoE adapter with another compatible device if possible, or try a different PoE adapter.
6.2 Cannot Access PharOS Web Интерфейс
- IP дарегин конфигурациялоо: Ensure your computer's IP address is set manually to
192.168.0.10(or within the same subnet as the CPE's default192.168.0.254) before attempting to access the interface. - Кабель туташуу: Verify the Ethernet cable from the PoE adapter's "LAN" port to your computer is secure.
- Браузердеги көйгөйлөр: Башкасын байкап көрүңүз web браузер же браузериңиздин кэшин тазалаңыз.
- Firewall/Антивирус: Temporarily disable any firewall or antivirus software that might be blocking access.
6.3 Poor Wireless Performance/Connection Drops
- Көрүү сызыгы: Ensure there is a clear line of sight between the CPE610 and the target device/access point. Obstructions can severely degrade performance.
- Антеннаны тегиздөө: Precisely align the directional antenna for optimal signal strength. Use the signal strength indicators in the PharOS interface.
- Интерференция: Check for potential sources of interference (e.g., other 5GHz devices, physical obstacles). Try changing the wireless channel.
- Микропрограмма: Акыркы микропрограмма орнотулганын текшериңиз.
- WDS Setting: If operating in client mode, ensure WDS is disabled if experiencing connectivity issues, especially with mesh networks.
7. Техникалык шарттар
| Өзгөчөлүк | Деталь |
|---|---|
| Бренд | TP-Link |
| Модел | CPE610 |
| Антенна | High-gain directional 2x2 MIMO antenna with 23dBi gain |
| Жыштык | 5 ГГц |
| Зымсыз стандарт | 802.11n/a |
| Maximum Wireless Rate | 300 Мбит/сек |
| Өткөрүү күчү | Adjustable from 0 to 27dBm/500mW |
| PoE колдоосу | Passive PoE (24V 0.5A adapter included) |
| PoE Range | 60 метрге чейин (200 фут) |
| Башкаруу | Centralized management system - Pharos Control |
| Түс | Ак |
| Элемент Салмагы | 0.46 килограмм |
| UPC | 845973081027 |
8. Кепилдик маалыматы
The TP-Link CPE610 comes with a 2 жылдык кепилдик from the date of purchase. This warranty covers defects in materials and workmanship under normal use. It does not cover damage caused by accidents, misuse, unauthorized modifications, or external factors such as lightning strikes or power surges not mitigated by proper grounding.
For warranty claims, please retain your proof of purchase and contact TP-Link customer support.
9. Техникалык колдоо
For further assistance, technical support, or to download the latest firmware and documentation, please visit the official TP-Link webсайт.
- TP-Link расмий Webсайт: www.tp-link.com
- Колдоо баракчасы: Locate the support section for your specific model (CPE610) for FAQs, troubleshooting guides, and contact information.
It is recommended to consult the online resources before contacting technical support, as many common issues can be resolved through available documentation.