1. Киришүү
This manual provides essential information for the safe installation, operation, and maintenance of your hntoolight LED Floodlight. Please read this manual thoroughly before installation and retain it for future reference.
2. Коопсуздук маалыматы
- Орнотуудан, тейлөөдөн же тазалоодон мурун электр кубаты өчүрүлгөнүн текшериңиз.
- Орнотуу квалификациялуу электрик же компетенттүү адам тарабынан аткарылышы керек.
- камсыз кылуу том экенин текшериңизtage томуна дал келетtage specified on the product label (AC100-240V).
- Do not look directly into the LED light source when it is operating, as it may cause eye damage.
- Продукцияны күйүүчү материалдардан алыс кармаңыз.
- Электр шоктун алдын алуу үчүн туура жерге туташтырууну камсыз кылыңыз.
- Продукцияны эч кандай өзгөртүүгө болбойт. Уруксатсыз өзгөртүүлөр кепилдикти жокко чыгарып, коопсуздукка коркунуч келтириши мүмкүн.
3. Пакеттин мазмуну
Бардык компоненттердин бар экенин жана бузулбаганын текшерүү үчүн пакетти текшериңиз:
- 1 x hntoolight LED Floodlight (30W, AC100-240V)
- 1 x Mounting Bracket (pre-attached or separate)
- Көрсөтмө (бул документ)
4. Орнотуу жана орнотуу
The hntoolight LED Floodlight is designed for outdoor use with an IP65 waterproof rating, suitable for wall mount or flush mount installations.
4.1 Прожекторду орнотуу
- Жайгашкан жерди тандаңыз: Select a suitable outdoor location for installation, ensuring it can support the weight of the floodlight and provides the desired illumination area.
- Бургулоо пункттарын белгилөө: Дубалдагы же орнотуу бетиндеги бургулоо чекиттерин белгилөө үчүн монтаждоочу кронштейнди шаблон катары колдонуңуз.
- Бургулоо тешиктери: Монтаждоо бурамалар үчүн ылайыктуу тешиктерди бургула (кошумча эмес).
- Коопсуз кашаа: Attach the mounting bracket securely to the surface using suitable screws and anchors.
- Бурчту тууралоо: The bracket allows for angle adjustment. Loosen the screws on the side of the bracket, adjust the light to the desired angle, and then tighten the screws firmly.
4.2 Электрдик туташуу
ЭСКЕРТҮҮ: Электр туташууларын жасоодон мурун автоматтык өчүргүчтүн кубаты ӨЧҮК экенин текшериңиз.
- The floodlight comes with a short power cord. Connect the wires to your main power supply according to local electrical codes.
- Typically, the wiring color codes are:
- Күрөң кара: Live (L)
- Көк/Ак: Нейтралдуу (N)
- Жашыл сары: Жер (GND)
- Use appropriate waterproof connectors and junction boxes for outdoor wiring to maintain the IP65 rating.
- After connections are made and secured, restore power to the circuit.
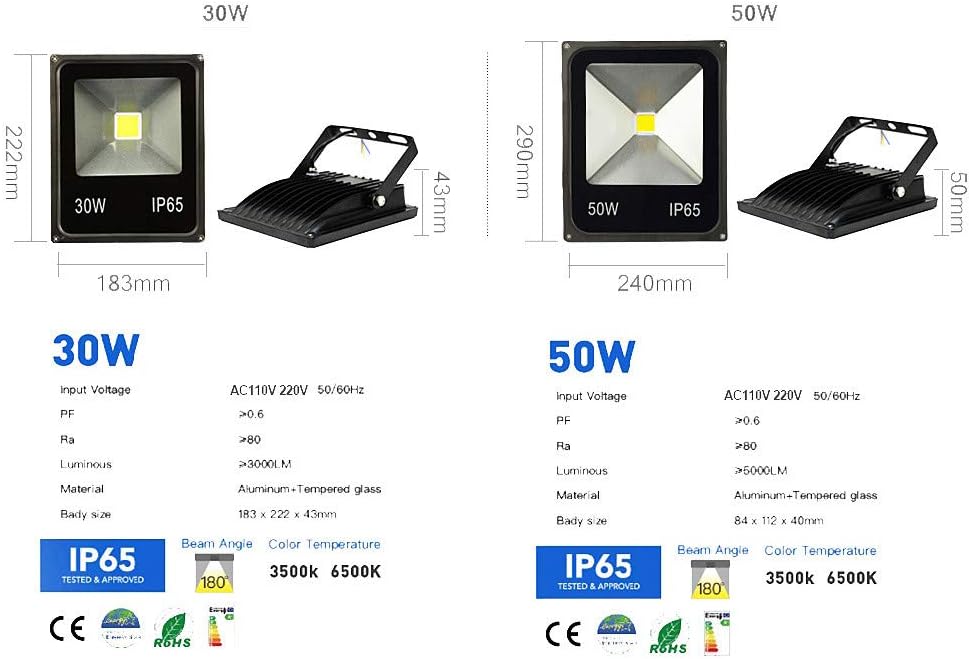
Image: Dimensions and specifications for 30W and 50W LED floodlights. The 30W model measures approximately 183mm wide, 222mm high, and 43mm deep, with an IP65 rating and 180-degree beam angle.

Image: Close-up of the LED chip and the floodlight's heat dissipation design. The image highlights the robust construction designed for efficient heat management, crucial for LED longevity.
5. Иштөө нускамалары
Once properly installed and connected to a power source, the hntoolight LED Floodlight operates simply:
- Күйгүзүү/өчүрүү: The floodlight will turn on when power is supplied to its circuit and turn off when power is disconnected. It is typically controlled by an external wall switch, timer, or motion sensor (not included).
- Нур бурчу: The floodlight provides a wide beam angle, suitable for general area illumination.
- Түс температурасы: This model emits a white light with a color temperature of 6000-6500K, providing bright, clear illumination.

Image: Illustration of various lighting effects corresponding to different color temperatures. This floodlight provides a white light in the 6000-6500K range, which is a cool white light.

Сүрөт: Мисamples of the floodlight's application in outdoor environments, including illuminating trees, building facades, and pathways. This demonstrates the versatility of the floodlight for various outdoor lighting needs.
6. Техникалык тейлөө
Үзгүлтүксүз тейлөө прожекторуңуздун оптималдуу иштешин жана узак иштөөсүн камсыздайт.
- Тазалоо: Periodically clean the surface of the floodlight and the glass cover with a soft, damp cloth. Do not use abrasive cleaners or solvents, as they may damage the finish or lens. Ensure the power is off before cleaning.
- Текшерүү: Regularly inspect the power cord and connections for any signs of wear, damage, or corrosion. Ensure all mounting screws remain tight.
- Колдонуучу тейлей турган бөлүктөр жок: The LED light source is integrated and not user-replaceable. Do not attempt to open the housing.
7. Кыйынчылыктарды
Прожекторуңузда көйгөйлөргө туш болсоңуз, төмөнкү жалпы көйгөйлөрдү жана аларды чечүү жолдорун караңыз:
| Көйгөй | Мүмкүн себеп | Чечим |
|---|---|---|
| Жарык күйбөйт. | Электр энергиясы жок. Бошогон зымдар байланышы. Faulty switch/sensor. | Автоматтык өчүргүчтү жана кубат булагын текшериңиз. Бардык зымдарды туташтыруу коопсуз экенин текшериңиз (кубат өчүрүлгөнүн текшериңиз). Test the switch or sensor with another device. |
| Жарык бүлбүлдөп же күңүрт. | Туруксуз электр энергиясы. Бошоң байланыш. Туура эмес томtage. | Туруктуу электр менен жабдууну камсыз кылуу. Зымдарды байланыштарды текшериңиз. Киргизилген томду ырастооtage is within AC100-240V range. |
| Турак жайдын ичиндеги суу. | Туура эмес орнотуу. Damage to housing/seal. | Ensure all seals and connections are properly tightened during installation. If damaged, discontinue use and contact support. |
If the problem persists after attempting these solutions, please contact hntoolight customer support for assistance.
8. Техникалык шарттар
| Өзгөчөлүк | Деталь |
|---|---|
| Модел | 30W LED прожектор |
| Күч | 30 Ватт |
| Киргизүү көлөмүtage | AC100-240V |
| Жарык булагы | COB LED |
| Түс температурасы | 6000-6500K (Ак жарык) |
| Суу өткөрбөйт рейтинги | IP65 |
| Материал | Алюминий, чыңалган айнек |
| Ички/тышкы колдонуу | Сыртта |
| Орнотуу түрү | Агып орнотуу, Дубалга орнотуу |
| Өлчөмдөрү (болжол менен) | 183мм (W) x 222mm (H) x 43mm (D) |
9. Кепилдик жана колдоо
hntoolight products are manufactured to high-quality standards. For warranty information or technical support, please refer to the purchase documentation or contact the seller directly. Keep your proof of purchase for any warranty claims.