1. Киришүү
This manual provides detailed instructions for the installation, operation, and maintenance of your Pioneer DEH-S5100BT CD Receiver. The DEH-S5100BT is designed to integrate multimedia capabilities into a single-DIN receiver, featuring direct access buttons for navigation and bass boost, and a dual-function volume knob optimized for the Pioneer Smart Sync app. It also includes a USB auto switch feature, allowing the user to choose between using a connected phone as an audio source or solely for charging.
Негизги өзгөчөлүктөрү:
- Android шайкештиги: Seamless integration with Android devices.
- Pandora and Spotify Support: Direct control and streaming from popular music services.
- Камтылган Bluetooth: Үнсүз чалуу жана аудио агым үчүн.
- Түс ыңгайлаштыруу: Personalize display illumination colors.
- MIXTRAX: Creates a non-stop mix with DJ-style effects.
2. Кутуда эмне бар
Орнотууну улантуудан мурун бардык компоненттер бар экенин текшериңиз.
- CD Receiver Unit
- Электр зымдары
- Орнотуу жабдыктары
- Instruction Manual
- Faceplate Case (for removable faceplate)
- Microphone (for hands-free calling)
- Алып салуу ачкычтары (2)
3. Орнотуу жана орнотуу
Туура орнотуу оптималдуу аткаруу үчүн абдан маанилүү болуп саналат. Эгерде сиз кандайдыр бир кадамдарды так билбесеңиз, анда профессионал орнотуучуга кайрылуу сунушталат.
3.1 Орнотуу аяктадыview
The DEH-S5100BT is designed for single-DIN dashboard openings. Ensure your vehicle's dashboard can accommodate this size. A vehicle-specific wiring harness adapter (sold separately) is highly recommended to simplify wiring connections and avoid cutting factory wires.
- Кубат туташуу: Connect the yellow wire to a constant 12V supply, the red wire to an accessory 12V supply (switched with ignition), and the black wire to ground.
- Динамик байланыштары: Connect speaker wires according to the wiring diagram provided with the unit and your vehicle's wiring. Ensure correct polarity.
- Антенна туташуу: Connect the vehicle's antenna cable to the receiver.
- Микрофон туташуу: Plug the supplied microphone into the dedicated input jack on the rear of the receiver and route it to a suitable location (e.g., sun visor) for clear hands-free calling.
Refer to the detailed wiring diagram in the separate installation guide for specific connections.
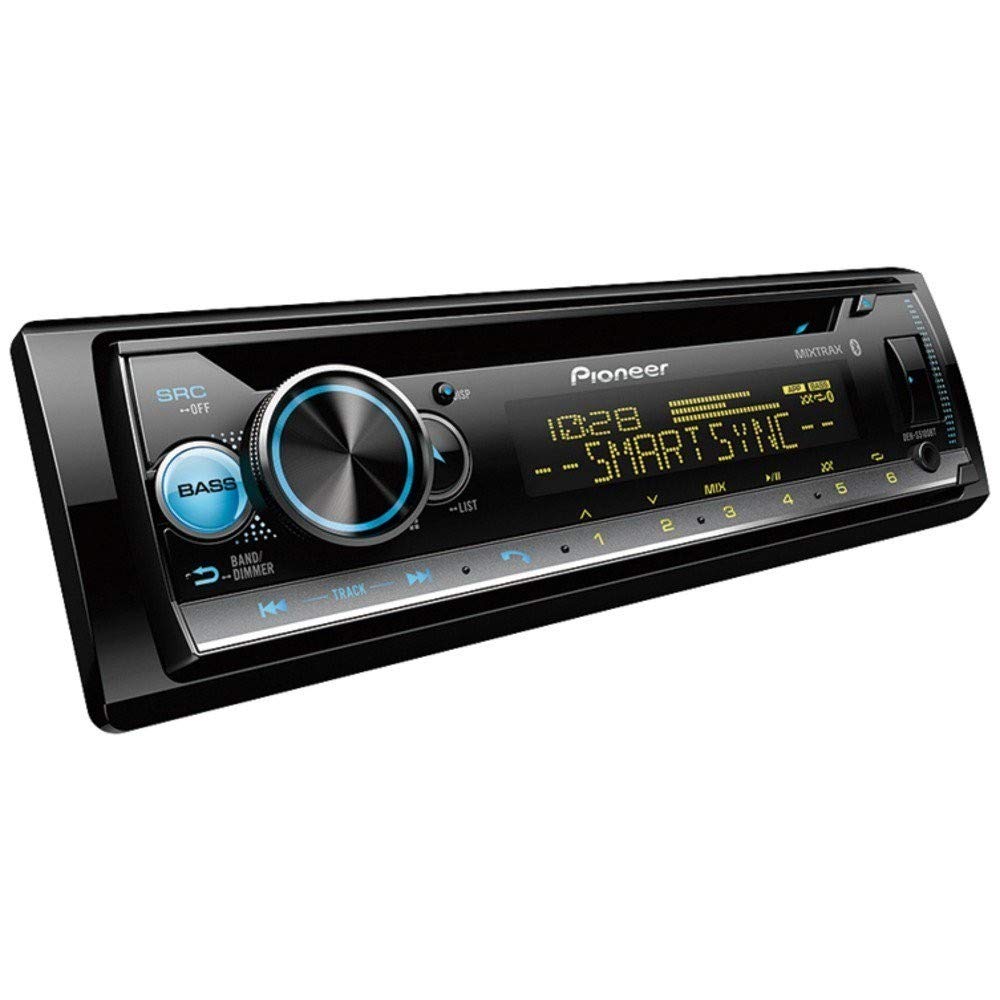
Сүрөт 1: Алдыңкы view of the Pioneer DEH-S5100BT CD Receiver, showing the display, control knob, and various buttons.
3.2 Баштапкы күйгүзүү жана негизги орнотуулар
- Орнотуудан кийин, унааңыздын от алдыруучу системасын күйгүзүңүз.
- басыңыз SRC (Source) button to power on the receiver.
- Adjust the volume using the large rotary knob.
- Set the clock and initial audio preferences as prompted or via the system menu.
3.3 Pioneer Smart Sync App Setup
The Pioneer Smart Sync app enhances the receiver's functionality by providing an intuitive interface for controlling audio, navigation, and communication features from your smartphone.
- Download the "Pioneer Smart Sync" app from your smartphone's app store (Google Play Store for Android, Apple App Store for iOS).
- Смартфонуңузда Bluetooth'ду иштетиңиз.
- On the DEH-S5100BT, navigate to the Bluetooth pairing menu.
- Select your smartphone from the list of available devices and confirm pairing.
- Launch the Pioneer Smart Sync app on your smartphone. The app will automatically connect to the receiver.
- Once connected, you can use the app to control various receiver functions, including audio settings, source selection, and app-based navigation.
4. Иштөө нускамалары
4.1 Негизги башкаруу каражаттары
- SRC (Булак) баскычы: Press to cycle through available audio sources (Tuner, CD, USB, Bluetooth Audio, AUX). Press and hold to turn the unit off.
- Үн баскычы: Rotate to adjust the volume level. Press to access the main menu for audio settings and system options.
- Band/ESC Button: In tuner mode, press to change radio bands (FM1, FM2, FM3, AM). In menu mode, press to exit the current menu.
- Forward/Reverse Buttons (<< / >>): Skip tracks, fast forward/rewind, or tune radio stations.
- Түздөн-түз кирүү баскычтары: Dedicated buttons for functions like Navigation (when Smart Sync is active) and Bass Boost.
4.2 Bluetooth операциясы
Камтылган Bluetooth үнсүз чалууга жана зымсыз аудио агымга мүмкүндүк берет.
- Жупташтыруу: Refer to Section 3.3 for initial pairing. Once paired, the receiver will automatically connect to your phone when in range.
- Hands Free Чалуу:
- When a call comes in, the display will show the caller ID.
- басыңыз ТЕЛЕФОН button (or the green call button on the unit) to answer.
- басыңыз ТЕЛЕФОН button (or the red end call button) to end a call.
- Use the volume knob to adjust call volume.
- Bluetooth аудио агымы:
- Select "Bluetooth Audio" as the source.
- Play music from your paired smartphone.
- Use the receiver's forward/reverse buttons to skip tracks.
4.3 CD ойнотуу
- Insert a CD into the disc slot with the label side up. The receiver will automatically switch to the CD source and begin playback.
- Use the forward/reverse buttons to skip tracks.
- басыңыз ТЫНЫГУУ ойнотууну убактылуу токтотуу үчүн баскыч.
- басыңыз ЧЫГАРУУ CDди алып салуу үчүн баскычты басыңыз.
4.4 USB Device Playback
Connect a USB storage device (e.g., USB flash drive) or a compatible smartphone via the USB port.
- Insert the USB device into the USB port. The receiver will automatically detect it and switch to the USB source.
- If a smartphone is connected, the USB auto switch feature allows you to choose whether to use the phone as a source or just for charging.
- Use the forward/reverse buttons to navigate tracks.
- The receiver supports WAV and WMA audio formats.
4.5 Радио менен иштөө
- Булак катары "Тюнерди" тандаңыз.
- басыңыз БАНД FM1, FM2, FM3 жана AM диапазондорунун ортосунда которулуу үчүн баскычты басыңыз.
- Кол менен жөндөө: Press and hold the forward/reverse buttons to manually tune to a station.
- Күүлөөнү издөө: Briefly press the forward/reverse buttons to automatically seek the next strong station.
- Алдын ала коюлган станциялар:
- To store a station: Tune to the desired station, then press and hold one of the preset number buttons (1-6) until you hear a beep.
- To recall a station: Briefly press the corresponding preset number button.
4.6 Audio Settings and MIXTRAX
- Accessing Audio Menu: Press the volume knob to enter the main menu, then navigate to "Audio Settings."
- Эквалайзер (EQ): Adjust preset EQ curves or customize a user-defined EQ.
- Бас жогорулатуу: Use the dedicated direct access button or the audio menu to enhance low frequencies.
- Фейдер / Баланс: Алдыңкы/арткы жана сол/оң динамиктердин ортосундагы үн бөлүштүрүүнү тууралаңыз.
- Сабвуферди башкаруу: Эгерде сабвуфер туташтырылган болсо, анын чыгаруу деңгээлин жана кроссовер жыштыгын тууралаңыз.
- MIXTRAX: When playing music from a USB device or CD, activate MIXTRAX to create a non-stop mix with various DJ-style effects and club-like illumination. Press the MIXTRAX иштетүү/өчүрүү үчүн баскычты басыңыз.
4.7 Түстү ыңгайлаштыруу
The display and button illumination colors can be customized.
- Press the volume knob to enter the main menu.
- Navigate to "System Settings" or "Illumination Settings."
- Select "Color" or "Display Color" to choose from a variety of preset colors or create a custom color.
5. Техникалык тейлөө
- Агрегатты тазалоо: Алдыңкы панелди сүртүү үчүн жумшак, кургак чүпүрөктү колдонуңуз. өжөр кир үчүн, dampen the cloth with water. Never use abrasive cleaners, waxes, or solvents.
- Диск уячасын тазалоо: Avoid inserting foreign objects into the disc slot. If a disc gets stuck, refer to the troubleshooting section.
- Faceplate Care: When removing the faceplate, store it in the supplied protective case to prevent scratches and damage.
6. Кыйынчылыктарды
| Көйгөй | Мүмкүн себеп | Чечим |
|---|---|---|
| Күч жок | Туура эмес зымдар; күйгүзүлгөн сактагыч; Унаа от алдыруу өчүрүлгөн. | Check power and ground connections. Verify fuse integrity. Ensure vehicle ignition is on. |
| Үн жок | Volume too low; Mute activated; Incorrect speaker wiring; Fader/Balance settings. | Increase volume. Deactivate mute. Check speaker connections and polarity. Adjust Fader/Balance. |
| Bluetooth байланышы ишке ашпай калды | Smartphone Bluetooth off; Device not paired; Interference. | Ensure smartphone Bluetooth is on. Re-pair the device (see Section 3.3). Move closer to the unit. |
| CD/USB ойнотуу көйгөйлөрү | Бузулган диск/file; Incompatible format; USB device not properly connected. | Башка дискти колдонуп көрүңүз/file. камсыз кылуу files are WAV or WMA. Reconnect USB device. |
| Радио кабыл алуу начар | Antenna not connected; Weak signal; Environmental interference. | Антеннанын туташуусун текшериңиз. Күчтүү станцияга жөндөп көрүңүз. |
If problems persist, consult your dealer or an authorized Pioneer service center.
7. Техникалык шарттар
| Бренд | ПИОНЕР |
| Модель номери | DEH-S5100BT |
| Элемент түрү аты | CD кабылдагыч |
| Байланыш технологиясы | Bluetooth |
| Зымсыз технология | Bluetooth |
| Шайкеш түзмөктөр | Смартфон |
| Туташтыргыч түрү | 3.5 мм уяча, USB |
| Аудио чыгаруу режими | Стерео |
| Колдоого алынган Интернет кызматтары | Pandora, Spotify |
| Башкаруу ыкмасы | Колдонмо |
| Чыгуу күчү | 50 Ватт (ар бир канал үчүн, типтүү) |
| Ватtage (Max Output) | 200 Watts (50W x 4 channels) |
| Каналдардын саны | 6 (4 speaker channels + 2 RCA pre-outs) |
| Формат колдоо | WAV, WMA |
| Түс | Настройкаланган жарыктандыруу |
| Элемент Салмагы | 3 фунт (болжол менен) |
| UPC | 884938403368 |
8. Кепилдик жана колдоо
8.1 Кепилдик маалыматы
The Pioneer DEH-S5100BT CD Receiver comes with a БИР ЖЫЛ limited warranty from the date of purchase. This warranty covers defects in materials and workmanship under normal use. Please retain your proof of purchase for warranty claims. For full warranty terms and conditions, refer to the warranty card included with your product or visit the official Pioneer webсайт.
8.2 Кардарларды колдоо
For technical assistance, troubleshooting beyond this manual, or service inquiries, please contact Pioneer customer support or visit their official webсайт:
- Pioneer Official Webсайт: www.pioneerelectronics.com
- Онлайн колдоо: Access FAQs, software updates, and additional documentation.
When contacting support, please have your model number (DEH-S5100BT) and purchase date readily available.