
1. Киришүү
Welcome to the Ink Machines Stingray X2 Rotary Tattoo Machine user manual. This document provides essential information for the safe and effective operation, maintenance, and troubleshooting of your new tattoo machine. Please read this manual thoroughly before initial use to ensure optimal performance and longevity of your device.
The Stingray X2 is engineered for precision and reliability, designed to meet the demands of professional tattoo artists for both lining and color packing applications.
2. Коопсуздук нускамалары
- Always ensure the machine is disconnected from the power supply before cleaning, maintenance, or changing components.
- Use only sterile needles and tubes. Follow all local and national health regulations for tattooing procedures.
- Wear appropriate personal protective equipment (PPE), including gloves, during operation.
- Keep the machine dry and away from liquids. Do not immerse the machine in water or cleaning solutions.
- Store the machine in a clean, dry, and secure location when not in use.
- This device is intended for professional use only.
3. Components Overview
The Stingray X2 Rotary Tattoo Machine consists of several key components designed for precise and consistent performance. Understanding these parts is crucial for proper setup and maintenance.

3.1-сүрөт: жарылды view diagram showing the various components of the Stingray tattoo machine, including the piston, needlebar, motor, and adjustment screws. Each part is numbered for identification.
Key components include the motor, cam, piston, needlebar retainer, and various adjustment screws. Refer to Figure 3.1 for a detailed breakdown of all parts.
4. Орнотуу
Follow these steps for the initial setup of your Stingray X2 machine:
- Пакеттен чыгаруу: Carefully remove the machine from its packaging. Inspect for any visible damage.
- Стерилдөө: Ensure all components that will come into contact with the client (e.g., grip, needle, tube) are properly sterilized according to industry standards.
- Кармоочу тутканы бекитүү: Securely attach your preferred grip to the machine's tube vice.
- Ийнени киргизүү: Carefully insert a sterile tattoo needle into the tube and ensure it is properly seated and aligned.
- Туташуу кубаты: Connect the RCA cord to the machine's RCA contact point and then to a compatible power supply. Ensure the power supply is off before connecting.
- Ийненин тереңдигин тууралоо: Adjust the needle depth by rotating the grip or using the machine's adjustment mechanism, depending on your setup.

4.1-сүрөт: The Stingray X2 Rotary Tattoo Machine, ready for setup.

4.2-сүрөт: The Stingray X2 machine with a grip and needle installed, illustrating a typical setup configuration.
5. Operating the Stingray X2
The Stingray X2 is versatile, suitable for both precise lining and efficient color packing. Its design allows for consistent performance across various tattooing styles.
- Күйгүзүү: Once all connections are secure, turn on your power supply.
- Тtage Тууралоо: Start with a lower voltage setting and gradually increase it to find the optimal speed and power for your specific needle configuration and tattooing technique. Recommended voltage ranges can vary based on needle grouping and desired effect.
- Төшөө: For crisp lines, typically use a slightly higher speed and ensure consistent hand movement.
- Color Packing/Shading: For smooth color saturation and shading, a slightly lower speed and controlled, even passes are often preferred.
- Ийне тереңдиги: Continuously monitor and adjust needle depth as needed during the tattooing process.

5.1-сүрөт: The Stingray X2 is designed for versatility in both lining and color packing.
6. Техникалык тейлөө
Regular maintenance ensures the longevity and optimal performance of your Stingray X2 machine.
- Тазалоо: After each use, disconnect the machine from power. Wipe down the exterior surfaces with a suitable disinfectant spray or wipe. Avoid getting liquids into the motor housing.
- Майлоо: Periodically apply a small amount of high-quality machine lubricant to moving parts as indicated in the component diagram (Figure 3.1), particularly the cam and piston areas. Do not over-lubricate.
- Текшерүү: Regularly inspect the RCA connection, springs, and other visible parts for wear or damage. Replace worn components as necessary.
- Сактагыч: Store the machine in a clean, dry, and dust-free environment.
7. Кыйынчылыктарды
This section addresses common issues you might encounter with your Stingray X2 machine.
| Көйгөй | Мүмкүн себеп | Чечим |
|---|---|---|
| Машина иштебей жатат | Loose power connection, faulty power supply, motor issue. | Check RCA cable connection. Test with a different power supply. If issue persists, contact support. |
| Inconsistent needle movement | Worn cam, insufficient lubrication, bent needlebar. | Inspect cam and lubricate. Replace needlebar if bent. |
| Ашыкча титирөө же ызы-чуу | Loose components, lack of lubrication, motor wear. | Tighten all screws. Apply lubricant. If noise persists, motor may require service. |
| Машинанын ысып кетиши | Жогорку көлөмдө узакка колдонууtage, motor strain. | Кыскартуу томtage or take breaks. Ensure proper ventilation around the machine. |
8. Техникалык шарттар
Key technical specifications for the Ink Machines Stingray X2 Rotary Tattoo Machine:
- Модел: Stingray X2
- Бренд: Ink Machines
- UPC: 644287731761
- ASIN: B07LD1QRR3
- GTIN: 644287731761
- Колдонмо: Designed for Lining and Color Packing
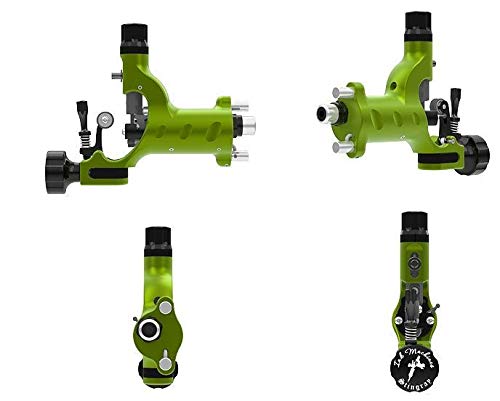
8.1-сүрөт: Көптөгөн views of the Stingray X2 machine.
9. Кепилдик жана колдоо
Ink Machines products are manufactured to high standards. For information regarding warranty coverage, terms, and conditions, please refer to the official Ink Machines webсайтка же ыйгарым укуктуу дилериңизге кайрылыңыз.
For technical support, spare parts, or service inquiries, please contact Ink Machines customer service through their official channels. Providing your product's model number (Stingray X2) and serial number (if applicable) will help expedite your support request.