
1. Киришүү
This manual provides comprehensive instructions for the setup, operation, maintenance, and troubleshooting of your Easytry123 Universal Remote Control. This remote is designed as a replacement for various Optoma DLP 3D Projector models, ensuring seamless control over your device.
Compatible Optoma Projector Models include: TW635-3D, DW326, S311, W311, W501, WX31, X302, X303, X31, X501, W556-3D, DS339, DX339, DW339, TX635-3D.
2. Продукт бүтүп калдыview
2.1 Алыстан башкаруунун схемасы

Сүрөт: алдыңкы view of the remote control, displaying all buttons and their labels. Key buttons include Power, Source, Menu, Volume, Keystone, Zoom, and input selections like HDMI1, HDMI2, VGA1, VGA2, Video, 3D.
2.2 Баскыч функциялары
- Күч: Проекторду күйгүзөт же өчүрөт.
- Булак: Cycles through available input sources (e.g., HDMI, VGA, Video).
- Меню: Opens the projector's on-screen display (OSD) menu.
- Navigation (Up, Down, Left, Right, Enter): Менюларда чабыттоо жана тандоолорду ырастоо үчүн колдонулат.
- Көлөмү (+/-): Аудио чыгаруу деңгээлин тууралайт.
- Page (+/-): Used for presentation control or specific menu navigation.
- Негизги таш: Adjusts the image's vertical keystone correction.
- Zoom (+/-): Adjusts the digital zoom level of the projected image.
- Input Selectors (HDMI1, HDMI2, VGA1, VGA2, Video, 3D): Directly selects the corresponding input source or activates 3D mode.
- Катуу: Pauses the current image display.
- AV үнүн өчүрүү: Temporarily mutes audio and blanks the screen.
- Кайра синхрондоштуруу: Resynchronizes the input signal.
- Которуу: Toggles between different display modes or functions.
- Жарыктык (+/-): Сүрөттүн жарыктыгын тууралайт.
3. Орнотуу
3.1 Батареяны орнотуу
Алыстан башкаруу аппараты иштөө үчүн эки AAA батарейкасын (кошумча эмес) талап кылат. Батареяларды орнотуу үчүн төмөнкү кадамдарды аткарыңыз:
- Пульттун артындагы батарея отсегин табыңыз.
- Press down on the latch and slide the battery compartment cover downwards to remove it.
- Оң (+) жана терс (-) терминалдары бөлүмдүн ичиндеги белгилер менен туура дал келишин камсыз кылып, эки AAA батарейкасын салыңыз.
- Батарея бөлүкчөсүнүн капкагын бекем чыккыча ордуна жылдырыңыз.

Сүрөт: Арткы view of the remote control, highlighting the battery compartment cover at the bottom.
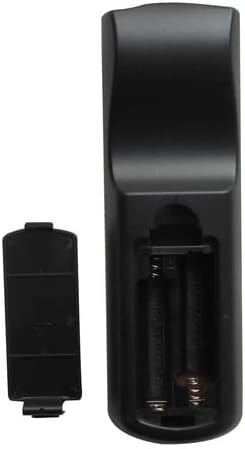
Image: The remote control's battery compartment with the cover removed, revealing two empty slots for AAA batteries and the positive/negative terminals.

Сүрөт: бурчтуу view of the remote control with the battery cover detached, illustrating the correct orientation for inserting AAA batteries into the compartment.
4. Иштөө нускамалары
Point the remote control directly at the projector's IR receiver for optimal performance.
4.1 Күйгүзүү/өчүрүү
басыңыз Күч button once to turn the projector on. Press it again to turn the projector off. Confirm any power-off prompts on the projector screen if applicable.
4.2 Киргизүү булагын тандоо
басыңыз Булак button repeatedly to cycle through available input sources (e.g., HDMI1, HDMI2, VGA1, VGA2, Video). Alternatively, use the dedicated input buttons (e.g., HDMI1, VGA1) for direct selection.
4.3 Үндү тууралоо
колдонуу Көлөм + button to increase the audio volume and the Көлөмү - азайтуу үчүн баскыч.
4.4 Менюларды башкаруу
басыңыз Меню button to open the projector's on-screen display (OSD). Use the Өйдө, ылдый, сол, оң arrow buttons to navigate through menu options. Press Кириңиз to confirm a selection or access a sub-menu. Press Меню OSDден чыгуу үчүн кайрадан басыңыз.
4.5 Негизги таштарды оңдоо
колдонуу Keystone buttons to correct trapezoidal distortion in the projected image, ensuring a rectangular display.
4.6 Чоңойтуу функциясы
басыңыз Чоңойтуу + button to digitally enlarge the image or Чоңойтуу - to reduce it.
4.7 3D Mode Activation
If your projector and content support 3D, press the 3D button to activate or deactivate 3D display mode.
5. Техникалык тейлөө
5.1 Пультту тазалоо
Пультту тазалоо үчүн анын бетин жумшак, кургак чүпүрөк менен акырын сүртүңүз. өжөр кир үчүн, бир аз гampкездемени суу менен сүртүңүз. Катуу химиялык заттарды же абразивдүү тазалоочу каражаттарды колдонуудан алыс болуңуз, анткени алар пульттун сырткы көрүнүшүнө же ички компоненттерине зыян келтириши мүмкүн.
5.2 Батареяны алмаштыруу
Replace batteries when the remote's response becomes sluggish or stops functioning. Always replace both batteries simultaneously with new AAA batteries. Do not mix old and new batteries, or different types of batteries. Dispose of used batteries responsibly according to local regulations.
6. Кыйынчылыктарды
- Пульт жооп бербей жатат:
- Жаңы AAA батарейкалары туура орнотулганын текшериңиз.
- Check for any obstructions between the remote and the projector's IR receiver.
- Verify that you are within the effective range of the projector's IR receiver.
- Чектелген функциялар:
- While this remote is compatible with listed Optoma models, some advanced or specific functions of your original projector remote may not be replicated. Refer to your projector's original manual for specific features.
- Ensure the projector is powered on and not in a standby mode that restricts remote commands.
7. Техникалык шарттар
- Кубат булагы: 2 x AAA Батареялар (киргизилген эмес)
- Байланыш технологиясы: Инфракызыл (IR)
- Шайкеш түзмөктөр: Optoma DLP 3D Projectors (specific models listed in Introduction)
- Колдоого алынган түзмөктөрдүн максималдуу саны: 1 (dedicated to the paired projector)
8. Кепилдик жана колдоо
For any issues not covered in this manual or for further assistance, please contact the manufacturer, Easytry123, through your purchase platform. Keep your purchase receipt as proof of purchase for any warranty claims.