
1. Киришүү
The PROEL MQ6 is a compact 6-channel mixer designed for various sound reinforcement applications. It offers a high input density, essential features, and superior audio quality in a durable, ultra-rugged case. This manual provides detailed instructions for the proper setup, operation, and maintenance of your MQ6 mixer.
2. Коопсуздук маалыматы
- Электр камсыздоо: Белгиленген кубат адаптерин гана колдонуңуз. Voltage сиздин жергиликтүү электр камсыздооңузга дал келет.
- Нымдуулук: Do not expose the unit to rain or moisture. Avoid placing liquids near the mixer.
- Вентиляция: Адекваттуу вентиляцияны камсыз кылыңыз. Вентиляция тешиктерин жаап албаңыз.
- Жылуулук: Аппаратты радиаторлор, жылуулук регистрлери, мештер же жылуулук чыгарган башка аппараттар сыяктуу жылуулук булактарынан алыс кармаңыз.
- Тейлөө: Бул продуктту өзүңүз тейлөөгө аракет кылбаңыз. Бардык тейлөөнү квалификациялуу тейлөө кызматкерлерине тапшырыңыз.
- Кабелдер: Электр зымдарын басуудан же кысып калуудан сактаңыз, өзгөчө сайгычтарда, розеткаларда жана алар аппараттан чыга турган жеринде.
- Тазалоо: Кургак чүпүрөк менен гана тазалаңыз.
3. Продукт бүтүп калдыview
The PROEL MQ6 is a 6-channel compact mixer featuring 2 mono MIC/LINE inputs, 2 stereo LINE inputs, 3-band EQ on mono channels, 2-band EQ on stereo channels, and electronically balanced main outputs.

3.1-сүрөт: Жогорку view of the PROEL MQ6 Compact 6-Channel Mixer, showing all controls and inputs.

3.2-сүрөт: Бурчтуу view of the PROEL MQ6 mixer, highlighting the compact design and control layout.
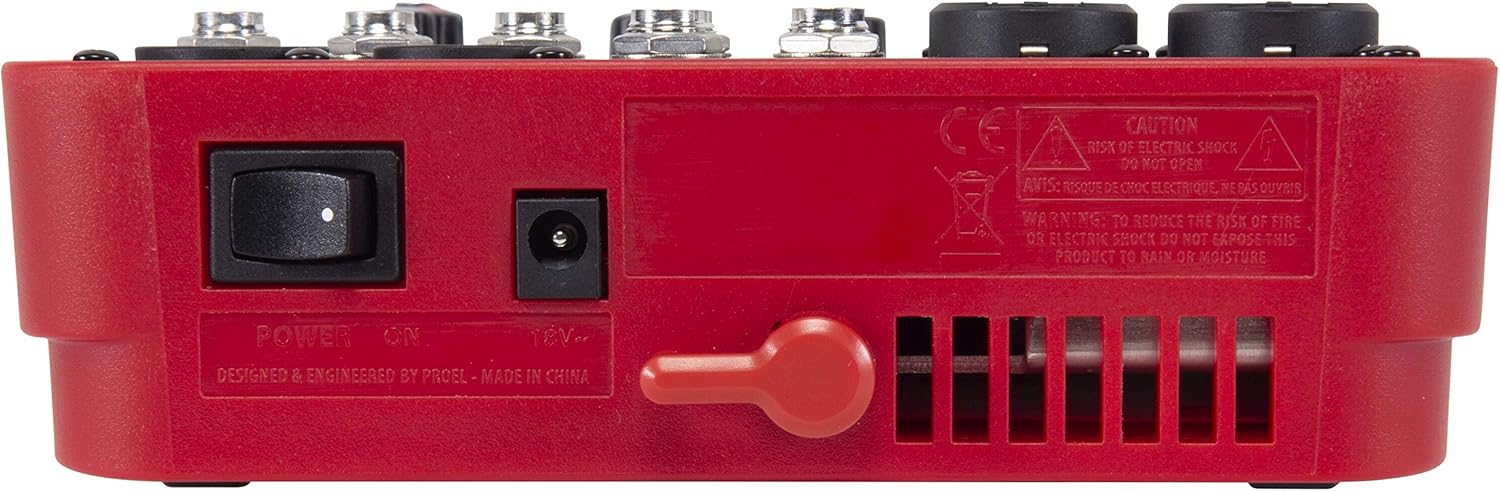
3.3-сүрөт: Арткы view of the PROEL MQ6 mixer, showing the power switch and DC input.
Продукт өзгөчөлүктөрү:
- 2 Mono MIC/LINE inputs with XLR/TRS combo jacks.
- 2 Stereo LINE inputs (3/4, 5/6) with TRS jacks.
- 3-Band EQ on mono channels for precise tone shaping.
- 2-Band EQ on stereo channels.
- Low-noise, high-headroom microphone preamps.
- Electronically balanced XLR MAIN MIX outputs.
- Phantom Power (+48V) for condenser microphones.
- Атайын деңгээлди башкаруу менен кулакчындын чыгышы.
PROEL MQ Series Overview Video
Бул видеодо толук маалымат берилетview of the PROEL MQ Series compact mixers. Please note that some features shown, such as digital effects, compressors, and USB connectivity, are available on other models within the MQ series (e.g., MQ6FX, MQ12USB, MQ16USB) and not on the MQ6 model specifically.
4. Орнотуу
4.1 Таңгактан чыгаруу жана текшерүү
Carefully unpack the mixer and check for any signs of damage. Ensure all components listed in the packaging are present. If any items are missing or damaged, contact your dealer immediately.
4.2 Кубат туташтыруу
- Миксердин кубат которгучу OFF абалында экенин текшериңиз.
- Connect the provided power adapter to the DC input jack on the rear of the mixer.
- Кубат адаптерин ылайыктуу AC розеткага сайыңыз.
4.3 Киргизүү байланыштары
The MQ6 features two types of input channels:
- Mono MIC/LINE Inputs (Channels 1-2): Use XLR cables for microphones or 1/4" TRS cables for line-level instruments (e.g., keyboards, guitars with preampс).
- Stereo LINE Inputs (Channels 3/4, 5/6): Use 1/4" TRS cables for stereo line-level sources. If connecting a mono source, use the L/MONO input.
4.4 Чыгуу байланыштары
- MAIN MIX Outputs: Негизги динамиктерди же кубаттагычты туташтырыңыз amplifier to the XLR MAIN MIX L and R outputs. These outputs are electronically balanced.
- PHONES Чыгуу: Connect your headphones to the 1/4" PHONES jack for monitoring.
5. Иштөө нускамалары
5.1 Күйгүзүү/өчүрүү
- Before powering on, ensure all channel GAIN and MIX level knobs are set to their minimum position.
- Turn on the mixer using the power switch on the rear panel.
- When powering off, first turn down all output levels, then switch off the mixer.
5.2 Каналды башкаруу элементтери (Моно каналдар 1-2)
- MIC/LINE киргизүү: Combo jack for XLR microphones or 1/4" TRS line-level sources.
- LO CUT (75 Hz): Engages a high-pass filter at 75 Hz to remove unwanted low-frequency rumble.
- УТУШ: Adjusts the input sensitivity for the connected microphone or line source. Set this to achieve a strong signal without clipping (indicated by the PEAK LED).
- HI (12 kHz): Adjusts the high-frequency (treble) content of the channel.
- ТӨМӨН (80 Гц): Adjusts the low-frequency (bass) content of the channel.
- PEAK LED: Illuminates when the input signal is too high, indicating potential clipping. Reduce the GAIN if this LED lights up frequently.
- Деңгээл баскычы: Controls the channel's contribution to the main mix.
5.3 Channel Controls (Stereo Channels 3/4, 5/6)
- L/MONO, R LINE Inputs: 1/4" TRS jacks for stereo line-level sources. Use L/MONO for mono sources.
- HI (12 kHz): Adjusts the high-frequency (treble) content of the channel.
- ТӨМӨН (80 Гц): Adjusts the low-frequency (bass) content of the channel.
- Деңгээл баскычы: Controls the channel's contribution to the main mix.
5.4 Main Mix Section
- PHANTOM POWER ON/OFF: Activates +48V phantom power for condenser microphones connected to the XLR inputs. Ensure condenser microphones are connected before activating phantom power.
- Даража өлчөгүчтөр: Displays the output level of the main mix. Aim for levels around 0 dB to avoid clipping.
- MIX Level Knob: Негизги аралашманын жалпы өндүрүш көлөмүн көзөмөлдөйт.
- PHONES Level Knob: Гарнитуранын чыгышынын үнүн тууралайт.
6. Техникалык тейлөө
- Тазалоо: Use a soft, dry cloth to clean the mixer's surface. Do not use abrasive cleaners, solvents, or waxes.
- Сактагыч: Миксерди көпкө чейин колдонбогондо, кургак, чаңсыз чөйрөдө сактаңыз.
- Кабельге кам көрүү: Regularly inspect all cables for damage. Replace frayed or damaged cables to prevent electrical hazards and ensure optimal performance.
- Вентиляция: Ensure the ventilation slots are clear of dust and debris to prevent overheating.
7. Кыйынчылыктарды
| Көйгөй | Мүмкүн себеп | Чечим |
|---|---|---|
| Үн чыгышы жок |
|
|
| Бурмаланган үн |
|
|
| Микрофон сигналы жок |
|
|
| Үн же ызы-чуу |
|
|
8. Техникалык шарттар
| Өзгөчөлүк | Деталь |
|---|---|
| Бренд | PROEL |
| Модел | MQ6 |
| Каналдардын саны | 6 |
| Аудио киргизүү | 2 x MIC/LINE (XLR/TRS Combo), 2 x Stereo LINE (TRS) |
| Байланыш технологиясы | XLR, TRS |
| EQ (Mono Channels) | 3-Band (HI, LOW, LO CUT) |
| EQ (Stereo Channels) | 2-Band (HI, LOW) |
| фантомдук күч | +48V |
| Негизги жыйынтыктар | XLR (Electronically Balanced) |
| Наушник чыгаруу | 1/4" TRS |
9. Кепилдик
PROEL offers its customers a minimum of 24 (twenty-four) months warranty from the date of purchase for sound systems products. Please retain your proof of purchase for warranty claims. For detailed warranty terms and conditions, please refer to the official PROEL webсайтка же кардарларды тейлөөгө кайрылыңыз.
10. Колдоо
For technical assistance, product inquiries, or service requests, please visit the official PROEL website or contact your authorized PROEL dealer. You may also find additional resources and FAQs on their support pages.