
1. Киришүү
This manual provides detailed instructions for the installation, operation, and maintenance of your ASRock B365 PRO4 ATX Motherboard. Please read this manual thoroughly before proceeding with installation to ensure correct setup and to prevent damage to the components.
The ASRock B365 PRO4 motherboard supports 9th and 8th Generation Intel Core Processors, offering a robust platform for personal computing. It features a Digi Power Design with an 8 Power Phase Design, ensuring stable power delivery to the CPU.
2. Коопсуздук маалыматы
- Кандайдыр бир компоненттерди орнотуудан же алып салуудан мурун ар дайым электр кубатынан ажыратыңыз.
- Сезимтал компоненттердин электростатикалык разряддан (ЭСД) жабыркашын алдын алуу үчүн антистатикалык билек боону тагыныңыз.
- Сезимтал компоненттерге тийбеш үчүн, энелик платаны четтеринен кармаңыз.
- Ашыкча ысып кетүүдөн сактануу үчүн компьютериңиздин ичинде туура желдетүүнү камсыз кылыңыз.
- Motherboard'ду нымдуулуктан жана экстремалдык температурадан алыс кармаңыз.
3. Орнотуу жана орнотуу
3.1 Пакеттин мазмуну
Пакетте бардык буюмдар бар экенин текшериңиз:
- ASRock B365 PRO4 Motherboard
- Ыкчам орнотуу колдонмосу
- Колдоо CD
- I / O Shield
- 2 x SATA маалымат кабелдери
- M.2 розеткалары үчүн 3 х бурамалар
- M.2 розетка үчүн 1 х Standoff

Image: ASRock B365 PRO4 Motherboard and its included accessories, including the quick installation guide, support CD, I/O shield, SATA cables, and M.2 screws/standoff.
3.2 Motherboard Layout
Энелик платадагы негизги компоненттер жана туташтыргычтар менен таанышыңыз.

Сүрөт: жогорудан төмөнгө view of the ASRock B365 PRO4 Motherboard, highlighting the CPU socket, RAM slots, PCIe slots, and M.2 slots.

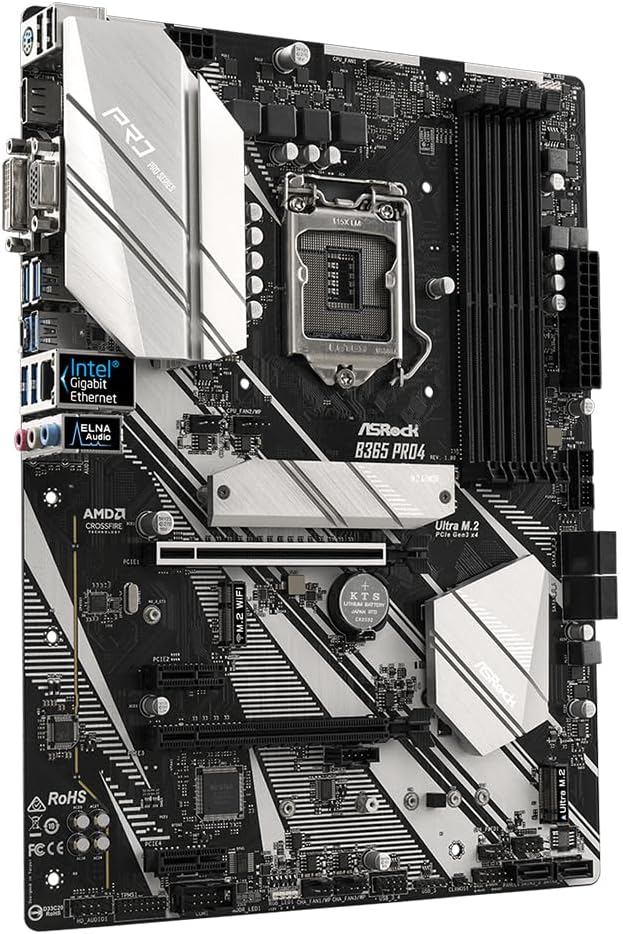
Сүрөт: бурчтуу view of the ASRock B365 PRO4 Motherboard, showing the heatsinks and various connectors.
3.3 CPU орнотуу (LGA1151)
- CPU розеткасынын рычагын ачып, жүктөө пластинасын көтөрүңүз.
- Процессорду розеткага кылдат тууралаңыз, CPUдагы алтын үч бурчтук розеткадагы үч бурчтукка дал келүүсүн камсыз кылыңыз.
- Процессорду мажбурлабастан акырын розеткага салыңыз.
- Жүктөө пластинасын жаап, аны рычаг менен бекитиңиз.
3.4 Эстутум (RAM) орнотуу
The motherboard features 4 DDR4 DIMM slots, supporting dual-channel memory up to 64GB.
- DIMM уячасынын эки учундагы клиптерди ачыңыз.
- RAM модулундагы оюкту DIMM уячасындагы ачкыч менен тууралаңыз.
- Insert the RAM module firmly until the clips snap into place.
3.5 Сактагыч түзүлүштү орнотуу
The motherboard supports 6 SATA3 ports and 2 Ultra M.2 ports.
- SATA дисктери: Connect SATA data cables to the SATA ports on the motherboard and to your storage devices (HDDs/SSDs). Connect power cables from your power supply to the devices.
- M.2 SSD'лер: Locate the M.2 slots. Insert the M.2 SSD into the slot at an angle, then gently push it down and secure it with the provided screw and standoff.
3.6 Кеңейтүү картасын орнотуу (PCIe)
The motherboard has 2 PCI-Express 3.0 x16 slots and 2 PCI-Express 3.0 x1 slots.
- Select an appropriate PCIe slot for your expansion card (e.g., graphics card).
- Компьютериңиздин корпусунан тиешелүү металл кронштейнди алып салыңыз.
- Align the card with the slot and press firmly until it is seated correctly.
- Картаны компьютердин корпусуна бурагыч менен бекитиңиз.
3.7 Connecting Peripherals to the I/O Panel
Арткы I/O панели тышкы түзмөктөрдү туташтыруу үчүн ар кандай портторду камсыз кылат.
Сүрөт: Жакын план view of the ASRock B365 PRO4 Motherboard's rear I/O panel, showing ports for PS/2, USB 2.0, USB 3.1 Gen 1, VGA, DVI-D, HDMI, LAN, and audio jacks.
- USB порттору: Connect USB devices (keyboard, mouse, external drives) to the available USB 2.0 (5 ports) and USB 3.1 Gen 1 (8 ports, including 1 Type-C rear) ports.
- Видео чыгуулары: Connect your monitor to the VGA, DVI-D, or HDMI port.
- LAN порту: Тармакка кирүү үчүн Ethernet кабелин туташтырыңыз.
- Аудио уячалары: Connect speakers, headphones, or microphones to the audio jacks.
- PS/2 порту: Connect a PS/2 keyboard or mouse.
4. Иштөө нускамалары
4.1 Биринчи жүктөө жана BIOS орнотуу
- After assembling all components, connect the power supply and monitor.
- Power on your system. Press Del or F2 during startup to enter the BIOS/UEFI setup utility.
- Жүктөө тартибин, системанын убактысын жана башка керектүү орнотууларды конфигурациялаңыз. Өзгөртүүлөрдү сактоо жана чыгуу.
- Операциялык системаңызды жүктөлүүчү USB дискинен же оптикалык медиадан орнотуңуз.
4.2 Драйверди орнотуу
After installing the operating system, install the necessary drivers from the provided Support CD or download the latest versions from the ASRock webсайт. Негизги драйверлер төмөнкүлөрдү камтыйт:
- Chipset Drivers
- Аудио драйверлер (Realtek ALC892)
- LAN Drivers (Intel I219V Gigabit Ethernet)
- Графикалык драйверлер (интеграцияланган графика же дискреттик GPU үчүн)
5. Техникалык тейлөө
- Чаңды тазалоо: Энелик платадан жана корпус желдеткичтеринен чаңды кысылган аба менен үзгүлтүксүз тазалап туруңуз. Тазалоодон мурун системанын өчүрүлгөнүн жана розеткадан суурулганын текшериңиз.
- BIOS жаңыртуулары: ASRock текшериңиз website periodically for BIOS updates. Updates can improve system stability and compatibility. Follow the instructions carefully when updating the BIOS.
- Кабелдик башкаруу: Аба агымын жакшыртуу жана тоскоолдуктарды болтурбоо үчүн кабелдердин тыкан өткөрүлүшүн текшериңиз.
6. Кыйынчылыктарды
- Кубат жок:
- Check all power connections, including the 24-pin ATX and 8-pin 12V CPU power connectors.
- Кубат менен камсыз кылуу которгучу ON абалында экенин текшериңиз.
- Дисплей жок:
- Verify that the monitor is connected to the correct video output (either integrated graphics or discrete GPU).
- Графикалык картаны жана RAM модулдарын кайра орнотуңуз.
- Системанын туруксуздугу/бузуулар:
- RAM модулдарынын туура жайгаштырылганын текшериңиз.
- CPU муздаткычы туура орнотулганын жана жакшы байланышта экенин текшериңиз.
- Драйверлерди жана BIOSту эң акыркы версияларына жаңыртыңыз.
- M.2 SSD аныкталган жок:
- M.2 SSD туура орнотулганын жана бекитилгенин текшериңиз.
- Check BIOS settings to ensure M.2 slots are enabled and configured correctly (SATA vs. PCIe mode).
7. Техникалык шарттар
| Өзгөчөлүк | Деталь |
|---|---|
| CPU розетка | LGA 1151 |
| Шайкеш процессорлор | 9th/8th Generation Intel Core Processors (up to 95W) |
| Чипсет | Intel B365 |
| Эс | 4 x DDR4 DIMM slots, Dual Channel, Non-ECC, Buffered, Max 64GB (2666/2400/2133 MHz) |
| Кеңейтүү уячалары | 2 x PCIe 3.0 x16, 2 x PCIe 3.0 x1 |
| Көп графикалык колдоо | AMD Quad CrossFireX and CrossFire Technology |
| Сактагыч | 6 x SATA3 ports (RAID 0, 1, 5, 10), 2 x Ultra M.2 ports (PCIe Gen3 x4 & SATA3) |
| Аудио | Realtek ALC892 7.1-Channel HD Audio |
| LAN | Intel I219V Gigabit Ethernet |
| USB порттору | 8 x USB 3.1 Gen1 (1 Type-C rear, 5 rear, 2 via header), 5 x USB 2.0 (2 rear, 3 via header) |
| Video Outputs | 1 x VGA, 1 x DVI-D, 1 x HDMI |
| Форма фактору | ATX (12.0 x 9.0 inch / 30.5 x 22.9 cm) |
8. Кепилдик жана колдоо
8.1 Кепилдик маалыматы
The ASRock B365 PRO4 Motherboard comes with a 1 жылдык чектелген кепилдик. This warranty covers defects in materials and workmanship under normal use. For specific terms and conditions, please refer to the warranty card included with your product or visit the official ASRock webсайт.
Note: Damage caused by improper installation, misuse, unauthorized modifications, or natural disasters is not covered under warranty.
8.2 Техникалык колдоо
For technical assistance, driver downloads, BIOS updates, or further troubleshooting, please visit the official ASRock support webсайт:
You may also contact ASRock customer service directly through their webжекелештирилген колдоо үчүн сайт.