
Introduction
Thank you for choosing the XYOP RGB LED Strip Lights. This manual provides essential information for the safe and effective use of your LED strip lights. Please read it thoroughly before installation and operation, and retain it for future reference.
Коопсуздук маалыматы
- Ensure the battery box is kept dry. While the LED strip is IP65 waterproof, the battery box is not.
- Use only 3 AA batteries (not included) of the specified type. Do not mix old and new batteries or different battery types.
- Эгерде продукт агып кетпеши үчүн узак убакыт бою колдонулбаса, батареяларды алып салыңыз.
- Продукцияны оңдоого же өзгөртүүгө аракет кылбаңыз. Бардык тейлөө иштерин квалификациялуу адистерге тапшырыңыз.
- Балдар жетпеген жерде сактаңыз.
- LED жарыгына көздүн түз тийүүсүнө узак убакыт бою жол бербеңиз.
Пакеттин мазмуну
Сураныч, таңгактын мазмунун ачканда, бардык буюмдардын бар экенин жана бузулбаганын текшериңиз:
- 1 x RGB LED Strip Light (2 meters / 6.56 feet)
- 1 x 3-Key Mini Controller
- 1 x Battery Box (for 3 AA batteries)
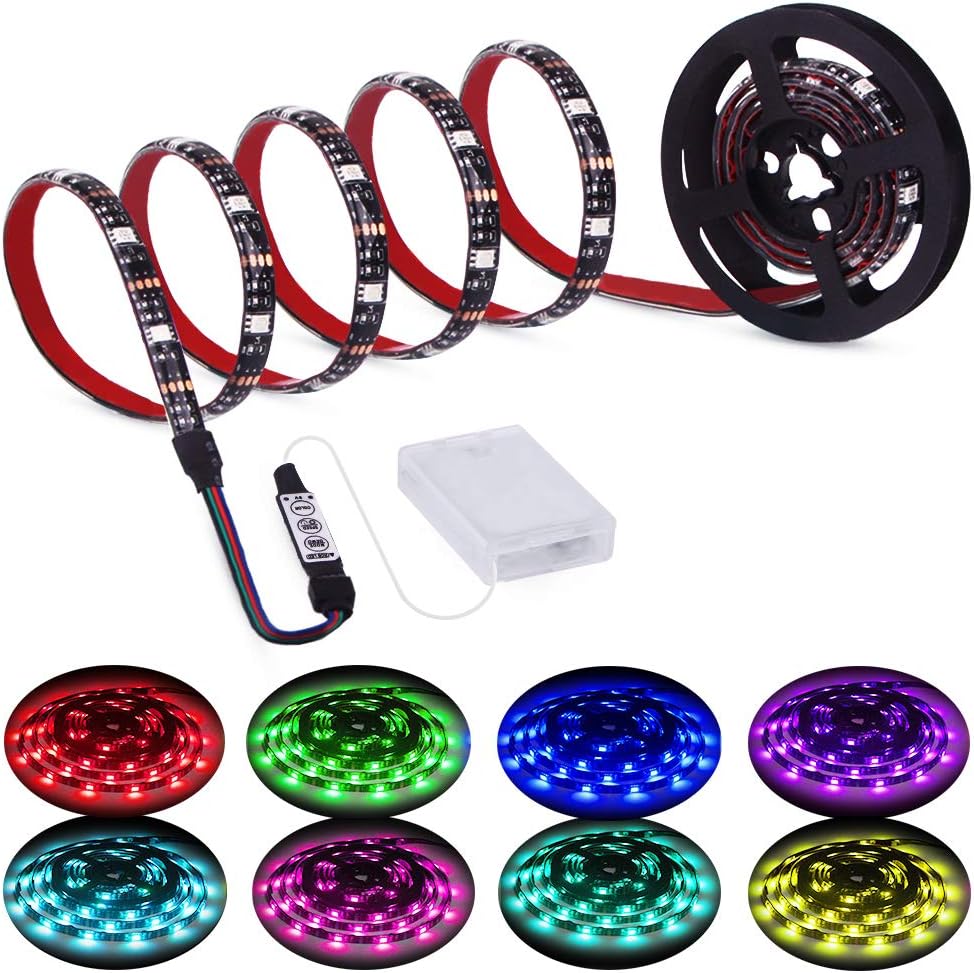
Сүрөт: бүттүview of the LED strip, mini controller, battery box, and various color outputs.
Продукт өзгөчөлүктөрү
- Узундугу: 2 метр (6.56 фут)
- Кубат булагы: Battery-powered (3 x AA batteries, not included)
- Контролдоо: Integrated 3-key mini controller
- Түс параметрлери: 20 статикалык түстөр
- Динамикалык режимдер: 20 different dynamic lighting modes
- Жөнгө салуу: 8 levels of brightness adjustment for static colors, 8 levels of speed adjustment for dynamic modes
- Суу өткөрбөйт рейтинги: IP65 (LED тилкеси гана)
- Орнотуу: Жеңил монтаждоо үчүн өзүн-өзү чаптама
- Ыңгайлаштырылган: Can be cut at designated marks to fit desired length
Жайгашуу
1. Батареяны орнотуу
- Open the battery compartment on the battery box.
- Туура полярдуулукту (+/-) камсыз кылуу менен 3 AA батарейкасын салыңыз.
- Батарея отсегин бекем жабыңыз.

Image: Illustration of connecting the LED strip to the controller and battery box, highlighting the battery insertion and power switch.
2. Туташтыруучу компоненттер
- Connect the LED strip connector to the mini controller's input. Ensure the arrows or markings on both connectors align for proper connection.
- Connect the mini controller's output to the battery box connector. Again, ensure proper alignment.
3. LED тилкесин орнотуу
- Бетти тазалоо: Before applying, ensure the surface is clean, dry, and free of dust or grease. This is crucial for strong adhesion.
- Кабык жана таякча: LED тилкесинин арткы бетиндеги жабышчаак лентадан коргоочу катмарды этияттык менен сыйрып алыңыз. Тилкени каалаган бетке бекем басыңыз.
- Тасманы кесүү: If a shorter length is required, the LED strip can be cut at the designated cut marks (usually indicated by a copper pad and scissor icon). Only cut at these marks to avoid damaging the circuit.

Image: Demonstrates the super adhesive tape, the ability to cut the strip at marked intervals, and the IP65 waterproof rating of the strip.
Операция
The LED strip is controlled by the 3-key mini controller. Ensure the battery box switch is in the 'ON' position.

Сүрөт: деталдуу view of the 3-key controller, showing the 'MODE/DEMO', 'SPEED/BRIGHTNESS/OFF', and 'COLOR' buttons and their functions.
Контроллердин функциялары:
- MODE/DEMO Button:
- Short press to cycle through 20 dynamic lighting modes.
- SPEED/BRIGHTNESS/OFF Button:
- When in a dynamic mode, short press to adjust the speed (8 levels).
- When in a static color mode, short press to adjust the brightness (8 levels).
- Long press to turn the lights OFF. Short press again to turn ON.
- ТҮС баскычы:
- Short press to cycle through 20 static color options.
Техникалык тейлөө
- Тазалоо: Gently wipe the LED strip with a dry, soft cloth if it becomes dusty. Do not use harsh chemicals or abrasive cleaners.
- Батареяны алмаштыруу: Replace all 3 AA batteries when the lights dim significantly or stop working. Ensure proper polarity.
- Сактагыч: If storing for an extended period, remove the batteries from the battery box to prevent corrosion. Store the strip in a cool, dry place.
Проблемаларды чечүү
| Көйгөй | Мүмкүн себеп | Чечим |
|---|---|---|
| Жарыктар күйбөйт. | No batteries, dead batteries, incorrect battery polarity, loose connection, battery box switch OFF. | Insert fresh AA batteries with correct polarity. Check all connections are secure. Ensure the battery box switch is ON. |
| Жарыктар күңүрт же жымыңдайт. | Батареянын кубаттуулугу төмөн. | Жаңы AA батарейкалары менен алмаштырыңыз. |
| Контроллер жооп бербей жатат. | Loose connection, controller malfunction. | Check connections between strip, controller, and battery box. Replace batteries. If issue persists, contact support. |
| Part of the strip is not lighting up. | Damage to the strip (e.g., cut incorrectly, bent sharply). | Inspect the strip for visible damage. If cut, ensure it was done at designated marks. Damaged sections may not be repairable. |
| Клей жабышпайт. | Surface not clean or dry, adhesive worn out. | Ensure surface is thoroughly cleaned and dry before application. For re-application, use additional double-sided adhesive tape. |
Техникалык шарттар
- Модел: XP-LED11-3K
- Бренд: XYOP
- Жарык түрү: LED Strip
- Ачык түс: RGB (Көп түстүү)
- Узундугу: 2 метр (6.56 фут)
- Кубат булагы: 3 x AA батарейкалар (киргизилген эмес)
- Тtage: 5 вольт
- Ватtage: 3 Ватт
- Сууга туруктуулук деңгээли: IP65 (LED тилкеси гана)
- Камтылган компоненттер: Controller
- Материал: Металл, винил
- Элемент Салмагы: Болжол менен 0.634 унция (0.02 Kilogram)
- Пакеттин өлчөмдөрү: 7.44 x 5.63 x 0.79 дюйм
Кепилдик жана колдоо
For warranty information or technical support, please refer to the retailer's return policy or contact XYOP customer service directly. Contact details can typically be found on the product packaging or the official XYOP webсайт.