
Introduction
This manual provides detailed instructions for the setup, operation, and maintenance of your AUNMAS hws8g0vnk1-01 Digital LED Alarm Clock. This device features a digital time display, alarm with snooze function, temperature and humidity monitoring, and a time projection feature. Please read this manual thoroughly before using the product to ensure proper function and longevity.
Маанилүү коопсуздук маалыматы
- Аппаратты экстремалдык температурага, түз күндүн нуруна же жогорку нымдуулукка дуушар кылбаңыз.
- Аппаратты түшүрүүдөн же катуу таасирлерден сактаныңыз.
- Белгиленген кубат адаптерин же батарейкаларды гана колдонуңуз.
- Аппаратты суудан же башка суюктуктардан алыс кармаңыз.
- Аппаратты өз алдынча бөлүүгө же оңдоого аракет кылбаңыз. Квалификациялуу тейлөө кызматкерлерине кайрылыңыз.
Продукт бүттүview
Familiarize yourself with the components and controls of your digital alarm clock.
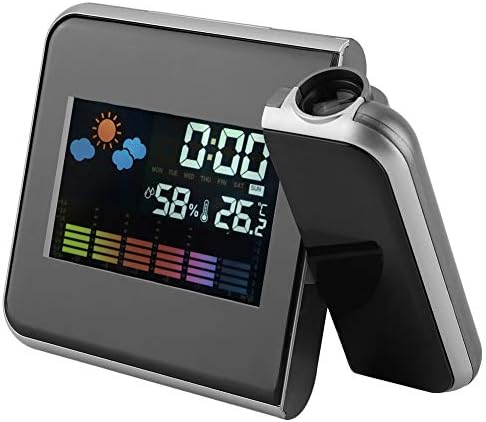
1-сүрөт: Фронт view of the AUNMAS hws8g0vnk1-01 Digital LED Alarm Clock, displaying time, humidity, temperature, and weather icons.

2-сүрөт: Арткы view of the alarm clock, showing control buttons, battery compartment, and power input.
Башкаруу баскычтары жана порттор:
- РЕЖИМ: Used to enter setup modes for time, alarm, etc.
- ӨЙДӨ / ТӨМӨНГҮ: Used to adjust values during setup.
- MAX / MIN: Displays maximum/minimum temperature and humidity.
- SNZ: Activates the snooze function for the alarm.
- Зонд тешиги: For external sensors (if applicable, not included).
- Power Supply (AAA*2): Battery compartment for backup power.
- External Power Interface (DC 4.5V): USB кубат кабелин туташтыруу үчүн.
- Supporting Base: Provides stability for the clock.
Жайгашуу
Аппаратты кубаттандыруу
The alarm clock can be powered via a USB cable or by AAA batteries for backup.
- USB Power: Connect the provided USB cable to the "External Power Interface (DC 4.5V)" on the back of the clock and plug the other end into a compatible USB power adapter (not included) or a USB port.
- Батареянын камдык көчүрмөсү: Open the battery compartment on the back of the clock and insert 2 AAA batteries (not included), ensuring correct polarity. Batteries provide backup for settings in case of power loss, but the display may turn off to conserve power when running on batteries alone.
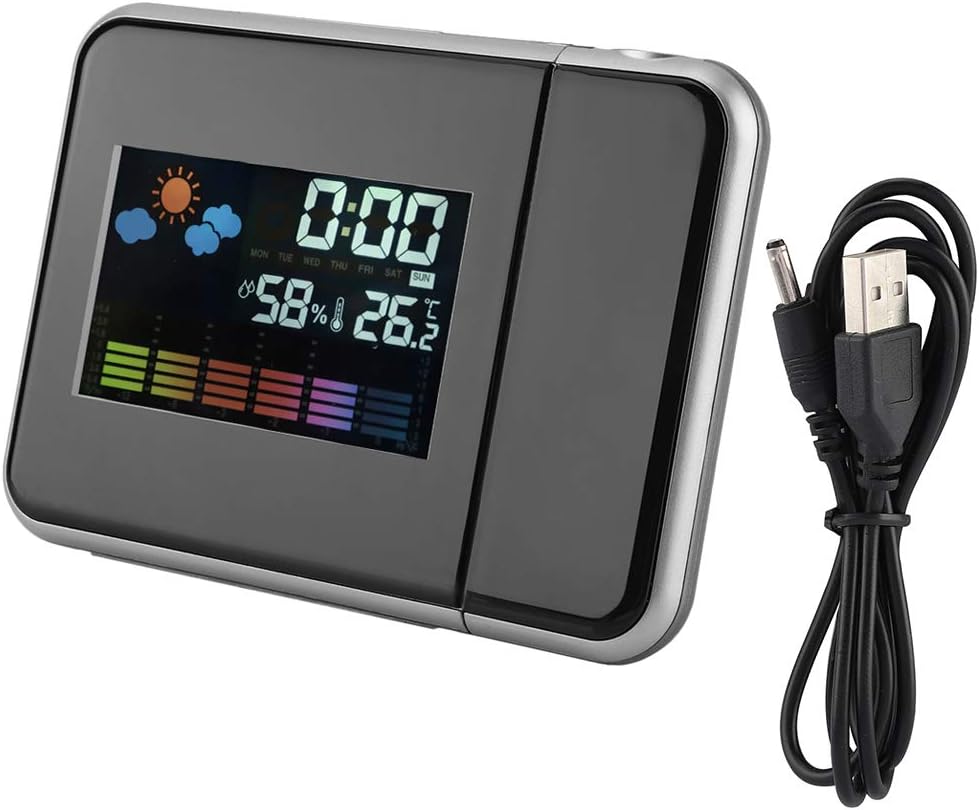
3-сүрөт: The alarm clock connected via its USB power cable.
Иштөө нускамалары
Убакыт жана дата орнотуу
- басыңыз РЕЖИМ убакыт дисплейи күйүп-өчө баштаганга чейин баскычын кайра-кайра басыңыз.
- колдонуу UP жана ылдый саатты тууралоо үчүн баскычтар.
- Басыңыз РЕЖИМ мүнөттөргө жылдыруу үчүн кайрадан колдонуңуз, андан кийин колдонуңуз UP жана ылдый тууралоо.
- Басууну улантыңыз РЕЖИМ жыл, ай жана күн жөндөөлөрүн өзгөртүү үчүн, ар бирин тууралоо UP жана ылдый.
- Бардык жөндөөлөр туура болгондон кийин, баскычты басыңыз РЕЖИМ one last time or wait a few seconds for the settings to save automatically.
Ойготкучту орнотуу
- басыңыз РЕЖИМ button until the alarm icon appears and the alarm time starts flashing.
- колдонуу UP жана ылдый каалаган ойготкуч саатын коюу үчүн баскычтар.
- Басыңыз РЕЖИМ again to set the alarm minutes using UP жана ылдый.
- Басыңыз РЕЖИМ one last time or wait for the settings to save.
- To activate/deactivate the alarm, refer to the specific icon on the display or a dedicated alarm toggle button if present (not explicitly labeled in image, typically part of MODE cycle or a separate switch).
Тындырма функциясы
Ойготкуч басылганда, басыңыз АРОСА button to temporarily silence the alarm. The alarm will sound again after a short interval (typically 5-10 minutes).
Температура жана нымдуулук дисплей
The clock automatically displays the current indoor temperature and humidity. The unit may cycle between Celsius and Fahrenheit or have a dedicated button for switching (not explicitly labeled). Pressing the МАКС/МИН button will display the highest and lowest recorded temperature and humidity values since the last reset.
Time Projection Feature
The clock can project the time onto a wall or ceiling.
- Проектордун линзасын сааттын капталынан табыңыз.
- Adjust the angle of the projector lens to direct the time display to your desired surface. The projection angle can be rotated up to 180 degrees.
- The optimal projection distance is between 1 to 5 meters (39.37 to 196.85 inches).
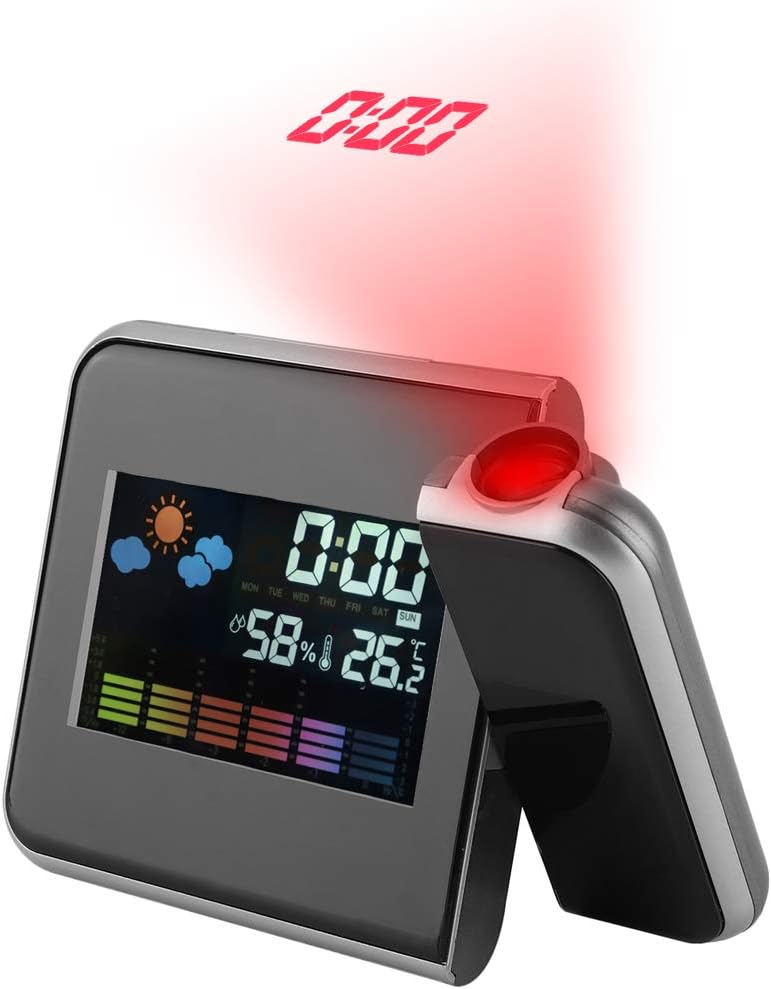
4-сүрөт: The alarm clock demonstrating its time projection feature.
Техникалык тейлөө
- Тазалоо: Wipe the clock's surface with a soft, dry cloth. Do not use abrasive cleaners or solvents.
- Батареяны алмаштыруу: If using battery backup, replace AAA batteries when the display becomes dim or settings are not retained during power outages. Жаңы батареяларды салууда туура полярдуулукту камсыз кылыңыз.
- Сактагыч: Саатты узак убакытка сактасаңыз, агып кетпеш үчүн батарейкаларды алып салыңыз.
Проблемаларды чечүү
| Маселе | Мүмкүн себеп | Чечим |
|---|---|---|
| Display turns off or resets when unplugged. | No battery backup or depleted batteries. | Install 2 fresh AAA batteries for backup power. The display may still turn off on battery power to save energy, but settings will be retained. |
| Temperature/humidity readings are inaccurate. | Clock placed near heat sources, vents, or in direct sunlight. | Relocate the clock to a stable environment away from direct heat, cold, or drafts. Allow time for readings to stabilize. |
| Time projection is blurry or unclear. | Incorrect focus or distance. | Adjust the focus ring on the projector lens (if available) and ensure the projection distance is within 1 to 5 meters. |
| Ойготкуч угулбайт. | Ойготкуч иштетилген эмес же үн өтө төмөн. | Ensure the alarm is set and activated (check for alarm icon on display). Check for any volume settings (if applicable). |
Техникалык шарттар
| Өзгөчөлүк | Деталь |
|---|---|
| Бренд | AUNMAS |
| Модель номери | hws8g0vnk1-01 |
| Өлчөмдөрү (L x W x Y) | 16 x 12 x 7 см (болжол менен 6.3 x 4.7 x 2.8 дюйм) |
| Салмагы | 10 г (0.35 унция) |
| Материал | Пластик |
| Power Source | USB Cable (DC 4.5V) / 2 x AAA Batteries (backup) |
| Дисплей түрү | Санарип |
| Өзгөчөлүктөр | Humidity Display, Time Projection, Temperature Display, Alarm, Snooze |
| Максаттуу колдонуу | Indoor |
Кепилдик жана колдоо
For warranty information or technical support, please refer to the retailer's return policy or contact the seller directly through your purchase platform. Keep your purchase receipt as proof of purchase.