
ssontong Ssontong X10
Ssontong X10 Dual Dash Camera User Manual
Model: Ssontong X10 | Brand: Ssontong
1. Киришүү
Thank you for choosing the Ssontong X10 Dual Dash Camera. This device is designed to provide comprehensive recording of your driving journey, offering both front and rear views in high definition. Equipped with advanced features such as loop recording, G-sensor emergency locking, parking monitoring, and motion detection, it ensures reliable evidence capture and enhanced vehicle security. Please read this manual carefully before operation to ensure proper installation and optimal performance.

Сүрөт 1.1: Алдыңкы view of the Ssontong X10 Dual Dash Camera, displaying a car on its screen.
2. Пакеттин мазмуну
Сураныч, пакетте төмөнкү нерселерди текшериңиз:
- Ssontong X10 Dash Camera (Front Unit)
- Арткы камера
- Соруу Тоосу
- Унаа заряддагыч
- Mini USB Power Cable
- SD Card Reader
- Колдонуучунун колдонмосу (бул документ)
- Special Cleaning Cloth
Note: An SD card is NOT included and must be purchased separately. A Class 10 or above, 16GB or 32GB Micro SD card is recommended.
3. Продукциянын өзгөчөлүктөрү
The Ssontong X10 Dash Camera is equipped with a range of features to enhance your driving safety and recording experience:
- Эки камералуу жаздыруу: Simultaneous recording from front (170° wide-angle) and rear (140° wide-angle) cameras.
- Full HD 1080P Front Recording: Captures clear video at 1920x1080P (30fps).
- HD 720P Rear Recording: Арткы рекорддор view at 1280x720P.
- 4 дюймдук IPS экран: Реалдуу убакыт режиминде так көрсөтүүнү камсыз кылат viewжана ойнотуу.
- Цикл жаздыруу: Эң эски тамак-ашты автоматтык түрдө кайра жазатtage эс тутум картасы толгондо, үзгүлтүксүз жаздырууну камсыз кылат.
- G-сенсор (авариялык кулпу): Күтүүсүз титирөөлөрдү же кагылышууларды автоматтык түрдө аныктап, учурдагы видео флэш-дискти кулпулайтtagанын кайра жазылышын болтурбоо үчүн д.
- Унаа токтотуучу жай: Provides 24-hour protection by automatically recording when motion or impact is detected while parked.
- Кыймылды аныктоо: Initiates recording when movement is detected in front of the camera.
- Түнкү көрүнүш жана HDR: Enhanced low-light performance with infrared lens and High-Dynamic Range technology for clear nighttime recordings.
- Камтылган батарея: Small internal battery for saving the last video file after external power is cut off.

Сүрөт 3.1: Бүттүview of the Ssontong X10's key features and display.
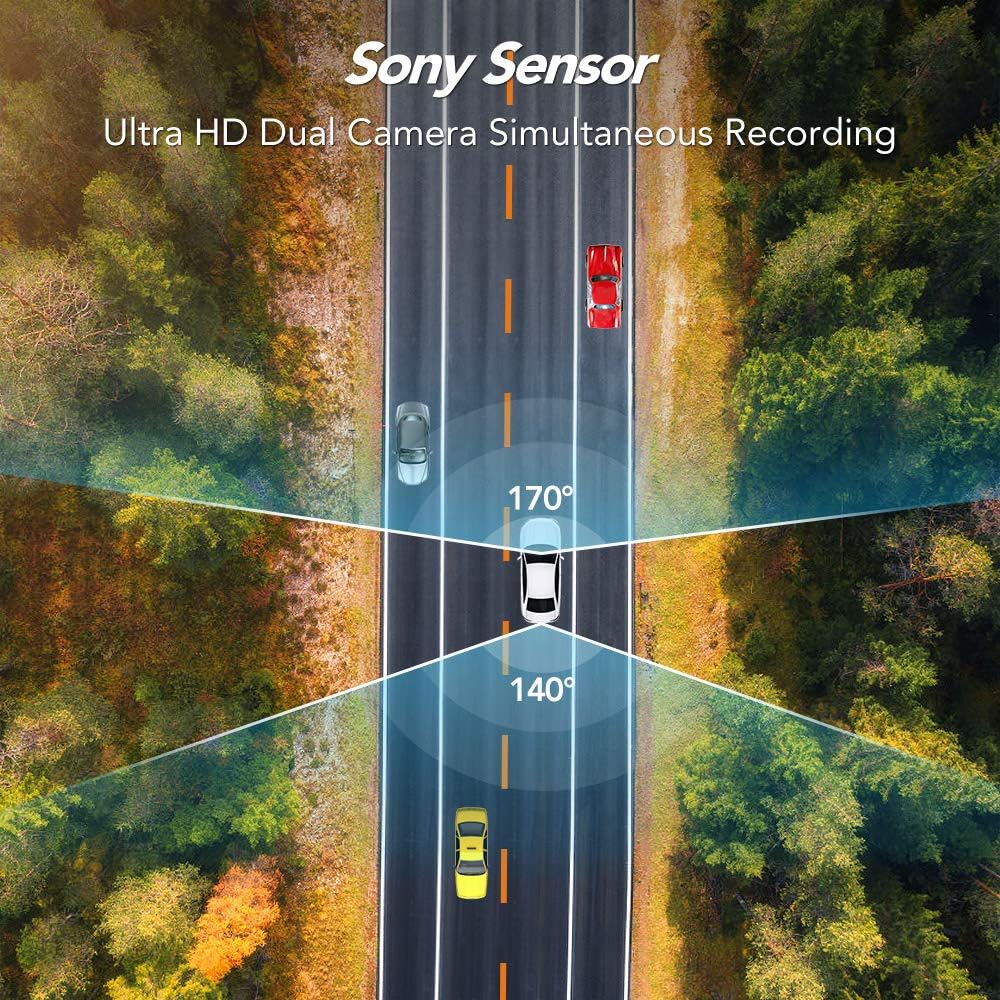
Image 3.2: Visual representation of the wide-angle lens coverage.

Image 3.3: Demonstration of the camera's high definition day and night vision.

Сүрөт 3.4: Мисample of the camera's performance in low-light and rainy conditions.
4. Орнотуу
4.1 Биринчи колдонуудан мурун
- Микро SD картаны салыңыз: Before using the camera, insert a Class 10 or above Micro SD card (16GB or 32GB recommended) into the designated slot. Ensure the card is inserted correctly until it clicks into place.
- Format Micro SD Card: It is crucial to format the Micro SD card directly within the camera's menu before its first use and periodically thereafter to ensure stable recording and prevent data corruption. Navigate to the 'Format' option in the system settings menu.
4.2 Унаага орнотуу
- Камераны орнотуу: Attach the suction mount to a clean, dry spot on your windshield, preferably behind the rearview күзгүгө, ал сизге тоскоол болбошу үчүн view. Secure the dash camera to the suction mount.
- Арткы камераны орнотуу: Mount the rear camera on the rear windshield or license plate area. Route the cable discreetly to the front dash camera.
- Туташуу кубаты: Connect the Mini USB power cable to the dash camera and plug the car charger into your vehicle's cigarette lighter socket.
- Линзанын бурчун тууралоо: Power on the camera and adjust the lens angle to ensure it captures the desired view алдыдагы жолдун.
Important: The camera requires continuous external power to operate. The built-in battery is only for saving the last video file after power is cut off and will not power the camera for extended use.
5. Иштөө нускамалары
5.1 Негизги операция
- Күйгүзүү/өчүрүү: The camera is designed to automatically power on and begin recording when your vehicle starts and power off when the vehicle is turned off.
- Күн жана убакыт жөндөөсү: Upon first use, or after a power reset, set the correct date and time in the camera's settings menu. This ensures accurate timestampжаздырууларыңыздагы s.
- Меню навигациясы: Use the 'MODE', 'UP', 'DOWN', and 'OK' buttons on the side of the camera to navigate through the menu options and confirm selections.
5.2 Жазуу режимдери
- Цикл жаздыруу: Бул функция кулпусу ачылган эң эскилердин үстүнөн жазуу менен үзгүлтүксүз жаздырууну камсыз кылат fileЭстутум картасы толгондо s. Ар бир видео сегменттин узактыгын (мисалы, 1, 3 же 5 мүнөт) жөндөөлөрдөн орното аласыз.
- Өзгөчө кырдаалдарда жаздыруу (G-сенсор): When the built-in G-sensor detects a sudden impact or sharp braking, it automatically locks the current video segment, preventing it from being overwritten by loop recording. These fileс өзүнчө папкада сакталат.
- Унаа токтотуучу жай: When enabled, the camera will automatically start recording if it detects a vibration or collision while the vehicle is parked and the engine is off. This feature requires a continuous power supply (e.g., hardwire kit, not included) for 24/7 monitoring.
- Кыймылды аныктоо: When enabled, the camera will start recording when it detects movement in its field of view. This is typically used when the vehicle is parked.

Image 5.1: Emergency recording in action, locking important footage.

Image 5.2: The camera's parking monitor providing continuous protection.
Warning: Do not turn on Parking Monitoring and Motion Detection while driving, as this can interfere with normal recording and fill up the memory card with unnecessary locked files.
6. Техникалык тейлөө
- Тазалоо: Use the provided special cleaning cloth to gently wipe the camera lens and screen. Do not use abrasive cleaners or solvents.
- Температура: Avoid leaving the camera in direct sunlight for extended periods or in environments where the temperature could exceed 170°F (75°C), as this can damage the device.
- SD картага кам көрүү: Regularly format your Micro SD card (at least once a month) to maintain optimal performance and prevent data corruption. Back up important files форматтоодон мурун.
- Программалык камсыздоонун жаңыртуулары: Өндүрүүчүнү текшериңиз webиштин натыйжалуулугун жогорулатуу жана жаңы функцияларды кошуу үчүн мезгил-мезгили менен сайттагы микропрограммалык камсыздоонун жаңыртууларын карап туруңуз.
7. Кыйынчылыктарды
- Камера күйбөйт: Ensure the car charger is properly connected and the vehicle's power outlet is active. The camera requires external power to operate; the internal battery is only for emergency file сактоо.
- Camera turns off unexpectedly: Check the power connection. If the issue persists, the internal battery might be depleted or faulty. Ensure the car charger is providing stable power.
- "Low Battery" message: This indicates the internal battery is low. Connect the camera to external power via the car charger.
- Жаздыруу токтотулат же тоңот: This is often due to a faulty or incompatible Micro SD card. Ensure you are using a Class 10 or above card (16GB/32GB recommended) and format it regularly within the camera. Try a different, high-quality SD card.
- Видеонун сапаты начар: Ensure the lenses are clean. Check the recording resolution settings. For optimal quality, use 1080P for the front camera.
- G-sensor is too sensitive/not sensitive enough: Adjust the G-sensor sensitivity setting in the camera's menu.
- Parking Monitor/Motion Detection not working: Ensure these features are enabled in the settings. For continuous parking monitoring, a constant power supply (e.g., hardwire kit) is usually required, as the internal battery is limited.
- Date and Time are incorrect: Reset the date and time in the settings menu. If it resets frequently, the internal battery might be failing to retain settings.
8. Техникалык шарттар
| Өзгөчөлүк | Description |
|---|---|
| Экран | 4 дюймдук IPS экраны |
| Front Lens Angle | 170° кең бурч |
| Арткы линзанын бурчу | 140° кең бурч |
| Front Resolution Recording Resolution | 1920x1080P (30fps) |
| Арткы жаздыруунун чечилиши | 1280x720P |
| Диафрагма | F2.0 |
| Сүрөттүн чечилиши | 12M |
| Микро SD картаны колдоо | 16GB or 32GB, Class 10 or above (not included) |
| USB интерфейси | Мини USB |
| Dash Cam Dimensions | 4.5 x 2.5 x 1.3 дюйм |
| Power Source | Унаа кубаттагыч (DC 12V) |
| Ички батарея | Built-in (for emergency file сактоо гана) |
9. Кепилдик жана колдоо
For warranty information and technical support, please refer to the contact details provided with your purchase or visit the official Ssontong webсайт. Сатып алуу квитанциясын кепилдик дооматтары үчүн сатып алуунун далили катары сактаңыз.
For common questions and troubleshooting, please refer to the Troubleshooting section of this manual or the FAQ section on the Ssontong support page.
Ask a question about this manual
Ask about setup, troubleshooting, compatibility, parts, safety, or missing instructions. Manuals+ will review the question and use this page’s manual context to help answer it.