1. Киришүү
The MASTECH MS8260E is a versatile 2000-count digital multimeter designed for a wide range of electrical and electronic measurements. It features a large LCD display, non-contact voltage (NCV) detection, and capabilities for measuring AC/DC voltage, AC/DC current, resistance, capacitance, and inductance. This manual provides essential information for the safe and effective operation, maintenance, and troubleshooting of your device.
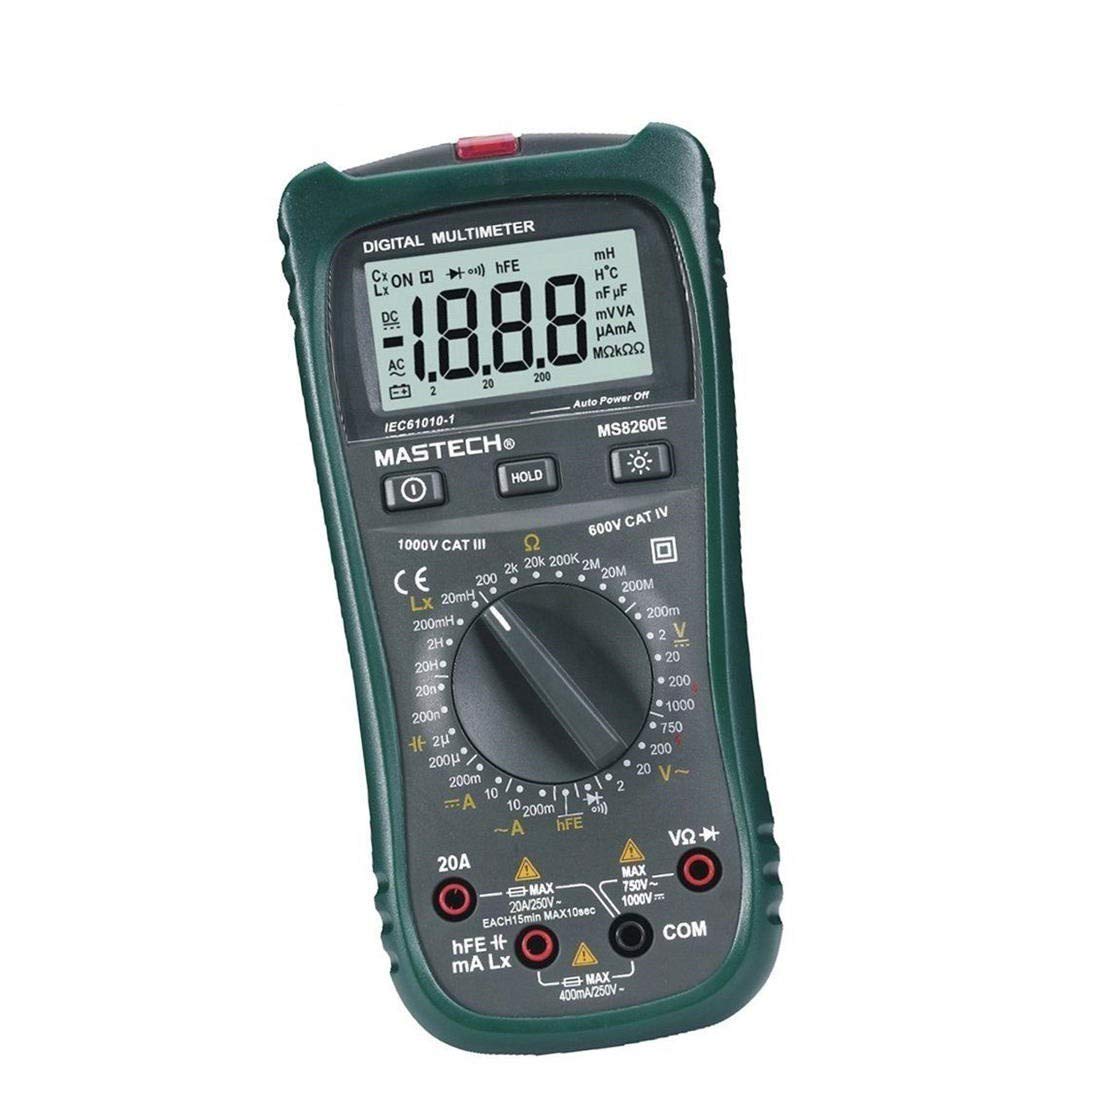
Сүрөт 1: Алдыңкы view of the MASTECH MS8260E Digital Multimeter, showing the LCD display, function rotary switch, and input jacks.
2. Коопсуздук маалыматы
To ensure safe operation and service of the meter, follow these safety guidelines:
- Read and understand all instructions in this manual before using the meter.
- Ар дайым жергиликтүү жана улуттук коопсуздук эрежелерин сактаңыз.
- Эгерде ал бузулуп калса же сыноо өткөргүчтөрүнүн изоляциясы бузулса, эсептегичти колдонбоңуз.
- Observe the input limits for each measurement range to prevent electrical shock or damage to the meter. This meter is rated for CAT.IV 600V.
- Том менен иштөөдө этият болуңузtag30V AC RMS, 42V пик же 60V DC жогору. Бул томtagшок коркунучун жаратат.
- Ар дайым чынжырдагы кубатты ажыратып, бардык жогорку көлөмдү чыгарыңызtage capacitors before making resistance, continuity, diode, or capacitance measurements.
- Батареянын аз көрсөткүчү так көрсөткүчтөрдү камсыз кылуу үчүн дароо батареяны алмаштырыңыз.
- Эсептегичти жарылуучу газ, буу же чаңдуу чөйрөдө иштетпеңиз.
3. Продукт бүтүп калдыview
The MS8260E multimeter is equipped with several features to facilitate accurate and convenient measurements:
- Large 2000 Counts LCD Display: Provides clear digital readings.
- In-Contact Voltage (NCV) детектору: AC томун аныктайтtage greater than 110V without physical contact, indicated by a flash warning.
- Маалыматты кармоо функциясы: Оңой жаздыруу үчүн көрсөтүлгөн окууну токтотот.
- Дисплейдин арткы жарыгы: Improves visibility in dimly lit conditions.
- Авто өчүрүү: Conserves battery life by automatically turning off the meter after a period of inactivity.
- Батареянын төмөн көрсөткүчү: Alerts the user when the battery needs replacement.
- Полярдуулуктун көрсөткүчү: Automatically displays negative polarity.
- 30-Range Rotary Switch: Selects various measurement functions including AC/DC voltage, AC/DC current, resistance, capacitance, inductance, diode check, continuity test, and transistor (hFE) check.
4. Орнотуу
4.1 Батареяны орнотуу
The MS8260E requires one 9V battery (NEDA 1604/6F22). To install or replace the battery:
- Ensure the meter is turned off and disconnect all test leads from the input terminals.
- Батарея уясынын капкагын эсептегичтин арткы жагында табыңыз.
- Кармап туруучу бурам(дарды) бурап, капкакты алып салыңыз.
- Insert the 9V battery, observing the correct polarity.
- Батарея уясынын капкагын ордуна коюңуз жана аны бурама(лар) менен бекитиңиз.
4.2 Сыноо өткөргүчтөрүн туташтыруу
Always connect the black test lead to the "COM" (common) input jack. Connect the red test lead to the appropriate input jack based on the desired measurement:
- Voltage, Resistance, Capacitance, Inductance, Diode, Continuity, and hFE measurements: Connect the red lead to the "VΩCAPHz" jack.
- For Current measurements up to 200mA: Connect the red lead to the "mA" jack.
- For Current measurements up to 10A: Connect the red lead to the "10A" jack.
Ensure test leads are fully inserted into the jacks before taking measurements.
5. Иштөө нускамалары
Turn the rotary switch to the desired function. The meter will display "OL" (Overload) if no input is present or if the input exceeds the range.
5.1 DC Voltage Өлчөө (DCV)
- Set the rotary switch to the desired DCV range (200mV, 2V, 20V, 200V, 1000V).
- Connect the black test lead to the "COM" jack and the red test lead to the "VΩCAPHz" jack.
- Полярдуулукту байкап, өлчөнө турган компонентке же чынжырчага сыноо зымдарын туташтырыңыз.
- Томду окуңузtage дисплейдеги e мааниси.
5.2 AC томtage Өлчөө (ACV)
- Set the rotary switch to the desired ACV range (2V, 20V, 200V, 750V).
- Connect the black test lead to the "COM" jack and the red test lead to the "VΩCAPHz" jack.
- Сыноо өткөргүчтөрүн AC том аркылуу туташтырыңызtage булагы.
- Томду окуңузtage дисплейдеги e мааниси.
5.3 Туруктуу токту өлчөө (ТТО)
- Set the rotary switch to the desired DCA range (200mA, 10A).
- For measurements up to 200mA, connect the red lead to the "mA" jack. For measurements up to 10A, connect the red lead to the "10A" jack. The black lead connects to "COM".
- Ток күчү өлчөнө турган чынжырды ачып, эсептегичти жүк менен удаалаш туташтырыңыз.
- ЖК дисплейдеги учурдагы маанини окуңуз.
5.4 Өзгөрмө токту өлчөө (ACA)
- Set the rotary switch to the desired ACA range (200mA, 10A).
- For measurements up to 200mA, connect the red lead to the "mA" jack. For measurements up to 10A, connect the red lead to the "10A" jack. The black lead connects to "COM".
- Ток күчү өлчөнө турган чынжырды ачып, эсептегичти жүк менен удаалаш туташтырыңыз.
- ЖК дисплейдеги учурдагы маанини окуңуз.
5.5 Каршылыкты өлчөө (Ω)
- Set the rotary switch to the desired Ω range (200Ω, 2kΩ, 20kΩ, 200kΩ, 2MΩ, 20MΩ, 200MΩ).
- Connect the black test lead to "COM" and the red test lead to "VΩCAPHz".
- Схема кубаты өчүрүлгөнүн жана бардык конденсаторлордун зарядсыздангандыгын текшериңиз.
- Сыноо өткөргүчтөрүн резистор же компонент аркылуу туташтырыңыз.
- ЖК дисплейдеги каршылыктын маанисин окуңуз.
5.6 Capacitance Measurement (CAP)
- Set the rotary switch to the desired CAP range (20nF, 200nF, 2uF, 200uF).
- Connect the black test lead to "COM" and the red test lead to "VΩCAPHz".
- Сыноочу зымдарды туташтыруудан мурун, конденсатордун толук разряддалганын текшериңиз.
- Конденсатор аркылуу сыноо өткөргүчтөрүн туташтырыңыз.
- ЖК дисплейдеги сыйымдуулуктун маанисин окуңуз.
5.7 Inductance Measurement (L)
- Set the rotary switch to the desired Inductance range (20mH, 200mH, 2H, 20H).
- Connect the black test lead to "COM" and the red test lead to "VΩCAPHz".
- Connect the test leads across the inductor.
- Read the inductance value on the LCD display.
5.8 Диоддун сыноосу
- Set the rotary switch to the Diode symbol.
- Connect the black test lead to "COM" and the red test lead to "VΩCAPHz".
- Кызыл зымды анодго, ал эми кара зымды диоддун катодуна туташтырыңыз. Алдыга вольтtagтөмөндөө (кремний диоддору үчүн адатта 0.5 Вдан 0.8 Вга чейин) көрсөтүлөт.
- Reverse the leads. The display should show "OL" for a good diode.
5.9 Үзгүлтүксүздүк тести
- Set the rotary switch to the Continuity symbol.
- Connect the black test lead to "COM" and the red test lead to "VΩCAPHz".
- Сынамык өткөргүчтөрдү чынжыр же компонент боюнча туташтырыңыз.
- Эгерде каршылык болжол менен 30Ω төмөн болсо, үзгүлтүксүздүктү көрсөтүүчү сигнал угулат.
5.10 Transistor (hFE) Test
- Айлануучу которгучту hFE абалына коюңуз.
- Identify the type (NPN or PNP) and pinout (Emitter, Base, Collector) of the transistor.
- Insert the transistor leads into the corresponding sockets in the hFE test socket on the meter.
- ЖК дисплейден hFE (туруктуу токтун күчөшү) маанисин окуңуз.
5.11 Контактсыз томtage (NCV) аныктоо
- Айланма которгучту NCV абалына коюңуз.
- Hold the top front part of the meter near the AC voltage source (e.g., an electrical outlet or insulated wire).
- Эгерде AC voltage greater than 110V is detected, the NCV indicator light will flash, and the buzzer may sound.
6. Техникалык тейлөө
6.1 Тазалоо
Жарнама менен эсептегичти сүртүңүзamp кездеме жана жумшак жуугуч каражатты колдонуңуз. Абразивдүү заттарды же эриткичтерди колдонбоңуз. Колдонуудан мурун өлчөгүчтүн кургак экенин текшериңиз.
6.2 Батареяны алмаштыруу
When the "BAT" symbol appears on the display, the battery needs to be replaced. Refer to Section 4.1 for battery installation instructions.
6.3 Сактагычты алмаштыруу
If the current measurement function fails, the fuse may need replacement. This operation should only be performed by qualified personnel. Refer to the service manual or contact customer support for fuse specifications and replacement procedures.
6.4 Сактоо
If the meter is not to be used for an extended period, remove the battery to prevent leakage and damage to the meter. Store the meter in a cool, dry place away from direct sunlight.
7. Кыйынчылыктарды
| Көйгөй | Мүмкүн себеп | Чечим |
|---|---|---|
| Эч кандай дисплей же начар дисплей | Low battery; Meter off | Replace battery; Turn on meter |
| "OL" көрсөтүлөт | Input exceeds range; Open circuit (for resistance/continuity) | Select higher range; Check circuit connection |
| Туура эмес окуулар | Low battery; Incorrect range selected; Poor test lead contact | Replace battery; Select appropriate range; Ensure good contact |
| Учурдагы өлчөө иштебей жатат | Күйгүзүүчү | Replace fuse (by qualified personnel) |
8. Техникалык шарттар
| Өлчөө функциясы | Диапазон | Тактык |
|---|---|---|
| DC Voltage (DCV) | 200мВ, 2В, 20В, 200В, 1000В | ±0.5% (200mV-200V), ±0.8% (1000V) |
| AC Voltage (ACV) | 2В, 20В, 200В, 750В | ±0.8% (2V-200V), ±1.2% (750V) |
| Туруктуу ток (DCA) | 200мА, 10А | ±1.5% (200mA), ±2.0% (10A) |
| AC ток (ACA) | 200мА, 10А | ±1.8% (200mA), ±3.0% (10A) |
| Каршылык көрсөтүү (Ω) | 200Ω, 2kΩ, 20kΩ, 200kΩ, 2MΩ, 20MΩ, 200MΩ | ±0.8% (200Ω-2MΩ), ±1.0% (20MΩ), ±5.0% (200MΩ) |
| Сыйымдуулук (CAP) | 20nF, 200nF, 2uF, 200uF | ±4.0% (20nF-2uF), ±5.0% (200uF) |
| Индуктивдүүлүк (L) | 20mH, 200mH, 2H, 20H | ±3.0% |
| Угуу үзгүлтүксүздүк | Buzzer sounds at <30Ω | Жок |
| Диод сыноо | 1мА, 2.8В | Жок |
| Transistor (hFE) | 0 - 1,000 | Жок |
Жалпы мүнөздөмөлөрү:
- Дисплей: 2000 саны LCD
- Коопсуздук рейтинги: CAT.IV 600V
- Күч: 9V battery (NEDA 1604/6F22)
- Салмагы: Болжол менен 1 кг (батареяны кошо алганда)
9. Кепилдик жана колдоо
For warranty information, technical support, or service inquiries, please refer to the warranty card included with your product or visit the official Mastech website. Do not attempt to repair the meter yourself, as this may void the warranty and pose safety risks.


