1. Киришүү
The PEAKMETER PM2128 is a versatile digital AC/DC clamp AC/DC көлөмүн өлчөө үчүн арналган метрtage, AC/DC current, resistance, capacitance, frequency, and temperature. It features non-contact voltage (NCV) detection, True RMS measurement, data hold, backlight, flashlight, and an auto power-off function, making it suitable for various electrical testing applications.

Figure 1.1: The PEAKMETER PM2128 Digital AC/DC Clamp Meter with included test leads.
2. Коопсуздук маалыматы
Please read and understand all safety information before operating this device. Failure to follow these instructions may result in electric shock, fire, or damage to the meter.
- Ар дайым жергиликтүү жана улуттук коопсуздук эрежелерин сактаңыз.
- Эгерде ал бузулуп калса же сыноо өткөргүчтөрүнүн изоляциясы бузулса, эсептегичти колдонбоңуз.
- Сыноо өткөргүчтөрүн туташтыруудан мурун, айланма өчүргүч керектүү өлчөө үчүн туура абалда экенине ынаныңыз.
- Voltages exceeding the maximum rated input (CAT.III 1000V).
- Ток чынжырлары менен иштөөдө өтө этият болуңуз.
- Батареянын аз көрсөткүчү так көрсөткүчтөрдү камсыз кылуу үчүн батарейкаларды дароо алмаштырыңыз.
- Эсептегичти жарылуучу газ, буу же чаңдуу чөйрөдө иштетпеңиз.
3. Продукт бүтүп калдыview
Familiarize yourself with the components of your PM2128 clamp метр.
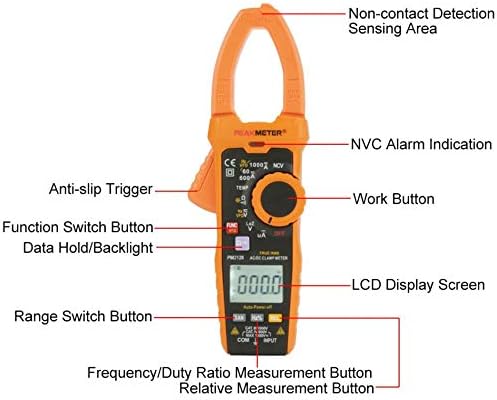
Figure 3.1: Front panel components of the PM2128 clamp метр.
- Clamp Жаак: Байланышсыз AC/DC токту өлчөө үчүн колдонулат.
- Non-Contact Detection Sensing Area: AC томун аныктайтtagд түз байланышсыз.
- Айлануучу которгуч: Өлчөө функцияларын тандайт (Көлөмtage, Current, Resistance, Capacitance, Frequency, Temperature, NCV, OFF).
- LCD дисплей: Өлчөө окууларын, бирдиктерди жана көрсөткүчтөрдү көрсөтөт.
- Функция (FUNC) баскычы: Toggles between different measurement modes within a rotary switch setting (e.g., AC/DC voltage, AC/DC current).
- Маалыматтарды кармоо/Арткы жарык баскычы: Short press to hold data, long press to activate/deactivate backlight.
- Range (RAN) Button: Автоматтык жана кол менен диапазондоону которуштурат.
- Hz/% Button: Жыштыкты же жумуш циклин өлчөөнү тандайт.
- Relative (REL) Button: Салыштырмалуу өлчөө режимин иштетет.
- Input Jacks (COM, INPUT): Connect test leads for voltage, каршылыкты, сыйымдуулукту, жыштыкты жана температураны өлчөө.
- Anti-slip Trigger: cl ачат жана жабатamp жаак.
4. Орнотуу
4.1 Батареяны орнотуу
The PM2128 requires three 1.5V AAA batteries (not included). To install:
- Эсептегич өчүрүлгөнүн текшериңиз.
- Батарея уясынын капкагын эсептегичтин арткы жагында табыңыз.
- Батарея отсегин ачуу үчүн бурагычты колдонуңуз.
- Туура полярдуулукту (+/-) сактап, үч AAA батарейкасын салыңыз.
- Батарея уясынын капкагын ордуна коюңуз жана аны бурама менен бекитиңиз.
4.2 Сыноо өткөргүчтөрүн туташтыруу
Көпчүлүк өлчөөлөр үчүн (томtage, resistance, capacitance, frequency, temperature), connect the test leads as follows:
- Кызыл сыноочу зымын 'INPUT' уячасына киргизиңиз.
- Кара сыноочу зымын 'COM' (жалпы) уячага киргизиңиз.
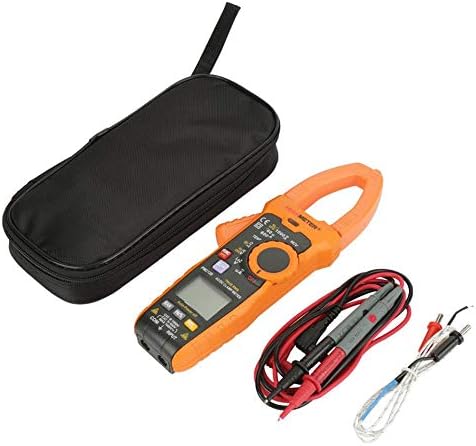
Figure 4.1: The PM2128 meter with its accessories, including test leads and a temperature probe.
5. Иштөө нускамалары
5.1 Күйгүзүү/өчүрүү
Turn the rotary switch from 'OFF' to any measurement function to power on the meter. Turn it back to 'OFF' to power off. The meter features an auto power-off function after approximately 10 minutes of inactivity to conserve battery life.
5.2 AC/DC Voltage Өлчөө
- Set the rotary switch to the 'V' position.
- Press the 'FUNC' button to toggle between ACV (~) and DCV (—).
- Сыноо өткөргүчтөрүн текшерилип жаткан схемага же компонентке параллелдүү туташтырыңыз.
- Томду окуңузtagLCDдеги e мааниси.
5.3 AC/DC Ток өлчөө (Clamp Функция)
- Set the rotary switch to the 'A' position.
- Press the 'FUNC' button to toggle between ACA (~) and DCA (—).
- Press the anti-slip trigger to open the clamp жаак.
- Чынжырдын бир гана өткөргүчүн жабыңызamp жаак. Жаактын толугу менен жабык экенин текшериңиз.
- ЖКдагы учурдагы маанини окуңуз.
5.4 Каршылыкты өлчөө
- Set the rotary switch to the 'Ω' position.
- Ensure the circuit or component is de-energized before connecting the test leads.
- Компоненттин каршылыгын өлчөө үчүн сыноо зымдарын туташтырыңыз.
- LCD дисплейдеги каршылыктын маанисин окуңуз.
5.5 Сыйымдуулукту өлчөө
- Set the rotary switch to the 'Ω' position, then press 'FUNC' until 'nF' or 'µF' is displayed.
- Сыноочу зымдарды туташтыруудан мурун, конденсатордун толук разряддалганын текшериңиз.
- Конденсатор терминалдары аркылуу сыноо өткөргүчтөрүн туташтырыңыз.
- ЖКдагы сыйымдуулуктун маанисин окуңуз.
5.6 Жыштыктарды өлчөө
- Айланма которгучту 'Hz' абалына коюңуз.
- Connect the test leads in parallel to the circuit where frequency is to be measured.
- ЖК дисплейдеги жыштык маанисин окуңуз.
5.7 Температураны өлчөө
- Set the rotary switch to the 'TEMP' position.
- Connect the temperature probe to the input jacks (ensure correct polarity if applicable).
- Зонддун учун температурасы өлчөнүүчү объекттин үстүнө же жанына коюңуз.
- ЖК дисплейдеги температуранын маанисин окуңуз.
5.8 Үзгүлтүксүздүк тести
- Set the rotary switch to the 'Ω' position, then press 'FUNC' until the continuity symbol (a speaker icon) is displayed.
- Схема кубаты өчүрүлгөнүн текшериңиз.
- Сыноо өткөргүчтөрүн компонент же схема жолу аркылуу туташтырыңыз.
- An audible beep indicates continuity (resistance less than approximately 30 Ω).
5.9 Контактсыз томtage (NCV) аныктоо
- Айланма которгучту 'NCV' абалына коюңуз.
- Move the meter's NCV sensing area close to the conductor or outlet.
- The meter will emit an audible beep and the NCV alarm indication will light up if AC voltagе аныкталат.
5.10 Data Hold, Backlight, and Flashlight
- Дайындарды кармоо: Учурдагы көрсөткүчтү дисплейде тоңдуруу үчүн 'HOLD' баскычын кыскача басыңыз. Коё берүү үчүн кайра басыңыз.
- Арткы жарык: Press and hold the 'HOLD' button for approximately 2 seconds to turn the display backlight on or off.
- Кол чырак: The flashlight function is typically activated by a dedicated button or a long press of a specific function button (refer to the meter's markings for exact operation).
6. Техникалык тейлөө
6.1 Тазалоо
Эсептегичтин кутучасын жарнама менен сүртүңүзamp кездеме жана жумшак жуугуч каражат. Абразивдүү заттарды же эриткичтерди колдонбоңуз. Колдонуудан мурун эсептегичтин кургак экенин текшериңиз.
6.2 Батареяны алмаштыруу
When the low battery indicator appears on the LCD, replace the batteries as described in Section 4.1. Remove batteries if the meter will not be used for an extended period.
6.3 Сактоо
Store the meter in a cool, dry place, away from direct sunlight and extreme temperatures. If storing for a long time, remove the batteries.
7. Кыйынчылыктарды
- Дисплей жок: Батареянын орнотулушун текшерип, батарейкалары түгөнүп калбагандыгын текшериңиз.
- Туура эмес окуулар: Verify the rotary switch is set to the correct function and range. Ensure test leads are properly connected and making good contact. Check battery level.
- Эсептегич жооп бербейт: Turn the meter off and then on again. If the issue persists, replace batteries.
8. Техникалык шарттар
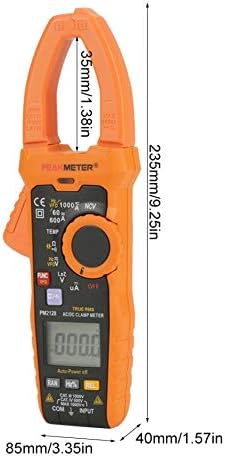
Figure 8.1: Physical dimensions of the PM2128 clamp метр.
| Параметр | Диапазон | Тактык |
|---|---|---|
| DC Voltage | 6V/60V/600V/1000V | (0.5% + 5) |
| AC Voltage (45~1000Hz) | 6V/60V/600V/1000V | (0.8% + 5) |
| AC Voltage (45~65Hz) | 6V/60V/600V | (0.8% + 5) |
| Туруктуу ток | 60A/600A/1000A | (2.5% + 8) |
| AC Current (40~65Hz) | 60A/600A/1000A | (3.0% + 10) |
| Каршылык | 6KΩ/60KΩ/600KΩ/6MΩ/60MΩ | (0.8% + 3) |
| Үзгүлтүксүздүк | <30Ω | Укулган сигнал |
| Жыштык | 60Гц/1000Гц | (1.0% + 5) |
| Температура | -20℃-1000℃/-4℉-1832℉ | (1.0% + 2) |
| Сыйымдуулук | 60nF-60mF | (4.0% + 3) |
| Төмөн каршылык тtage measurement DCV | 1000V | (1.0% + 10) |
| Төмөн каршылык тtage measurement ACV | 1000V | (2.0% + 20) |
| AC µA | 200μA | (0.8% + 3) |
Жалпы мүнөздөмөлөрү
- Дисплей: 6000 саны
- Тtage Measuring Frequency: 1кГц
- Clamp Өлчөө жыштыгы: 1кГц
- Кол чырак: Ооба
- Арткы жарык: Ооба
- Дайындарды кармоо: Ооба
- Байланышсыз Voltage Detection (NCV): Ооба
- Үзгүлтүксүздүк тести: Ооба
- Авто өчүрүү: 10 мүнөт
- Auto/Manual Measurement: Ооба
- Салыштырмалуу баалуулуктарды өлчөө: Ооба
- Чыныгы RMS: Ооба
- DC µA Measurement: Ооба
- Inverter Measurement (VFD): Ооба
- Аналогдук тилке: Ооба
- Lowpass Filtering: Ооба
- Automatic Identification of Current, Voltage and Resistance: Ооба
- Батарея: 3 x 1.5V AAA Batteries (NOT included)
- Элементтин көлөмү: 235x85x40mm (9.25x3.35x1.57in)
- Clamp Туурасы: 35мм (1.38in)
- Салмагы: Болжол менен 596г
- Коопсуздук рейтинги: EN61010-1, EN61010-2-032, EN61326, CAT.III 1000V
- Иштөө температурасы: 18℃ден 28℃ге чейин
9. Кепилдик жана колдоо
For warranty information and technical support, please refer to the documentation provided with your purchase or contact the seller directly. Specific warranty terms may vary by region and retailer.