
1. Киришүү
This manual provides essential instructions for the safe and effective use of your Hohem iSteady Pro2 3-Axis Gimbal Stabilizer Kit. Please read it thoroughly before operation and retain it for future reference.
2. Пакеттин мазмуну
Төмөндө тизмеленген нерселердин баары пакетиңизге камтылганын текшериңиз:
- iSteady Pro2 Gimbal Stabilizer x 1
- Smartphone Holder Clip x 1
- Monopod Extension Rod x 1
- Charging USB Cable x 1
- Action Cam Micro USB Cable x 1
- USB-C кабели x 1
- Көтөрүп жүрүүчү кап x 1
- Мини штатив x 1
- Колдонуучунун колдонмосу x 1
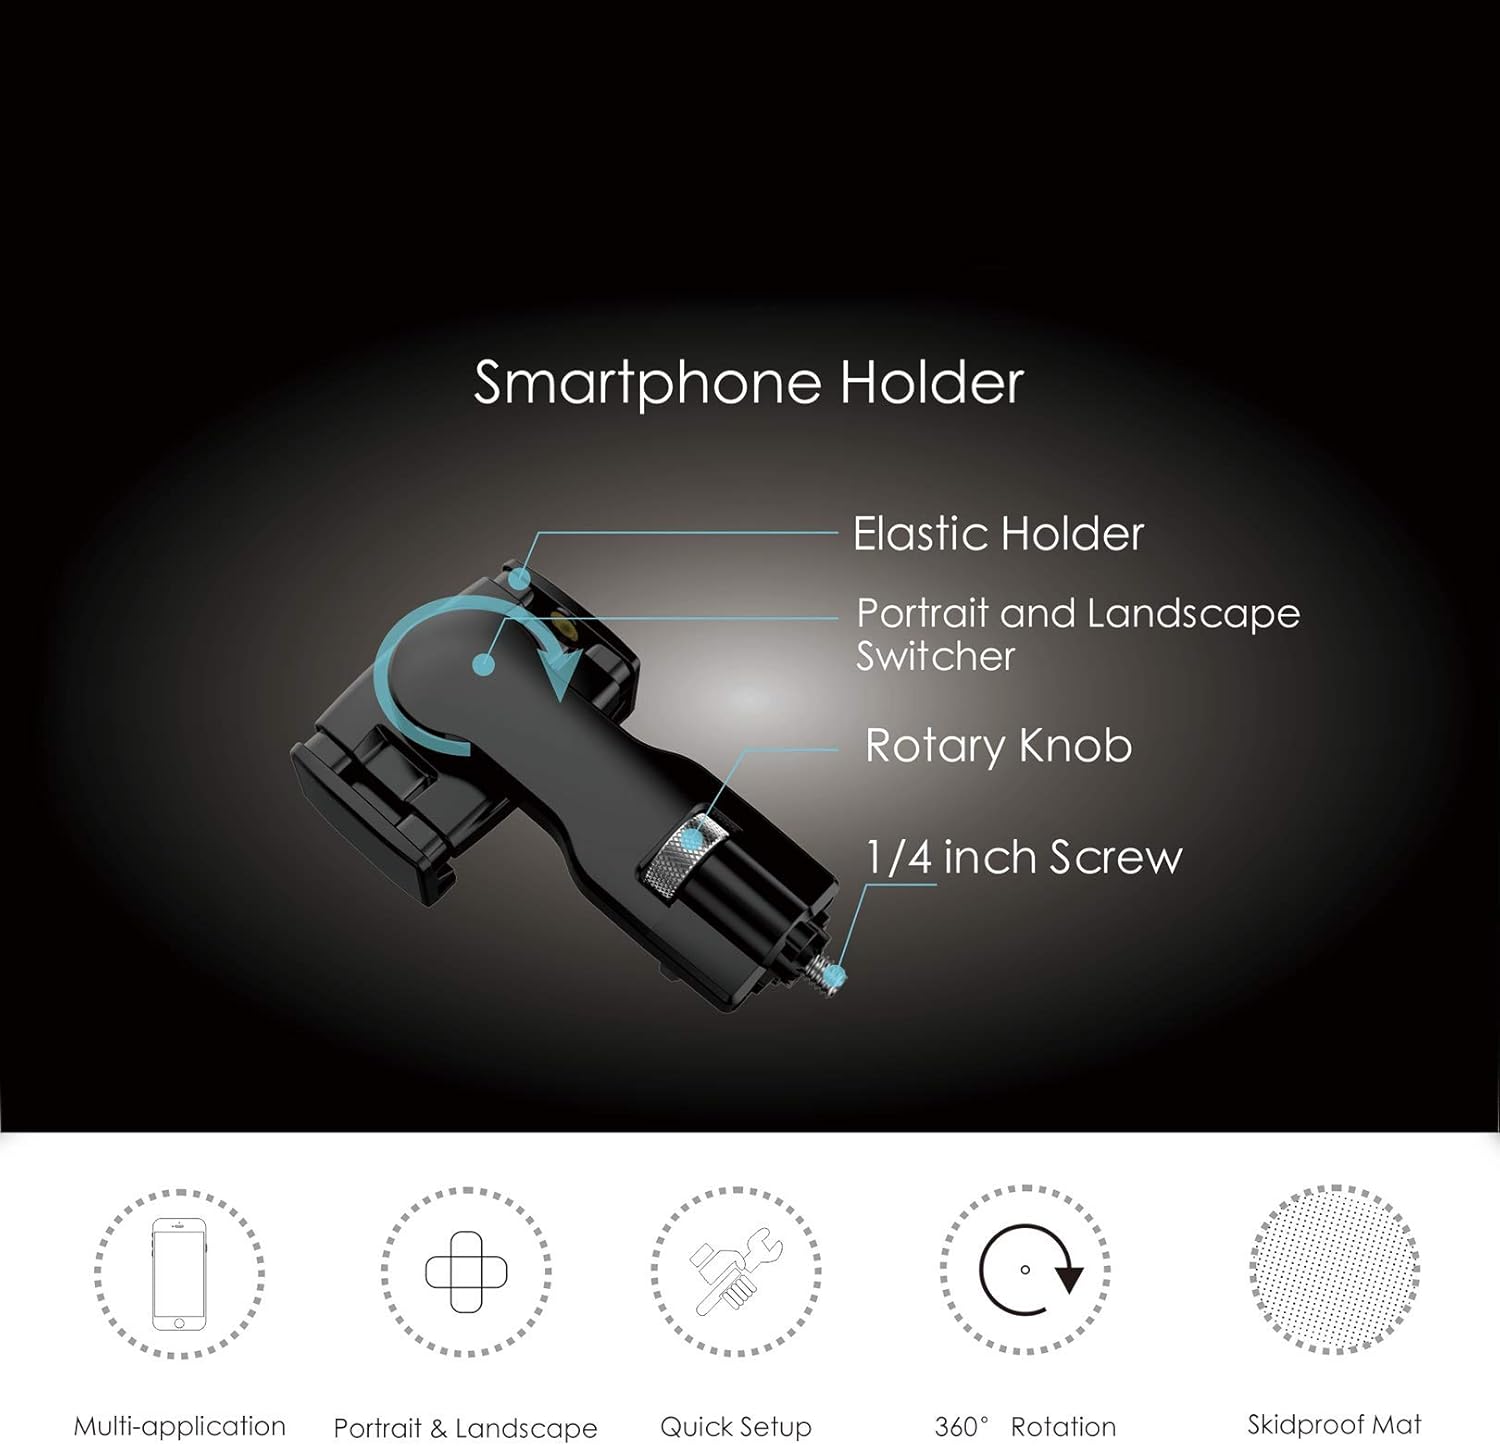
Image: All components included in the Hohem iSteady Pro2 Kit package.
3. Орнотуу
3.1 Алгачкы заряддоо
For first use, fully recharge the iSteady Pro2 gimbal battery for 2 to 3 hours. A universal USB adapter (not included) can be used for charging.
3.2 Camera Mounting and Balancing
The iSteady Pro2 is compatible with GoPro Hero series (7/6/5/4/3), DJI Osmo Action, SJ cam, and similar size action cameras. SONY RX0 series is also supported. Note that GoPro Max or Session are NOT supported.
- Before powering on the gimbal, carefully mount your action camera onto the gimbal.
- Ensure the camera is balanced well. Improper balancing can cause the gimbal to vibrate and may lead to damage.
Video: Tutorial on unboxing and mounting the camera on the Hohem iSteady Pro2 Gimbal Stabilizer.
3.3 Smartphone Holder Installation (Optional)
The smartphone holder clip allows you to attach your smartphone for monitoring or additional control.
- Locate the 1/4 inch screw mount on the side of the gimbal handle.
- Attach the smartphone holder clip to this mount and tighten the rotary knob to secure it.
- Place your smartphone into the elastic holder. The holder supports both portrait and landscape orientations.

Сүрөт: деталдуу view of the smartphone holder components.
3.4 Monopod Extension Rod Installation (Optional)
The monopod extension rod can be attached to the bottom of the gimbal for extended reach.
- Locate the screw thread at the bottom of the gimbal handle.
- Screw the monopod extension rod into this thread until secure.
- Extend the rod to your desired length.
4. Иштөө нускамалары
4.1 Күйгүзүү/өчүрүү
Long press the power button for 3 seconds to turn on or turn off the gimbal. The indicator light will quickly flash twice upon power on.
4.2 Негизги башкаруу каражаттары
- Джойстик: Controls panning (left/right) and tilting (up/down) of the camera.
- Слайдер: Adjusts the roll axis angle for precise framing.
- Trigger баскычы: Press and hold for Sport Mode for quick scene transitions. Double-tap to re-center the gimbal.

Image: Demonstrates the Sport Mode and trigger button functionality.
4.3 Жумуш режими
The iSteady Pro2 offers various work modes for different shooting scenarios:
- PF (Pan Following): Default mode. Tilt and roll axes are locked. The camera moves left or right smoothly with your hand movements.
- PTF (Pan/Tilt Following): Roll axis is locked. The camera moves left/right and tilts up/down with your hand movements.
- AL (All Locked): All axes are locked. The camera stays in its current orientation.
- All Following & Inception: Tilt axis, roll axis, and pan axis all follow your movements. This mode also enables the Inception effect for cinematic shots.

Image: The gimbal performing a 600-degree rotation, showcasinанын ийкемдүүлүгү.
Video: A tutorial demonstrating various gimbal modes and features, including Inception mode and splash-proof capabilities.
4.4 Колдонмону башкаруу
The "Hohem Gimbal" app enhances interaction with the gimbal, allowing for remote control and advanced features like motion timelapse and hyperlapse.
- Download and install the "Hohem Gimbal" app on your smartphone.
- Смартфонуңузда Bluetooth иштетилгенин текшериңиз.
- Open the app and select the "iSteady Pro2" icon to connect.
- Use the app interface to remotely control the gimbal, adjust settings, and access advanced shooting modes.
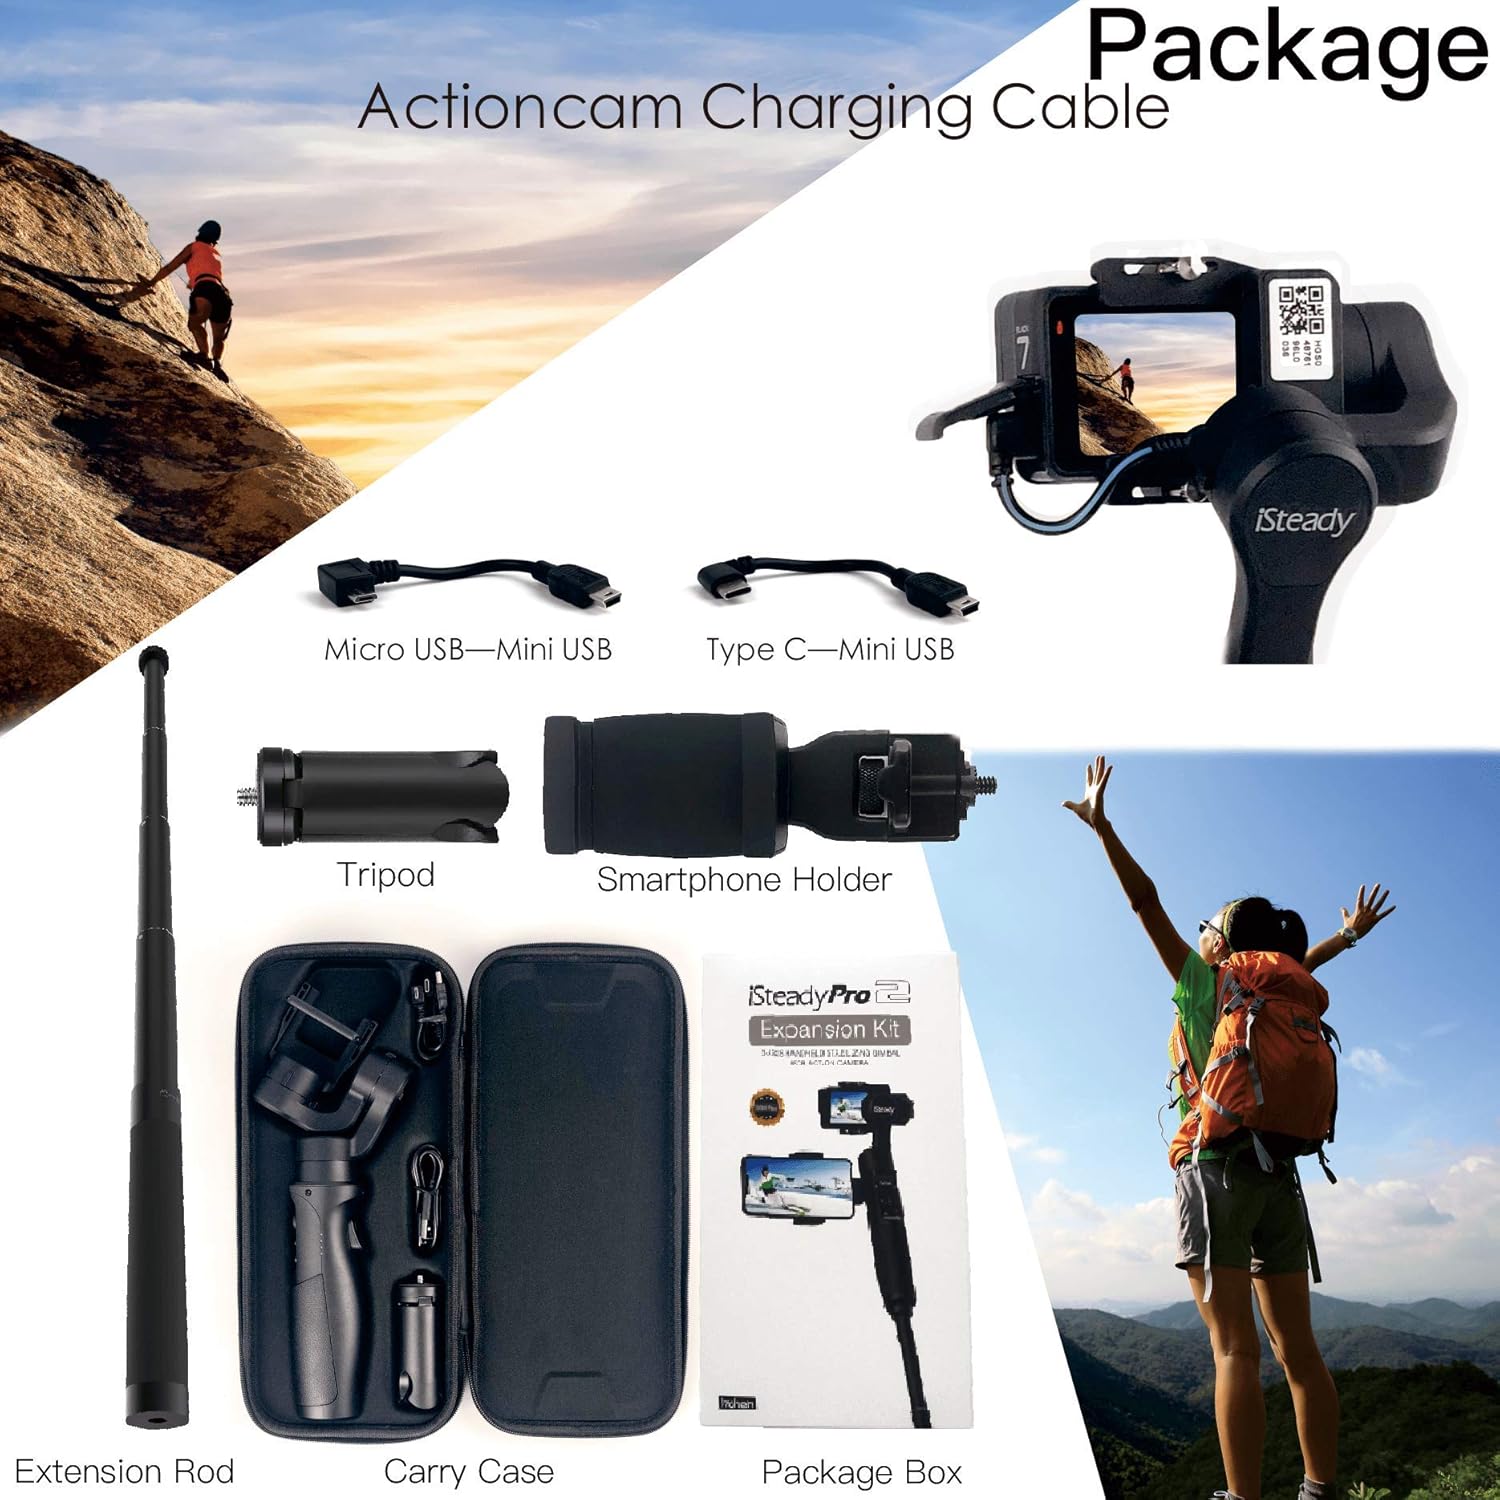
Image: The Hohem iSteady Pro2 Gimbal with a smartphone displaying the control app interface.
5. Техникалык тейлөө
5.1 Тазалоо
Wipe the gimbal with a soft, dry cloth. Do not use harsh chemicals or abrasive materials. Ensure no moisture enters the device.
5.2 Сактоо
Store the gimbal in its carry case in a cool, dry place away from direct sunlight and extreme temperatures. Remove the camera and any accessories before storage.
5.3 Сууга туруктуулук
The iSteady Pro2 kit is IP64 splash-proof. This means it can withstand splashes of water but should NOT be exposed to heavy rain, salt water, or sea water environments. Avoid submerging the device.
Video: Demonstrates the splash-proof feature of the Hohem iSteady Pro2 Gimbal.
6. Кыйынчылыктарды
- Gimbal Vibrates: Ensure the action camera is properly mounted and balanced before powering on the gimbal.
- Bluetooth аркылуу туташуу мүмкүн эмес: Verify Bluetooth is enabled on your smartphone and that you have selected "iSteady Pro2" within the "Hohem Gimbal" app.
- Gimbal жооп бербейт: Ensure the battery is sufficiently charged. Try restarting the gimbal.
7. Техникалык шарттар
| Өзгөчөлүк | Деталь |
|---|---|
| Пакеттин өлчөмдөрү | 12.4 x 7.2 x 2.2 дюйм |
| Элемент Салмагы | 1.9 фунт |
| ASIN | B07VQ8RCC5 |
| Элемент моделинин номери | Pro2+Phone Holder+ExtensionRod |
| Өндүрүүчү | hohem technology |
| Түс | Кара |
| Шайкеш түзмөктөр | Камера |
| UPC | 778197858604 |
| Шайкеш келген видеокамера моделдери | GoPro HERO7 Black, DJI OSMO ACTION |
8. Кепилдик жана колдоо
8.1 Кепилдик маалыматы
Please refer to the warranty card included in your product packaging for detailed warranty terms and conditions. Retain your proof of purchase for warranty claims.
8.2 Кардарларды колдоо
For technical assistance, troubleshooting, or other inquiries, please contact Hohem customer support through their official webсайт же продукт документациясында көрсөтүлгөн байланыш маалыматы.