
1. Продукт бүтүп калдыview
The GalaxyElec STC-100A is a microcomputer temperature controller designed for precise temperature management. It supports both heating and refrigerating modes, allowing for accurate control based on user-defined temperature settings and differential values. The device includes delay protection for compressor startup and heating elements, a feature to limit the temperature setting range, and an alarm function for sensor errors.
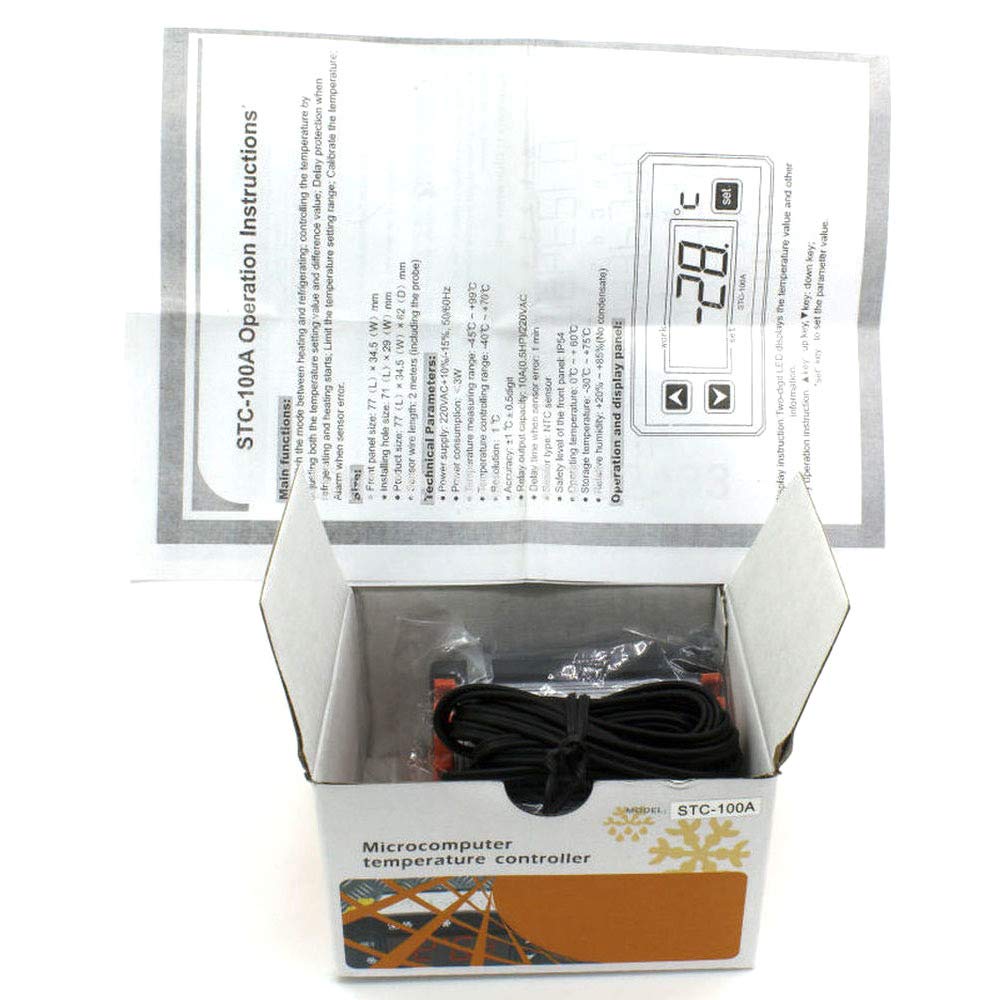
Сүрөт 1.1: The STC-100A Temperature Controller shown in its retail packaging, with the instruction manual partially visible. The device itself is a compact unit with a digital display and control buttons.
2. Техникалык шарттар
| Параметр | Нарк |
|---|---|
| Алдыңкы панелдин өлчөмү | 77 (L) x 34.5 (W) мм |
| Installing Hole Size | 71 (L) x 29 (W) мм |
| Продукт өлчөмү | 77 (L) x 34.5 (W) x 62 (D) мм |
| Сенсор зымынын узундугу | 2 meters (including the probe) |
| Электр камсыздоо | 220VAC +10% -15%, 50/60Hz |
| Энергияны керектөө | <3 Вт |
| Температураны өлчөө диапазону | -45°Cден +99°Cге чейин |
| Temperature Controlling Range | -40°Cден +70°Cге чейин |
| Резолюция | 1°C |
| Тактык | ±1°C ±0.5 цифра |
| Реле чыгаруу кубаттуулугу | 10A (0.5HP) / 220VAC |
| Delay Time When Sensor Error | 1 мүнөт |
| Сенсор түрү | NTC сенсору |
| Safety Level of Front Panel | IP54 |
| Иштөө температурасы | 0°Cден +60°Cге чейин |
| Сактоо температурасы | -30°Cден +75°Cге чейин |
| Салыштырмалуу нымдуулук | +20% to +85% (No condensate) |
3. Орнотуу боюнча көрсөтмөлөр
Proper installation is crucial for the safe and effective operation of the STC-100A temperature controller. Ensure all electrical connections are made by a qualified professional if you are unsure.
3.1 Физикалык орнотуу
- Prepare an opening in your control panel or enclosure with dimensions matching the 'Installing Hole Size' (71mm L x 29mm W).
- Insert the STC-100A controller into the prepared opening.
- Secure the controller using the provided mounting clips or screws to ensure it is firmly in place.
- Connect the NTC temperature sensor probe to the designated terminals on the controller. Ensure the sensor is placed in the area where temperature measurement is required. The sensor wire length is 2 meters.
3.2 Электр зымдары
Эскертүү: Disconnect power before performing any wiring to prevent electric shock. All wiring should comply with local electrical codes.
- Connect the power supply (220VAC, 50/60Hz) to the designated power input terminals on the controller.
- Connect your heating or refrigerating load (e.g., compressor, heater) to the relay output terminals. The relay output capacity is 10A (0.5HP) at 220VAC.
- Double-check all connections for tightness and correct polarity before applying power.
4. Иштетүү жана дисплей панели
The STC-100A features a two-digit LED display that shows the current temperature value and other operational information. Control is managed via three buttons located below the display.
Сүрөт 4.1: The operational display panel of the STC-100A. It features a digital LED display for temperature readings and three tactile buttons for navigation and setting parameters: an 'up' arrow, a 'down' arrow, and a 'set' button.
4.1 Баскыч функциялары
- Жогорку баскыч (▲): Маанилерди жогорулатуу же менюларда өйдө багыттоо үчүн колдонулат.
- Төмөн баскычы (▼): Маанилерди азайтуу же менюларда ылдый багыттоо үчүн колдонулат.
- Set Key (SET): Used to enter parameter setting mode, confirm selections, or save changes.
5. Иштөө нускамалары
5.1 Күйгүзүү/өчүрүү
The controller powers on automatically when connected to a suitable power supply. There is no dedicated power button.
5.2 Setting the Temperature Value
- басыңыз SET key once. The display will flash, indicating that the temperature setting value can be adjusted.
- колдонуу Өйдө (▲) or Төмөн (▼) keys to adjust the desired temperature set point.
- басыңыз SET key again to confirm and save the new setting. The display will stop flashing and return to showing the current temperature.
5.3 Adjusting Advanced Parameters
To access and modify advanced parameters (e.g., difference value, delay protection, temperature calibration), refer to the detailed parameter list in the full manual. Typically, this involves pressing and holding the SET key for several seconds to enter the parameter menu, then using the Өйдө (▲) жана Төмөн (▼) keys to navigate and adjust values, and SET ырастоо үчүн.
6. Техникалык тейлөө
Regular maintenance ensures the longevity and accuracy of your temperature controller.
- Тазалоо: Дисплейди мезгил-мезгили менен сүртүп туруңуз жанаasing with a soft, dry cloth. Do not use abrasive cleaners or solvents. Ensure no liquids enter the device.
- Сенсорго кам көрүү: Ensure the temperature sensor probe is clean and free from debris. Avoid bending or damaging the sensor wire. If the sensor appears damaged or provides inconsistent readings, it may need replacement.
- Экологиялык шарттар: Operate the controller within the specified operating temperature (0°C to +60°C) and relative humidity (+20% to +85%, non-condensing) to prevent damage.
7. Кыйынчылыктарды
This section addresses common issues you might encounter with the STC-100A controller.
7.1 Sensor Error Alarm
- Белги: The display shows an error code (e.g., 'E1' or similar, as indicated by 'Alarm when sensor error' in main functions).
- Мүмкүн болгон себеп: The NTC sensor is disconnected, damaged, or faulty.
- Чечим: Check the sensor's connection to the controller. Ensure the wire is not cut or shorted. If the connection is secure and the error persists, replace the sensor. The delay time when sensor error is 1 minute before an alarm is triggered.
7.2 Температуранын туура эмес көрсөткүчтөрү
- Мүмкүн болгон себеп: Sensor misplacement, environmental interference, or calibration offset.
- Чечим: Ensure the sensor is correctly positioned to measure the desired temperature. Check for drafts or heat sources directly affecting the sensor. If necessary, use the temperature calibration function (refer to advanced parameters) to adjust the reading.
7.3 Controller Not Powering On
- Мүмкүн болгон себеп: Электр менен камсыздоо жок, үн туура эмесtage, or faulty wiring.
- Чечим: Verify that the 220VAC power supply is connected and active. Check all wiring connections for security and correctness. Ensure the voltage is within the specified range (220VAC +10% -15%).
8. Коопсуздук маалыматы
- Always disconnect power before installing, wiring, or performing maintenance on the controller.
- Ensure all wiring is done by a qualified person and complies with local electrical codes and regulations.
- Do not operate the device in environments exceeding its specified operating temperature or humidity ranges.
- The front panel has a safety level of IP54, providing protection against dust and splashing water, but it is not waterproof. Avoid direct exposure to water.
- Аппаратты өзүңүз оңдоого аракет кылбаңыз. Квалификациялуу тейлөө кызматкерлерине кайрылыңыз.
9. Кепилдик жана колдоо
For warranty information, please refer to the documentation provided at the time of purchase or contact your retailer. For technical support or further assistance with your GalaxyElec STC-100A Temperature Controller, please contact the manufacturer, GalaxyElec, or your authorized distributor.