
Introduction
This manual provides essential instructions for the safe and efficient use of your BLACK+DECKER EM044KJN-P2 1.6-Cu. Ft. Over-the-Range Microwave. Please read all instructions carefully before installation and operation, and retain this manual for future reference.

Сүрөт 1: Алдыңкы view of the BLACK+DECKER EM044KJN-P2 Over-the-Range Microwave with the door open, revealing the interior cavity and glass turntable.
Маанилүү коопсуздук маалыматы
Шайманыңызды колдонууда өрт, электр шок, адамдардын жаракат алуу же ашыкча микротолкундуу энергиянын таасири коркунучун азайтуу үчүн, төмөнкүнү камтыган негизги сактык чараларын аткарыңыз:
- Шайманды колдонуудан мурун бардык нускамаларды окуп чыгыңыз.
- Do not operate the microwave if it is damaged or malfunctioning.
- Электр тогуна урунуу коркунучун болтурбоо үчүн туура жерге туташтырууну камсыз кылыңыз.
- Жабылган идиштерди ысытпаңыз, алар жарылып кетиши мүмкүн.
- Эч качан мешти бош иштетпеңиз.
- Балдар шаймандын жанында болгондо, аларды дайыма көзөмөлдөп туруңуз.
- Микротолкундуу мештен жасалган идиштерди гана колдонуңуз.
Пакеттин мазмуну
Таңгактан чыгарганда бардык компоненттер бар экенин жана бузулбаганын текшериңиз:
- BLACK+DECKER EM044KJN-P2 Over-the-Range Microwave Unit
- Айнек айнек
- Installation Hardware (mounting bracket, screws, template)
- User Manual
Орнотуу жана орнотуу
Installation of an over-the-range microwave requires careful planning and may necessitate two people due to the unit's weight and size. The microwave weighs approximately 55.1 pounds and measures 15 x 29.9 x 16.4 inches.

Figure 2: Product dimensions for the BLACK+DECKER EM044KJN-P2 microwave, indicating height, depth, and width.
Орнотууга чейинки кадамдар:
- Remove Old Microwave: If replacing an existing unit, carefully remove it. Note the location of existing screws and the power cord.
- Орнотуу аймагын тазалоо: For easier installation, consider temporarily removing the stove from beneath the cabinet.
- Studs табуу: Use a stud finder to identify suitable locations for the two lag bolts that secure the back brace.
- Drilling Considerations: If drilling through ceramic tile on the backsplash, use an appropriate masonry drill bit.
- Ventilation Configuration: The microwave supports both rear exhaust and top exhaust (recirculating) options. Ensure the vent blower is configured correctly for your chosen setup. If using top exhaust, verify the vent cut-out in the cabinet allows for proper clearance. If replacing a non-like model, a new flange transition to your existing ducting may be required.
Mounting the Microwave:
- Дубалга орнотулган кронштейн: Use the provided template to accurately position and mount the wall bracket on the back wall.
- Secure Top Screws: The microwave is typically secured with three screws from the top cabinet. Ensure these holes are pre-drilled according to the template.
- Электр кабелин башкаруу: A hole in the cabinet floor is required for the power cord to pass through and plug into a receptacle located inside the upper cabinet.
- Көтөрүү жана жайгаштыруу: With assistance, lift the microwave onto the wall bracket. The unit will hinge onto this bracket.
- Акыркы камсыздоо: Once hinged, secure the microwave by inserting the screws from the top cabinet into the designated mounting points on the microwave. Additionally, ensure the back brace is perfectly installed, utilizing the lag screws and any spring-loaded fasteners as directed.

3-сүрөт: Арткы view of the microwave, highlighting the power cord and potential mounting locations.
Иштөө нускамалары
Your BLACK+DECKER EM044KJN-P2 microwave features 1000 watts of cooking power and 10 different power levels for versatile cooking. The control panel is designed for ease of use.
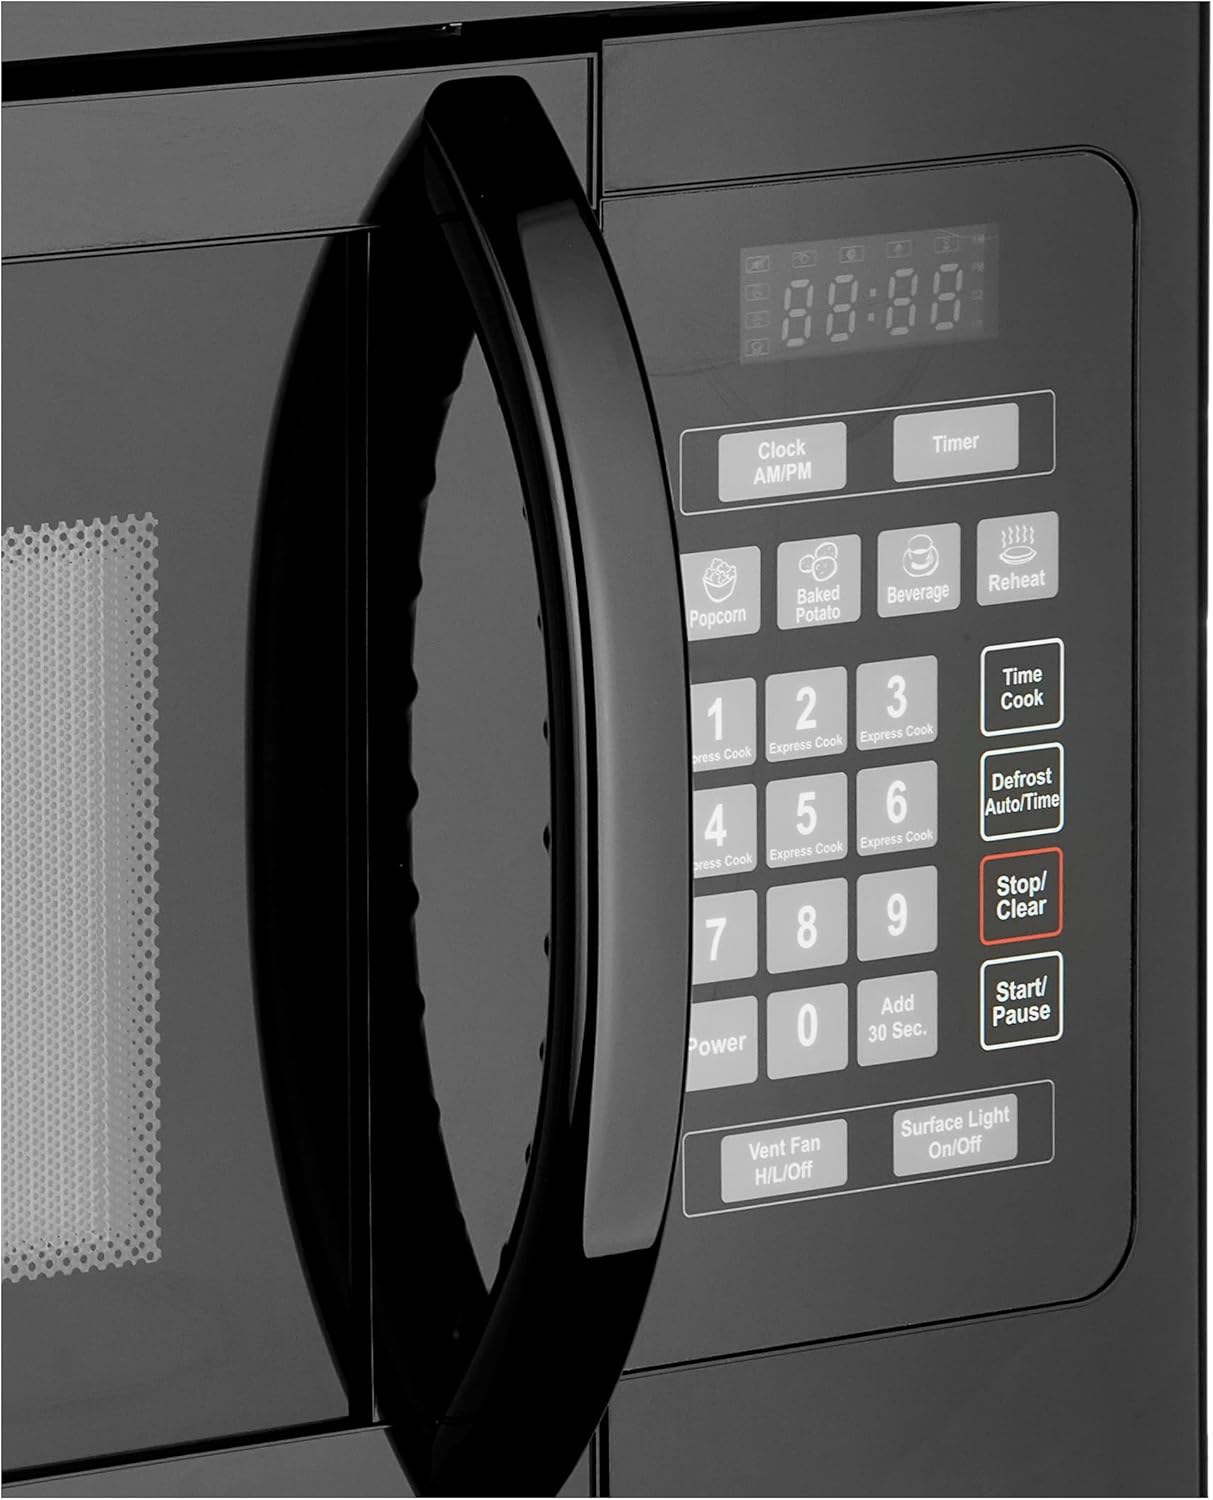
4-сүрөт: Детальдуу view of the microwave's control panel.
Негизги операция:
- Орнотуу убактысы: Use the 'Clock AM/PM' button to set the current time.
- Тез баштоо: For quick cooking, press the 'Add 30 Sec.' button to start cooking for 30 seconds at full power. You can press it repeatedly to add more time. The 1-6 minute quick start buttons also allow for immediate cooking.
- Time Cook: Press 'Time Cook', enter the desired cooking time using the number pad, then press 'Start/Pause'.
- Кубат деңгээли: After entering cooking time, press 'Power' and then a number (1-10) to select a power level. (10 is 100% power).
- Бир тийүү менен бышыруу: Utilize the 'Press N' Go' programs for common foods like Popcorn, Baked Potato, Beverage, and Reheat. Simply press the corresponding button.
- Эритүү: Use the 'Defrost Auto/Time' button to defrost food by weight or time.
- Токтотуу/тазалоо: Press 'Stop/Clear' to cancel a program or clear the display.
Өзгөчөлүктөр:
- Балдардын коопсуздук кулпусу: Lock the control panel to prevent accidental use or access by children. Refer to the manual for specific instructions on activating and deactivating the child lock.
- Желдетүүчү желдеткич: Control the vent fan with the 'Vent Fan H/L/Off' button to exhaust smoke, steam, and odors from your cooktop.
- Surface Light: The 'Surface Light On/Off' button controls the incandescent lighting above the range, illuminating your cooking space.
Техникалык тейлөө
Regular maintenance ensures the longevity and optimal performance of your microwave.
Тазалоо:
- Ички иштер: Clean the interior cavity with a mild detergent and a soft cloth. The glass turntable is removable and can be washed with warm, soapy water.
- Сырткы: Сырткы беттерин жумшак менен сүртүңүз, гamp кездеме. Абразивдүү тазалагычтардан алыс болуңуз.
- Башкаруу панели: Gently wipe the control panel with a damp кездеме. Тазалоочу каражаттарды түз эле панелге чачпаңыз.
Фильтрди алмаштыруу:
The microwave is equipped with a vent system that may include grease filters and a charcoal filter (for recirculating models). These filters should be cleaned or replaced periodically.

Figure 5: Underside of the microwave, showing the location of the grease filters and surface lights.
- Май чыпкалары: Located on the underside of the microwave, these filters should be removed and cleaned regularly (e.g., monthly) with warm, soapy water. Ensure they are completely dry before re-installing.
- Charcoal Filter (if applicable): If your microwave is set up for recirculating ventilation, it will have a charcoal filter to remove odors. This filter is typically located behind the vent grille and should be replaced every 6-12 months, depending on usage. Refer to the full installation guide for specific replacement instructions.
Лампаны алмаштыруу:
The incandescent surface lights on the underside of the microwave can be replaced when they burn out. Ensure the appliance is unplugged before attempting to replace bulbs.
Проблемаларды чечүү
If you encounter issues with your microwave, consult the following table for common problems and solutions.
| Көйгөй | Мүмкүн себеп | Чечим |
|---|---|---|
| Микротолкундуу меш башталбайт | Эшик туура жабылган эмес; Электр шнуру суурулган; Сактагыч күйүп кеткен/автоматтык өчүргүч өчүп калган; Балдардан коргоочу кулпу иштетилген. | Эшиктин бекем жабылганын текшериңиз; Электр тармагына туташууну текшериңиз; Автоматтык өчүргүчтү кайра орнотуңуз; Балдардын кулпусун өчүрүңүз. |
| No heat during cooking | Incorrect power level set; Door not closed properly. | Verify power level setting; Ensure door is securely latched. |
| Бурулма табак айланбайт | Turntable not seated correctly; Debris under turntable; Motor malfunction. | Reposition turntable; Clean area under turntable; Contact customer support if issue persists. |
| Мештин жарыгы иштебей жатат | Лампочка күйүп кетти. | Replace bulb (ensure microwave is unplugged). |
| Timer cannot be used while cooking | This model's design limitation. | The microwave timer function is independent and cannot run concurrently with a cooking cycle. |
Техникалык шарттар
| Өзгөчөлүк | Деталь |
|---|---|
| Бренд | BLACK+DECKER |
| Модель номери | EM044KJN-P2 |
| Кубаттуулугу | 1.6 куб фут |
| Орнотуу түрү | Чектелген |
| Ватtage | 1000 Ватт |
| Тtage | 120 вольт (AC) |
| Элемент Салмагы | 55.1 фунт |
| Продукциянын өлчөмдөрү (D x W x Y) | 15 x 29.9 x 16.4 дюйм |
| Түс | Кара |
| Материалдын түрү | Айнек |
| Өзгөчөлүктөр | Child Safety Lock, Quick Defrost |
| Камтылган компоненттер | Айлануучу |
Кепилдик жана колдоо
For warranty information, product registration, or technical support, please refer to the warranty card included with your product or visit the official BLACK+DECKER webсайт. Сатып алуу квитанциясын кепилдик дооматтары үчүн сатып алуунун далили катары сактаңыз.
Онлайн колдоо: www.blackanddecker.com/support
Кардарларды тейлөө: Аймактык байланыш номерлери үчүн продуктунун документтерин караңыз.