
1. Киришүү жана коопсуздук маалыматы
Thank you for choosing the ANENG V8 Digital Multimeter. This device is designed for safe and accurate measurement of AC/DC voltage, AC/DC current, resistance, capacitance, frequency, temperature, diode, continuity, and battery testing. Please read this manual thoroughly before use to ensure proper operation and to prevent potential hazards.
1.1 Коопсуздук чаралары
- Always ensure the multimeter is in good working condition before use. Inspect test leads for damage.
- Колдонбоңуз томtage or current that exceeds the maximum rated values for the multimeter.
- Том менен иштөөдө өтө этият болуңузtages above 36V DC or 25V AC RMS, as these can pose a shock hazard.
- Ар дайым чынжырдагы кубатты ажыратып, бардык жогорку көлөмдү чыгарыңызtagкаршылыкты, үзгүлтүксүздүктү, диоддорду же сыйымдуулукту өлчөөдөн мурун e конденсаторлор.
- Ensure the rotary switch is in the correct position for the desired measurement before connecting the test leads to the circuit.
- Мультиметрди жарылуучу газ, буу же чаңдуу чөйрөдө иштетпеңиз.
- Батарея аз индикатор пайда болгондо, батарейкаларды дароо алмаштырыңыз.
2. Продукт бүтүп калдыview
2.1 Пакеттин мазмуну
The ANENG V8 Digital Multimeter package typically includes the following items:
- ANENG V8 Digital Multimeter
- Сыноочу (Кызыл жана Кара)
- Температура проба
- Ташуу кутусу
- User Manual

Image: ANENG V8 Digital Multimeter with its standard accessories, including test leads, a temperature probe, and a protective carrying case.
2.2 Башкаруу жана дисплей
The multimeter features an 8000-count LCD backlight display for clear readings in various lighting conditions. Key controls include a rotary switch for function selection and buttons for range, data hold, and other features.

Сүрөт: деталдуу view of the multimeter's front panel, highlighting the LCD screen, the central rotary selector, and various control buttons.
3. Орнотуу
3.1 Батареяны орнотуу
The ANENG V8 Digital Multimeter is powered by batteries. To install or replace batteries:
- Ensure the multimeter is turned off and disconnect all test leads.
- Аппараттын артындагы батарея бөлүкчөсүнүн капкагын табыңыз.
- Батареянын капкагын бекиткен бурагычты(ларды) бошотуш үчүн бурагычты колдонуңуз.
- Капкакты алып салыңыз.
- Insert new batteries, observing the correct polarity (+ and -) as indicated inside the compartment. The device typically uses AA batteries.
- Батареянын капкагын ордуна коюңуз жана аны бурама(лар) менен бекитиңиз.
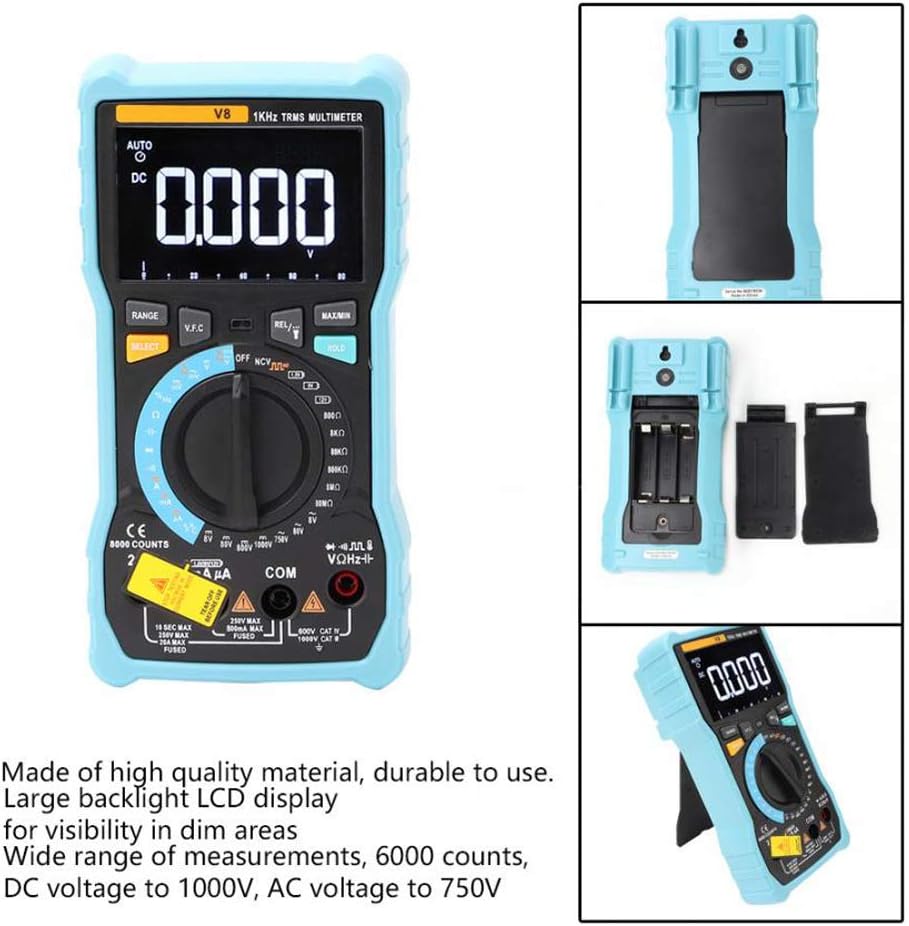
Сүрөт: арткы view of the multimeter with the battery compartment open, illustrating the correct placement for three AA batteries.
4. Иштөө нускамалары
Before any measurement, ensure the test leads are correctly inserted into the input jacks and the rotary switch is set to the appropriate function.
4.1 DC/AC агымынын көлөмүн өлчөөtage
- Set the rotary switch to the 'V–' (DC Voltage) же 'V~' (AC Voltagд) кызмат орду.
- Connect the red test lead to the 'VΩmA' jack and the black test lead to the 'COM' jack.
- Сыноочу зымдарды өлчөөнү каалаган схемага же компонентке параллель туташтырыңыз.
- Томду окуңузtage мааниси дисплейде.
4.2 Measuring DC/AC Current
- Set the rotary switch to the 'A–' (DC Current) or 'A~' (AC Current) position. For milliampere (mA) же микроampere (µA) measurements, select the corresponding range.
- For current up to 800mA, connect the red test lead to the 'VΩmA' jack. For current up to 20A, connect the red test lead to the '20A' jack. Connect the black test lead to the 'COM' jack.
- Disconnect power to the circuit. Open the circuit where you want to measure current. Connect the multimeter in series with the circuit.
- Схемага кубат бериңиз жана дисплейдеги учурдагы маанини окуңуз.
4.3 Каршылыкты өлчөө
- Айланма которгучту 'Ω' (каршылык) абалына коюңуз.
- Connect the red test lead to the 'VΩmA' jack and the black test lead to the 'COM' jack.
- Ensure the circuit is de-energized and all capacitors are discharged. Connect the test leads across the component to be measured.
- Дисплейдеги каршылык маанисин окуп чыгыңыз.
4.4 NCV (контактсыз томtagд) аныктоо
- Айланма которгучту 'NCV' абалына коюңуз.
- Move the top end of the multimeter near the conductor or outlet.
- The multimeter will emit an audible beep and the NCV indicator light will flash if AC voltage is detected, indicating the presence of live voltagд физикалык байланышсыз.
4.5 Температураны өлчөө
- Айланма которгучту '°C/°F' (Температура) абалына коюңуз.
- Connect the temperature probe to the 'VΩmA' and 'COM' jacks, observing polarity if applicable.
- Температуралык зонддун учун температурасын өлчөөнү каалаган объектиге же анын жанына коюңуз.
- Дисплейдеги температуранын маанисин окуңуз.
4.6 Башка функциялар
- Сыйымдуулугу: Set the rotary switch to the 'F' position. Connect leads across the discharged capacitor.
- Жыштык/Кызмат цикли: Set the rotary switch to the 'Hz/%' position. Connect leads to the signal source.
- Диод сыноо: Set the rotary switch to the 'Diode' position. Connect leads across the diode.
- Үзгүлтүксүздүк тести: Set the rotary switch to the 'Continuity' position. Connect leads across the circuit. An audible beep indicates continuity.
- Батарея сыноо: Set the rotary switch to the 'Battery' position. Connect leads to the battery terminals (1.5V, 9V, or 12V).
- Дайындарды кармоо: Дисплейдеги учурдагы көрсөткүчтү тоңдуруп коюу үчүн 'HOLD' баскычын басыңыз. Чыгаруу үчүн кайра басыңыз.
- Арткы жарык/чырак: Press the backlight button to turn on/off the display backlight or flashlight.
- Авто өчүрүү: Мультиметр батареянын иштөө мөөнөтүн үнөмдөө үчүн бир аз убакыт иштебей тургандан кийин автоматтык түрдө өчөт.
5. Техникалык тейлөө
5.1 Тазалоо
Ишти жарнама менен сүртүңүзamp кездеме жана жумшак жуугуч. Абразивдерди же эриткичтерди колдонбоңуз. Киргизүү терминалдарын кирден жана нымдан тазалаңыз.
5.2 Сактагычты алмаштыруу
Учурдагы өлчөө функциясы иштебей калса, сактагычты алмаштыруу керек болушу мүмкүн. Туура сактагычтын түрү жана рейтинги үчүн мүнөздөмөлөрдү караңыз. Сақтандыргычты алмаштыруу квалификациялуу кызматкерлер тарабынан гана жүргүзүлүшү керек.
5.3 Сактоо
When not in use for extended periods, remove the batteries to prevent leakage and store the multimeter in a dry, cool place.
6. Кыйынчылыктарды
- Дисплей жок: Батареянын орнотулганын жана заряддалганын текшериңиз. Зарыл болсо, батареяларды алмаштырыңыз.
- Туура эмес окуулар: Ensure the rotary switch is set to the correct function and range. Check test lead connections. Verify battery charge.
- Учурдагы өлчөө иштебей жатат: Check the fuse. Replace if blown (refer to fuse replacement section).
- NCV аныкталбай жатат: Ensure the NCV function is selected and the multimeter is close enough to the AC voltage булагы.
7. Техникалык шарттар
| Параметр | Нарк |
|---|---|
| Дисплей | Арткы жарыгы бар 8000 LCD дисплей |
| DC Voltage (V) | 8.000V / 80.00V / 800.0V / 1000V |
| DC Voltage (мВ) | 800мВ |
| AC Voltage (V) | 8.000V / 80.00V / 750V |
| AC Voltage (мВ) | 800мВ |
| Туруктуу ток (A) | 8.000A / 20.00A |
| Туруктуу ток (мА) | 8.000mA / 80.00mA / 800.0mA |
| DC Current (µA) | 800µA / 8000µA |
| AC тогу (A) | 8.000A / 20.00A |
| AC тогу (mA) | 8.000mA / 80.00mA / 800.0mA |
| AC Current (µA) | 800µA / 8000µA |
| Каршылык | 800.0Ω / 8.000kΩ / 80.00kΩ / 800.0kΩ / 8.000MΩ / 80.00MΩ |
| Сыйымдуулук | 9.999nF / 99.99nF / 999.9nF / 9.999µF / 99.99µF / 999.9µF / 9.999mF / 99.99mF |
| Жыштык | 9.999Hz / 99.99Hz / 999.9Hz / 9.999kHz / 99.99kHz / 999.9kHz / 9.999MHz |
| Милдеттик цикл | 1% ~ 99% |
| Температура диапазону | -20°C ~ 1000°C (-4°F ~ 1832°F) |
| Батарея сыноо | 1.5V / 9V / 12V |
| Рангинг | Auto / Manual |
| Жаңыртуу баасы | 3 жолу / экинчи |
| Чыныгы RMS | Ооба |
| Маалыматтарды кармоо | Ооба |
| Арткы жарык/ Фонар | Ооба |
| Батареянын аздыгы жөнүндө эскертүү | Ооба |
| Авто өчүрүү | Ооба |
| Материал | ABS / PVC |
| Power Source | Батарея менен иштейт |
8. Кепилдик жана колдоо
This product is covered by a standard manufacturer's warranty against defects in materials and workmanship. Please refer to the warranty card included with your purchase for specific terms and conditions. For technical support or service inquiries, please contact your retailer or the manufacturer's customer service department.
9. Расмий продукт Videos
Учурда сатуучунун расмий продукт видеолору кыстаруу үчүн жеткиликтүү эмес.