1. Киришүү
This manual provides essential information for the safe and efficient operation of your SFX JPT 50W 175x175mm Fiber Laser Marking Machine. Please read this manual thoroughly before operating the machine to ensure proper usage, prevent damage, and maintain safety.

1.1-сүрөт: SFX JPT 50W 175x175mm Fiber Laser Marking Machine. This image displays the complete laser marking system, including the main control unit and the laser head assembly mounted on an adjustable stand with a work bed.
2. Коопсуздук маалыматы
The SFX JPT 50W Fiber Laser Marking Machine is a Class 1 laser product with an output power of 0.39mW. While designed for safety, improper use can lead to serious injury. Adhere to all safety guidelines.
- Көздү коргоо: Always wear appropriate laser safety goggles when operating or observing the machine in operation. Direct or reflected laser light can cause permanent eye damage.
- Ыйгарым укуктуу персонал: Бул жабдууларды атайын даярдыктан өткөн жана уруксаты бар персонал гана иштетиши керек.
- Иш чөйрөсү: Ensure the work area is clear of flammable materials. Provide adequate ventilation to remove fumes generated during marking.
- Шашылыш токтотуу: Авариялык токтотуу баскычынын жайгашкан жери жана функциясы менен таанышып алыңыз.
- Электр коопсуздугу: Ensure the machine is properly grounded. Do not operate with damaged cables or if the machine appears to be malfunctioning.
- Материалдык коопсуздук: Be aware of the materials being marked. Some materials can produce hazardous fumes or ignite when exposed to laser energy.
3. Пакеттин мазмуну
Upon unpacking, verify that all items listed below are present and undamaged. If any items are missing or damaged, contact your supplier immediately.
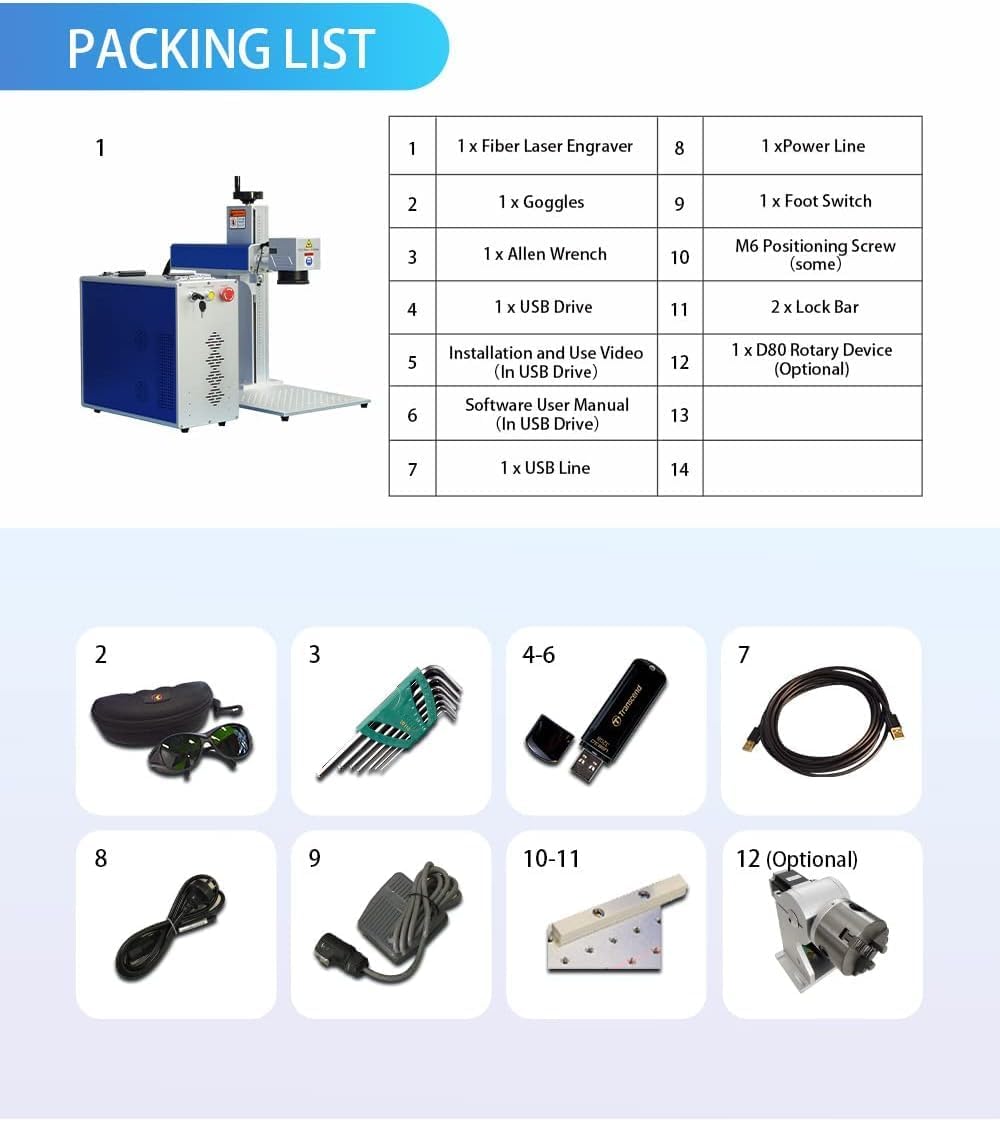
3.1-сүрөт: Visual representation of the SFX Fiber Laser Marking Machine's packing list. This image shows the main machine, safety goggles, Allen wrench set, USB drive, power line, foot switch, positioning screws, lock bar, and an optional D80 rotary device.
| Элемент № | Description | Саны |
|---|---|---|
| 1 | Fiber Laser Engraver | 1 |
| 2 | Көз айнек | 1 |
| 3 | Аллен ачкыч топтому | 1 |
| 4 | USB Drive (Installation and Video) | 1 |
| 5 | USB Drive (Software User Manual) | 1 |
| 6 | USB Line | 1 |
| 7 | Электр линиясы | 1 |
| 8 | Foot Switch | 1 |
| 9 | M6 Positioning Screw (some) | 1 |
| 10 | Lock Bar | 2 |
| 11 | D80 Rotary Device (Optional) | 1 |
4. Продукттун өзгөчөлүктөрү жана компоненттери
The SFX JPT 50W Fiber Laser Marking Machine incorporates advanced components for high-precision marking.
4.1 Laser Source and Lens

4.1-сүрөт: Деталдаштырылган view of the JPT LP series laser source and F-Theta lens. The laser source is a red rectangular unit with cooling fans, and the lens is shown with its optical elements.
- Лазердик булак: JPT LP+ series pulsed fiber laser. This source utilizes Master Oscillator Power Amplifier (MOPA) configuration, offering excellent laser performance, wide frequency range, high control precision, and superior pulse shaping capabilities compared to Q-switching technology.
- Объектив: Jollystar & Wavelength F-Theta Lenses. These lenses feature multiple optical elements, an air-spaced design, and high-efficiency AR coating for optimal image resolution and throughput. They are designed with industry-standard M85 threading for easy mounting.
4.2 Control Board and Galvo Scanner

4.2-сүрөт: The JCZ-LMCV4 control board and Sino-Galvo & ZBTK galvo scanner. The control board is a green circuit board with various connectors, and the galvo scanner is a silver and blue unit with a caution label.
- Башкаруу кеңеши: JCZ-LMCV4. This stable and reliable control board provides various interfaces and is compatible with EZCAD2.0 software (and Lightburn).
- Galvo Scanner: Sino-Galvo & ZBTK. This scanner ensures good running stability, high positioning accuracy, fast marking speed, and strong anti-interference ability.
4.3 Machine Interface and Rotary Axis (Optional)
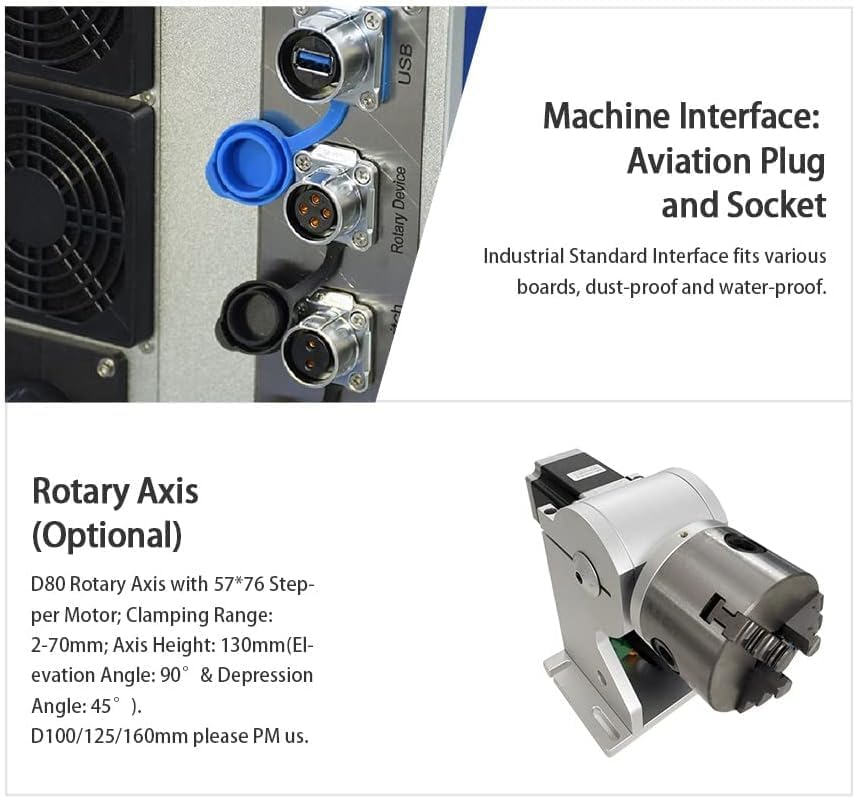
4.3-сүрөт: Close-up of the machine's aviation plug and socket interfaces, along with an image of the optional D80 rotary axis. The interfaces include USB ports and circular aviation connectors, while the rotary axis is a silver mechanical device for cylindrical object marking.
- Machine Interface: Features industrial standard aviation plugs and sockets, designed to be dust-proof and water-proof, ensuring reliable connections for various boards.
- Rotary Axis (Optional): D80 Rotary Axis with 57*76 Stepper Motor. This accessory allows for marking on cylindrical objects with a clamping range of 2-70mm and an axis height of 130mm. It supports elevation angles of 90° and depression angles of 45°. Other sizes (D100/125/160mm) may be available.
4.4 Double Red Dot Focusing and Work Bed
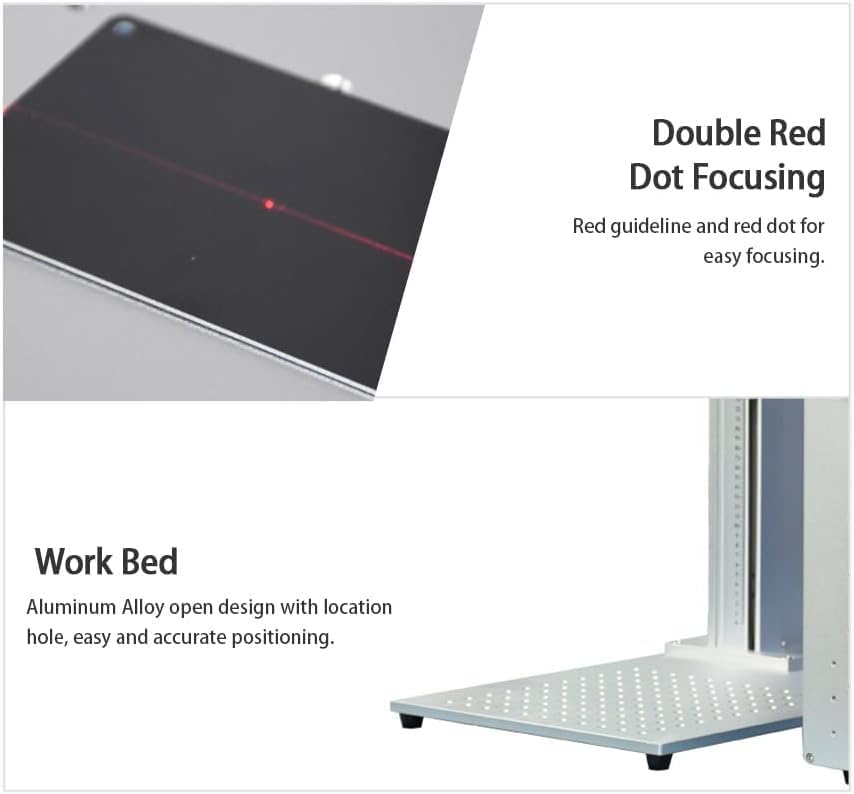
4.4-сүрөт: Illustration of the double red dot focusing mechanism and the aluminum alloy work bed. The focusing image shows two red laser dots converging on a surface, and the work bed is a perforated silver plate.
- Double Red Dot Focusing: Utilizes a red guideline and two red dots for easy and precise focusing, ensuring optimal laser performance on the material surface.
- Work Bed: Constructed from aluminum alloy with an open design and location holes, facilitating easy and accurate positioning of materials for marking.
5. Орнотуу нускамалары
Follow these steps to set up your laser marking machine.
- Пакеттен чыгаруу: Бардык компоненттерди таңгактан кылдаттык менен алып салыңыз. Келечектеги ташуу же сактоо үчүн таңгактарды сактаңыз.
- Жайгашкан жери: Place the machine on a stable, level surface in a well-ventilated area, away from direct sunlight and excessive dust.
- Ассамблея:
- Attach the laser head assembly to the vertical column, ensuring it is securely fastened.
- Connect the main control unit to the laser head using the provided cables, ensuring all aviation plugs and USB connections are firm.
- If using the optional rotary axis, connect it to the designated port on the control unit.
- Кубат туташуу: Connect the power line to the machine and then to a grounded electrical outlet (110V-240V/50-60Hz). Do not power on yet.
- Программалык камсыздоону орнотуу: Insert the provided USB drive containing the software (EZCAD2.0) and user manual into your computer. Follow the on-screen instructions to install the software and necessary drivers.
- Компьютерге туташуу: Берилген USB кабелин колдонуп, машинаны компьютериңизге туташтырыңыз.
- Баштапкы күйгүзүү: Ensure all connections are secure. Turn the key switch to the ON position and press the power button. The machine should initialize.
6. Иштөө нускамалары
This section outlines the basic steps for operating the laser marking machine. Refer to the EZCAD2.0 software manual on the provided USB drive for detailed software operations.
- Материалды даярдоо: Place the material to be marked on the work bed. Use the positioning holes or clamps to secure it if necessary.
- Программаны ишке киргизүү: Open the EZCAD2.0 software on your connected computer.
- Design/Load Marking File: Create your desired text, graphics, or load an existing marking file программалык камсыздоонун ичинде.
- Параметр орнотуулары: Adjust laser parameters such as power, frequency, speed, and pulse duration according to the material and desired marking effect. Refer to the software manual for guidance on specific material settings.
- Фокустоо:
- Activate the red light pointer in the software.
- Adjust the height of the laser head until the two red dots from the double red dot focusing system converge into a single, sharp point on the surface of your material. This indicates optimal focus.
- Preview Marking Area: Use the "Red Light Preview" function in the software to project the marking outline onto your material, ensuring correct placement.
- Белгилөөнү баштоо: Ensure all safety precautions are in place (e.g., wearing safety goggles). Press the "Mark" button in the software or use the foot switch to begin the marking process.
- Монитор процесси: Observe the marking process. If any issues arise, press the emergency stop button immediately.
- Аяктоо: Once marking is complete, remove the marked material.
7. Техникалык тейлөө
Үзгүлтүксүз тейлөө сиздин лазердик белгилөөчү машинаңыздын узак мөөнөттүү жана оптималдуу иштешин камсыздайт.
- Линзаны тазалоо: Periodically inspect and clean the F-Theta lens using a specialized optical lens cleaning solution and lint-free wipes. Dust and debris can degrade marking quality.
- Work Area Cleanliness: Keep the work bed and surrounding area clean from debris and dust.
- Кабелдик текшерүү: Regularly check all cables and connections for wear, damage, or looseness.
- Вентиляция: Ensure the machine's ventilation openings are clear and unobstructed to prevent overheating.
- Программалык камсыздоо жаңыртуулары: Keep your EZCAD2.0 software updated to the latest version for optimal performance and features.
8. Кыйынчылыктарды
Бул бөлүм сиз кабылышы мүмкүн болгон жалпы көйгөйлөрдү карайт. Татаал көйгөйлөр үчүн техникалык колдоо менен байланышыңыз.
| Көйгөй | Мүмкүн себеп | Чечим |
|---|---|---|
| Машина иштебейт. | Power cable loose, emergency stop engaged, power switch off. | Check power cable connection, disengage emergency stop, ensure key switch is ON. |
| No laser output. | Laser source not enabled, software error, incorrect parameters. | Verify laser is enabled in software, restart software/machine, check laser parameters. |
| Poor marking quality/unclear marks. | Incorrect focus, dirty lens, unsuitable parameters, material issues. | Re-focus the laser, clean the lens, adjust laser parameters, ensure material is suitable. |
| Программалык камсыздоо түзмөккө туташпай жатат. | USB cable loose/faulty, driver not installed, machine not powered on. | Check USB connection, reinstall drivers, ensure machine is powered on and initialized. |
9. Техникалык шарттар
Detailed technical specifications for the SFX JPT 50W Fiber Laser Marking Machine.
| Параметр | Нарк |
|---|---|
| Лазердик күч | 50 Вт |
| Белгилөө аймагы | 175x175мм |
| Макс. Материалдын калыңдыгы | 206мм |
| Лазердик булак | JPT LP+ |
| Repetition Rate Frequency | 1-600кГц |
| Импульстун узактыгы | 200ns |
| Output Power Adjustment Range | 10%-100% |
| Белгилөө ылдамдыгы | 7м/с |
| Engraving Depth | ≤1.0мм |
| Мин. Line Width | ≤0.01mm (material dependent) |
| Min. Character Size | 0.2mm (material dependent) |
| Киргизүү көлөмүtage | 110V-240V / 50-60Hz |
| Complete Power Consumption | 1000 Вт |
| Communication Mode for Automation | TCP/IP, IO, RS232 |
| Модель номери | SFX-50GS |
| Класс | Class 1 Laser Output Power 0.39mW |
| Программалык камсыздоонун шайкештиги | EZCAD2.0 (Lightburn Compatible) |
| Параметр | Нарк |
|---|---|
| Пакеттин өлчөмдөрү | 31.89 x 30.91 x 19.88 дюйм |
| Элемент Салмагы | 88 фунт |
| Өндүрүүчү | Luoyang SFX Industrial Technology Co.,Ltd |
| Биринчи жеткиликтүү күн | 23-октябрь, 2019-жыл |
10. Applicable Materials
The SFX JPT 50W Fiber Laser Marking Machine is suitable for marking and engraving a wide range of materials, and for cutting certain metals.

10.1-сүрөт: Chart illustrating materials compatible with laser cutting, marking, and engraving using this machine. It shows various metals and non-metals with checkmarks indicating compatibility.
| Материалдар | Лазердик кесүү | Laser Marking & Engraving |
|---|---|---|
| Акрил | ✓ | |
| Пластмассалар | ✓ | |
| Кирпич | ✓ | |
| Айнек | ✓ | |
| Мрамор | ✓ | |
| Мозаика | ✓ | |
| Алюминий | ✓ | ✓ |
| Жез | ✓ | ✓ |
| Silver | ✓ | ✓ |
| Алтын | ✓ | |
| Жез | ✓ | |
| Титан | ✓ | ✓ |
| Болот | ✓ | ✓ |
11. Кепилдик жана колдоо
For warranty information, technical support, or service inquiries, please contact the manufacturer or your authorized dealer. Refer to your purchase documentation for specific warranty terms and contact details.
Manufacturer: Luoyang SFX Industrial Technology Co.,Ltd
Кошумча ресурстар үчүн, сиз иш сапары менен болот SFX Industrial Technology Store on Amazon.