
1. Киришүү
The COMICA BoomX-D2 is a 2.4G digital RF wireless microphone system designed for high-quality audio recording. It features two transmitters and one receiver, offering stable transmission up to 650 feet (200 meters). This system is ideal for various applications including YouTube video recording, live streaming, interviews, and more, providing clear and reliable audio performance.
2. Пакеттин мазмуну
Төмөндө тизмеленген нерселердин баары пакетиңизге камтылганын текшериңиз:
- 2 x өткөргүчтөр (TX)
- 1 x Алуучу (RX)
- 1 x 3-in-1 USB A to USB C Charging Cable
- 2 x 3.5mm Lavalier Microphones
- 1 x 3.5mm TRS-TRRS Audio Cable (for smartphones)
- 1 x 3.5mm TRS-TRS Audio Cable (for cameras)
- 1 х көтөрүп Case
- 2 x Wind Muffs (for built-in microphones)
- 1 x Колдонуучунун колдонмосу (физикалык көчүрмө)
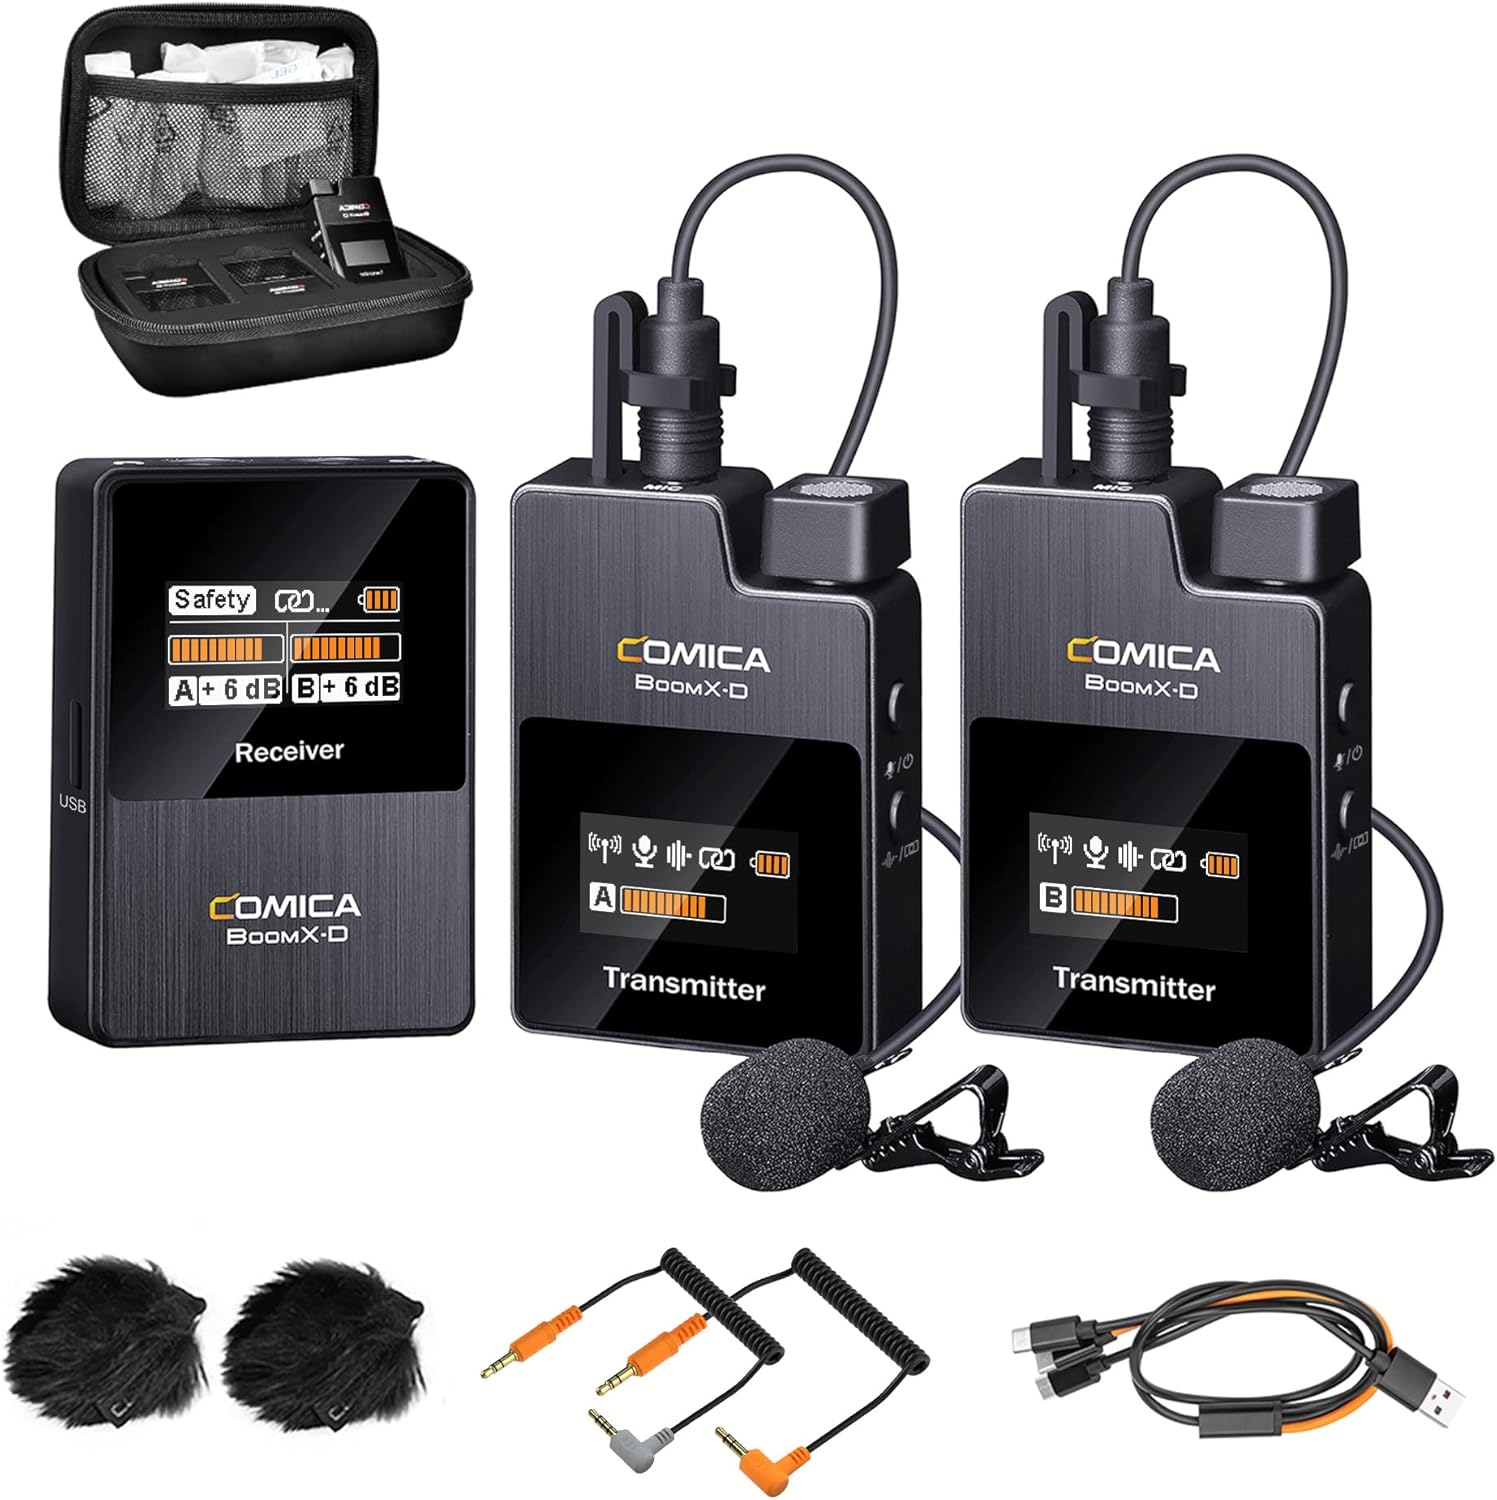
Figure 2.1: Complete package contents of the COMICA BoomX-D2 system.
3. Продукт бүтүп калдыview
3.1. Өткөргүч (TX)
- Камтылган микрофон: For direct audio capture.
- 3.5 мм TRS киргизүү: For connecting the external lavalier microphone.
- Кубат/Үнсүз баскычы: Short press to mute/unmute, long press to power on/off.
- Pair/Denoise Button: Short press for noise cancellation, long press for pairing.
- TFT дисплей экраны: Shows battery status, signal strength, audio levels, and mode.
- USB-C порту: Заряддоо үчүн.
- Кур клип: Кийимге бекитүү үчүн.
3.2. Кабыл алуучу (RX)
- TFT дисплей экраны: Displays battery status, signal strength for both transmitters, audio levels, and output mode (Mono/Stereo/Safety).
- Power/M/S Button: Short press to switch between Mono/Stereo/Safety modes, long press to power on/off.
- A/B Adjustment Buttons: Adjust gain levels for Transmitter A and Transmitter B independently.
- 3.5 мм TRS чыгаруу: Connects to cameras, camcorders, or PCs.
- 3.5 мм гарнитура уячасы: Реалдуу убакыт режиминдеги аудио мониторинг үчүн.
- USB-C порту: For charging and audio output.
- Кур кыскыч/муздак бут кийим бекиткичи: For attaching to clothing or camera hot/cold shoe.
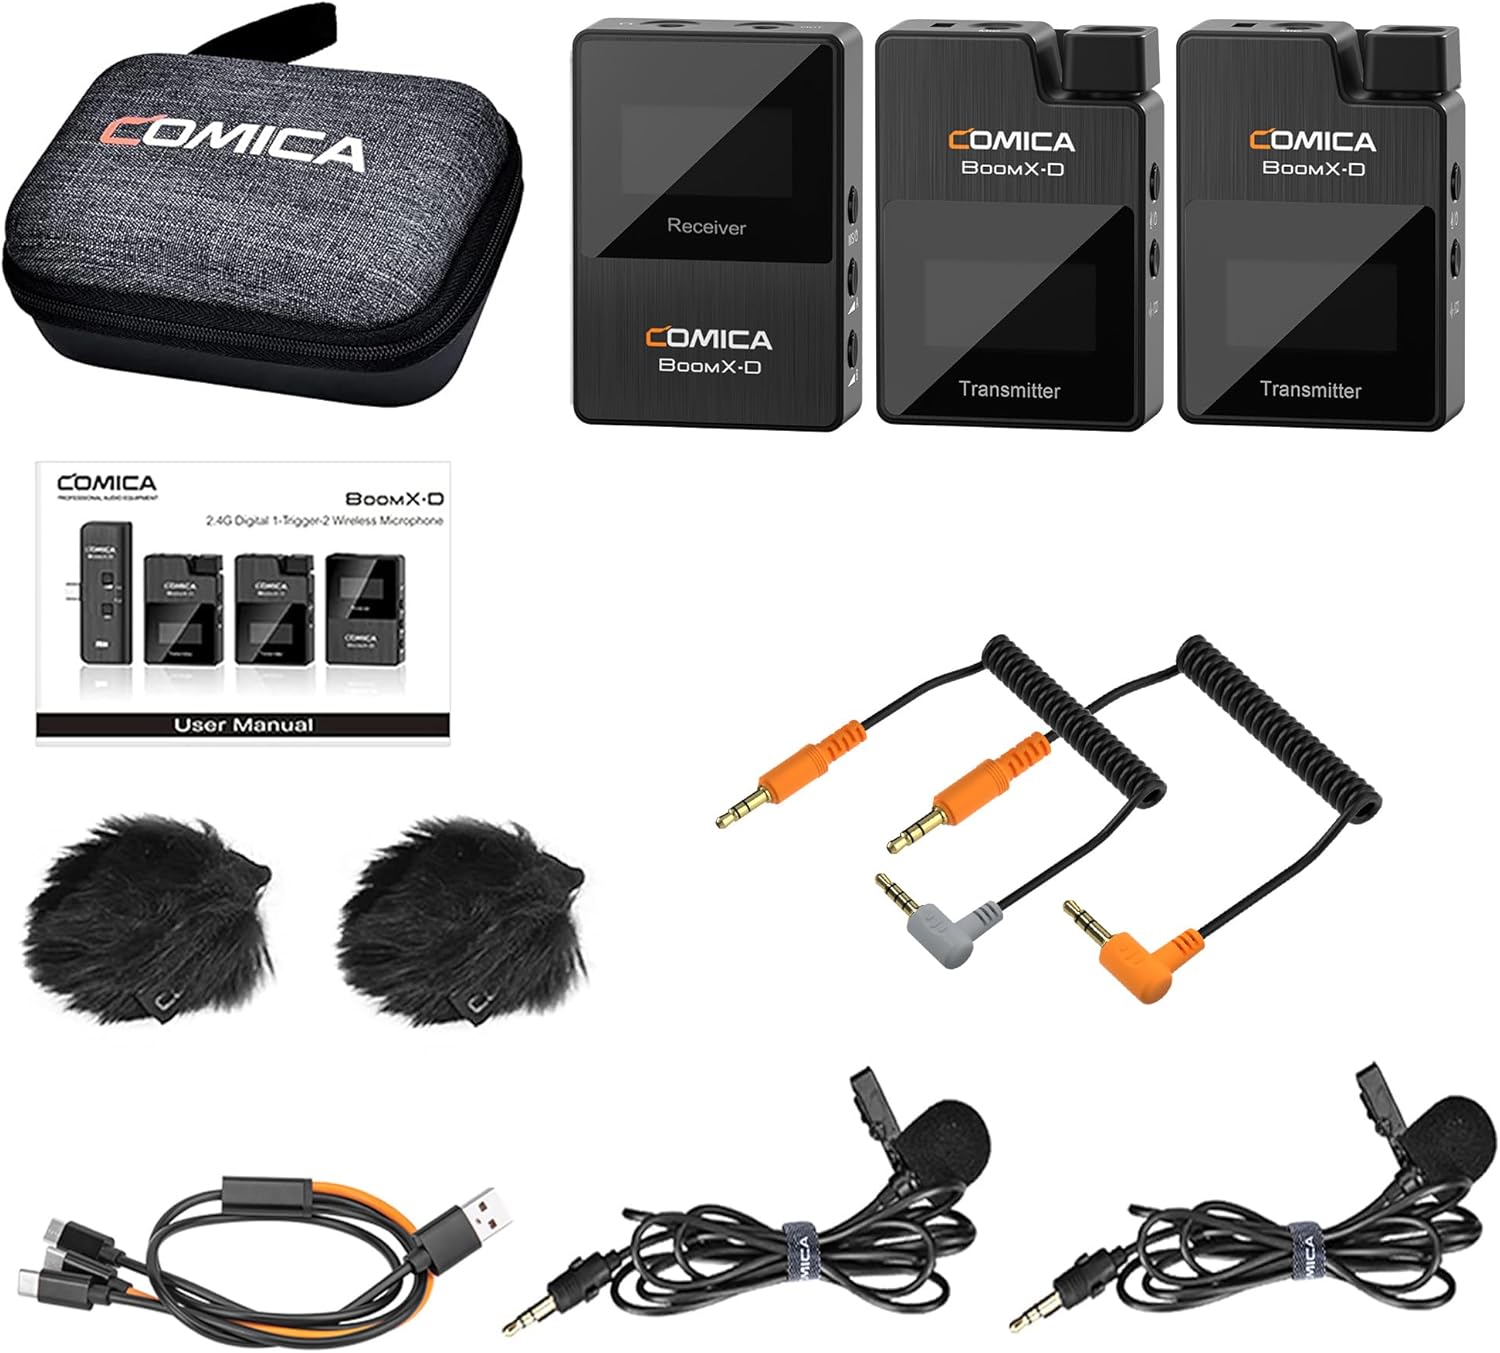
3.1-сүрөт: Детальдуу view of the BoomX-D2 system components.
4. Орнотуу
4.1. Түзмөктөрдү заряддоо
Before first use, fully charge the transmitters and receiver. Use the provided 3-in-1 USB C charging cable. The orange cable supports both charging and data transmission, while the black cables are for charging only.
- Connect the USB-C end of the cable to the charging port on each transmitter and the receiver.
- USB-A учун USB кубат адаптерине (кошулмага кирбейт) же компьютердин USB портуна туташтырыңыз.
- The battery icon on the TFT display will indicate charging status. A full charge provides up to 12 hours of runtime.
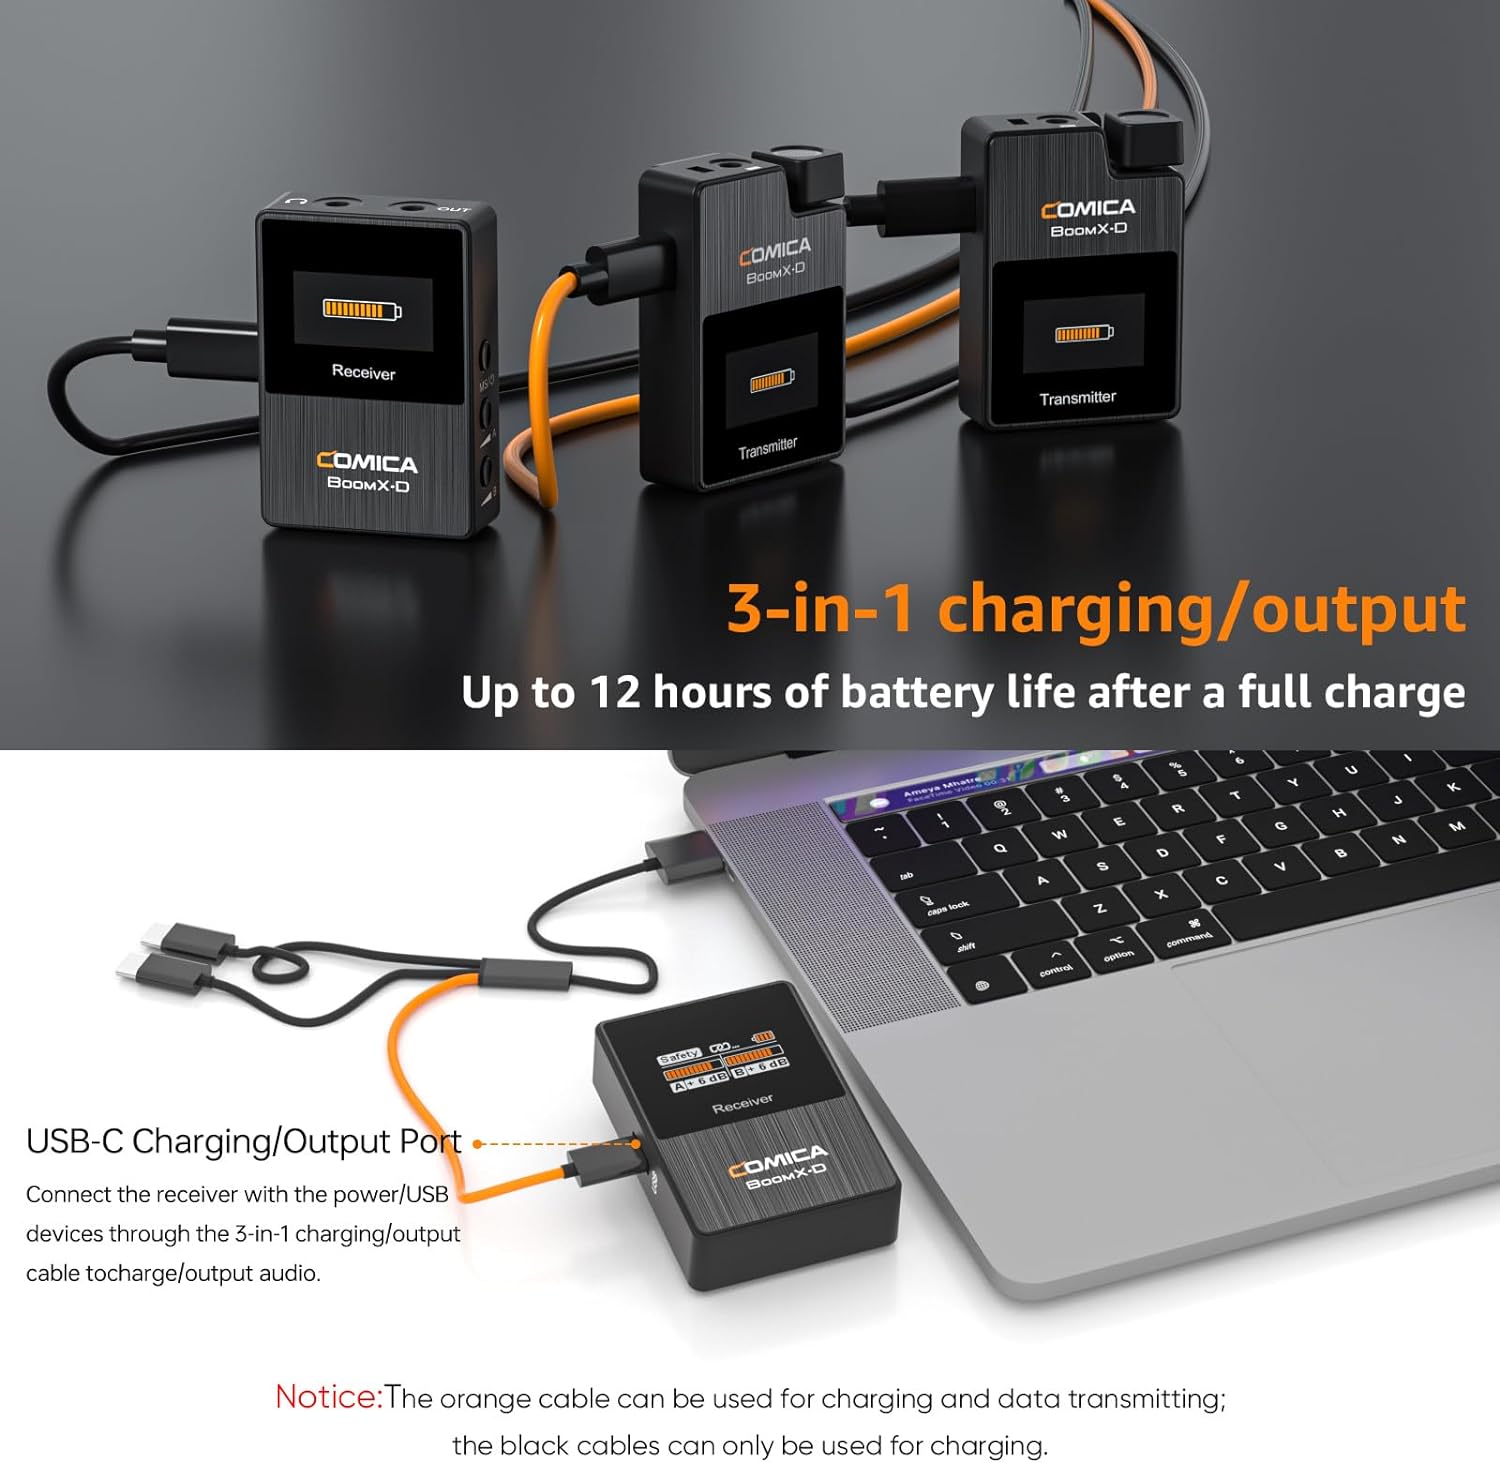
Figure 4.1: Charging the BoomX-D2 system components.
4.2. Күйгүзүү/өчүрүү жана жупташтыруу
The BoomX-D2 system features automatic pairing for convenience.
- Күйгүзүү: Long press the Power button on both transmitters and the receiver.
- Автоматтык жупташтыруу: The transmitters and receiver will automatically pair upon powering on. The signal strength indicator on the display will show a stable connection.
- Кол менен жупташтыруу: If pairing fails, long press the "Pair/Denoise" button on the transmitter and the "Power/M/S" button on the receiver simultaneously to initiate manual pairing.
- Өчүрүү: Long press the Power button on each device to turn them off.
4.3. Түзмөгүңүзгө туташуу
The BoomX-D2 offers wide compatibility with various recording devices.
- For Cameras (DSLR, Camcorders): Use the provided 3.5mm TRS-TRS audio cable. Connect one end to the receiver's 3.5mm audio output and the other end to your camera's microphone input.
- For Smartphones (Android, iPhone): Use the provided 3.5mm TRS-TRRS audio cable. Connect the TRS end to the receiver's 3.5mm audio output and the TRRS end to your smartphone's headphone/microphone jack. Note: For smartphones without a 3.5mm jack (e.g., newer iPhones, USB-C Android phones), a separate 3.5mm to Lightning or 3.5mm to USB-C adapter cable (not included) is required.
- Компьютерлер үчүн: Use the 3.5mm TRS-TRS audio cable or the 3-in-1 USB C charging cable (orange one) for direct digital audio output.
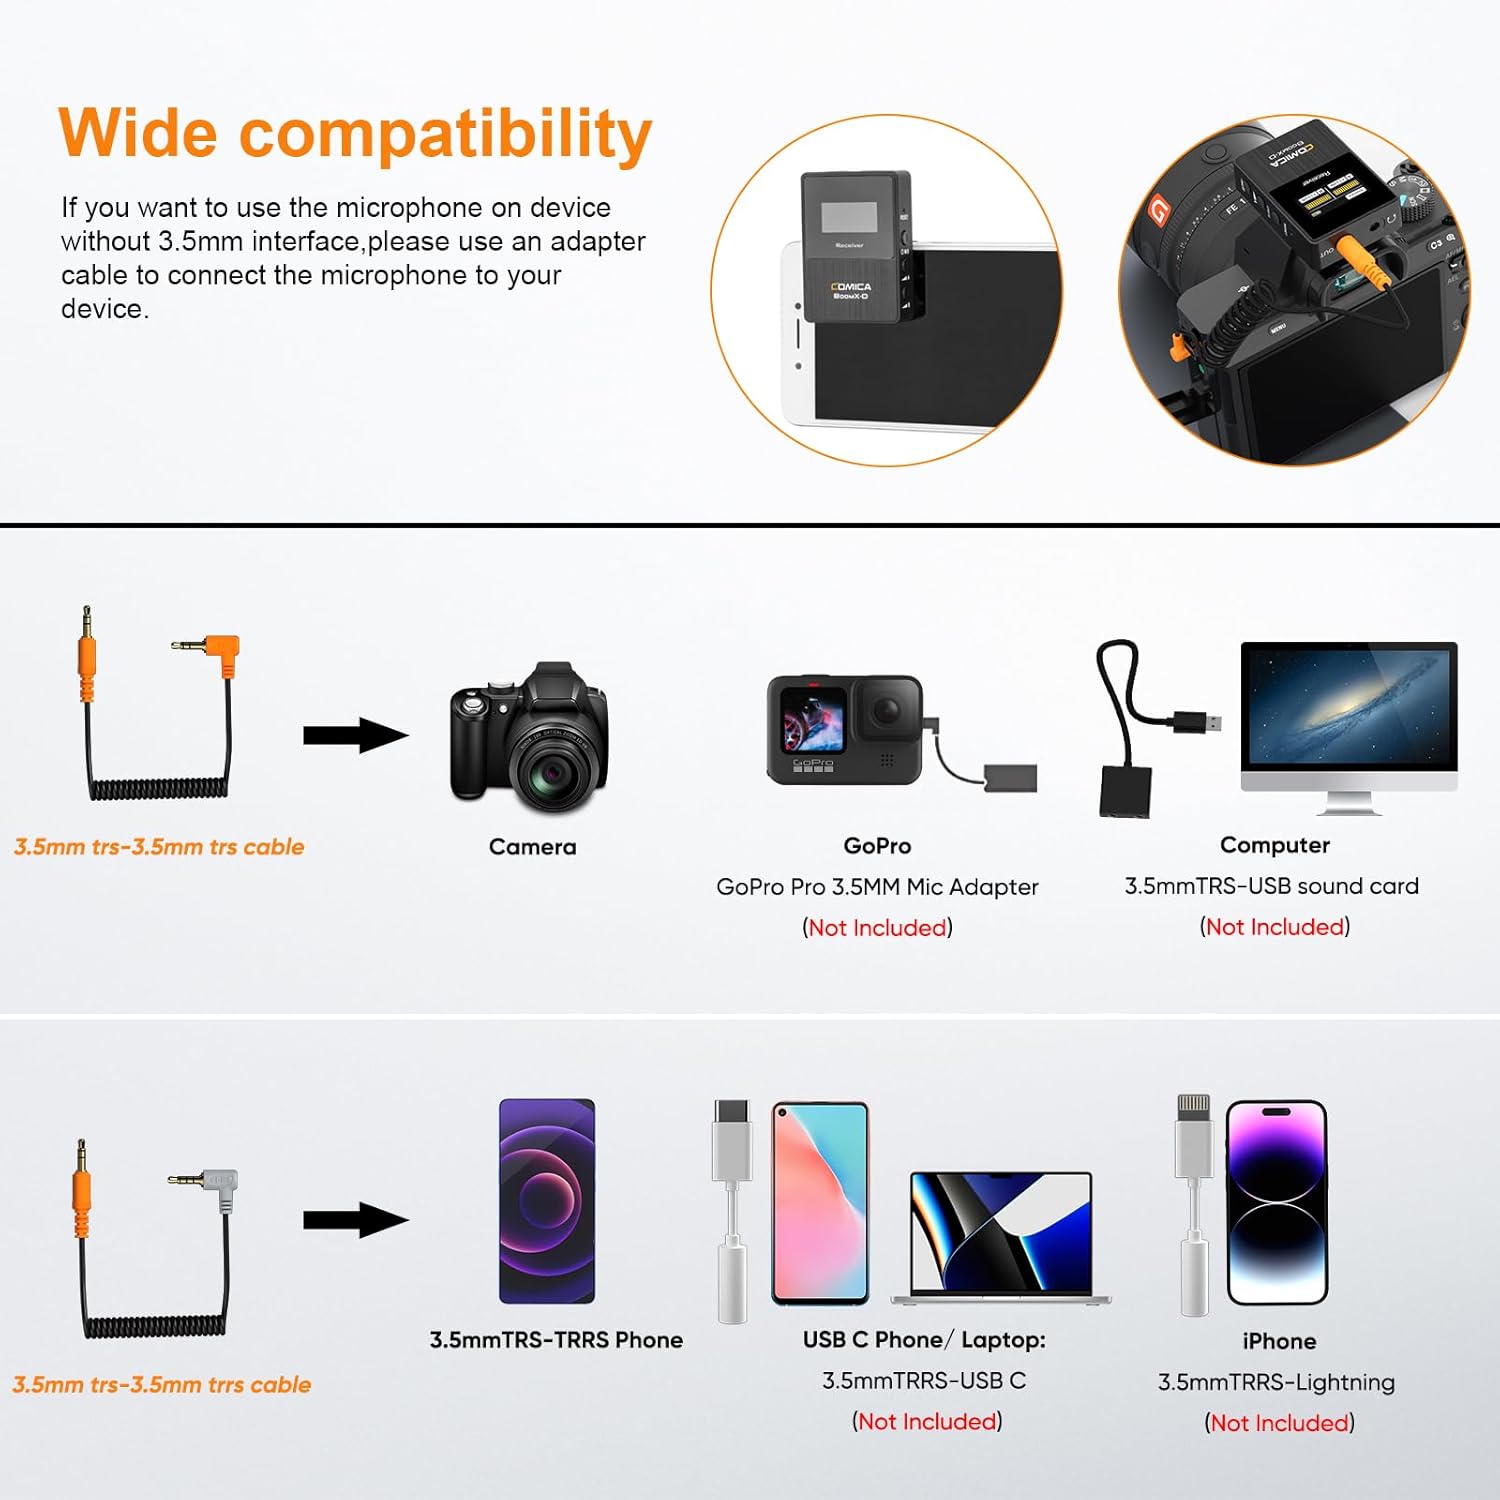
Figure 4.2: Compatibility and connection options for the BoomX-D2 system.
4.4. Attaching the Microphones
Each transmitter has a built-in microphone and a 3.5mm input for an external lavalier microphone.
- Using Built-in Mic: Simply clip the transmitter directly onto your clothing, ensuring the built-in microphone faces the sound source.
- Using Lavalier Mic: Plug the provided 3.5mm lavalier microphone into the TRS input on the transmitter. Clip the lavalier mic to your clothing, typically near the collar, and secure the transmitter using its belt clip.
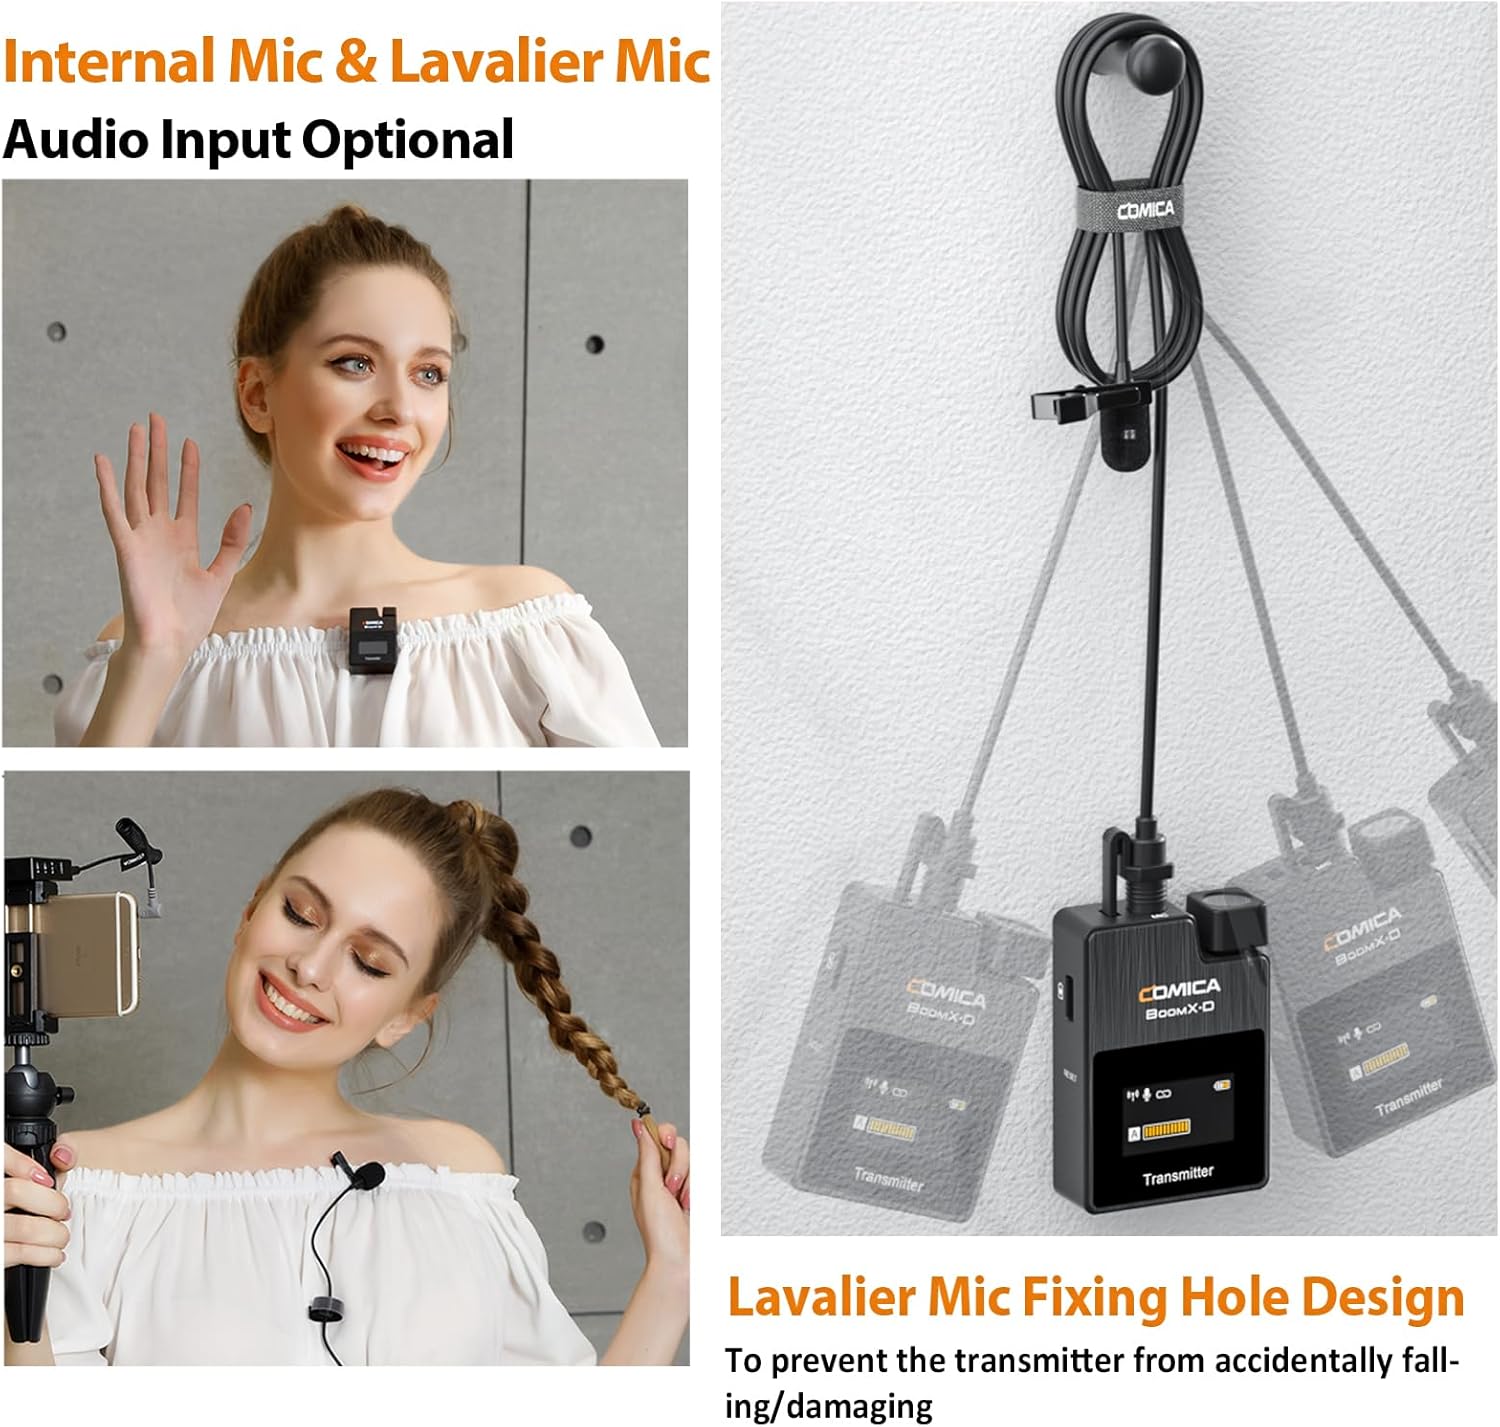
Figure 4.3: Internal vs. External Lavalier Microphone input options.
5. Иштөө нускамалары
5.1. Muting Function
To temporarily stop audio transmission from a transmitter, short press its Power/Mute button. The display will indicate the mute status. Short press again to unmute.
5.2. Реалдуу убакыттагы мониторинг
Connect headphones to the 3.5mm headphone jack on the receiver to monitor your audio in real-time during recording. This allows you to ensure optimal sound quality and detect any issues immediately.
5.3. Gain Adjustment
Use the A and B adjustment buttons on the receiver to independently control the output gain (volume) of each transmitter. This helps in optimizing audio levels for your recording device and environment.
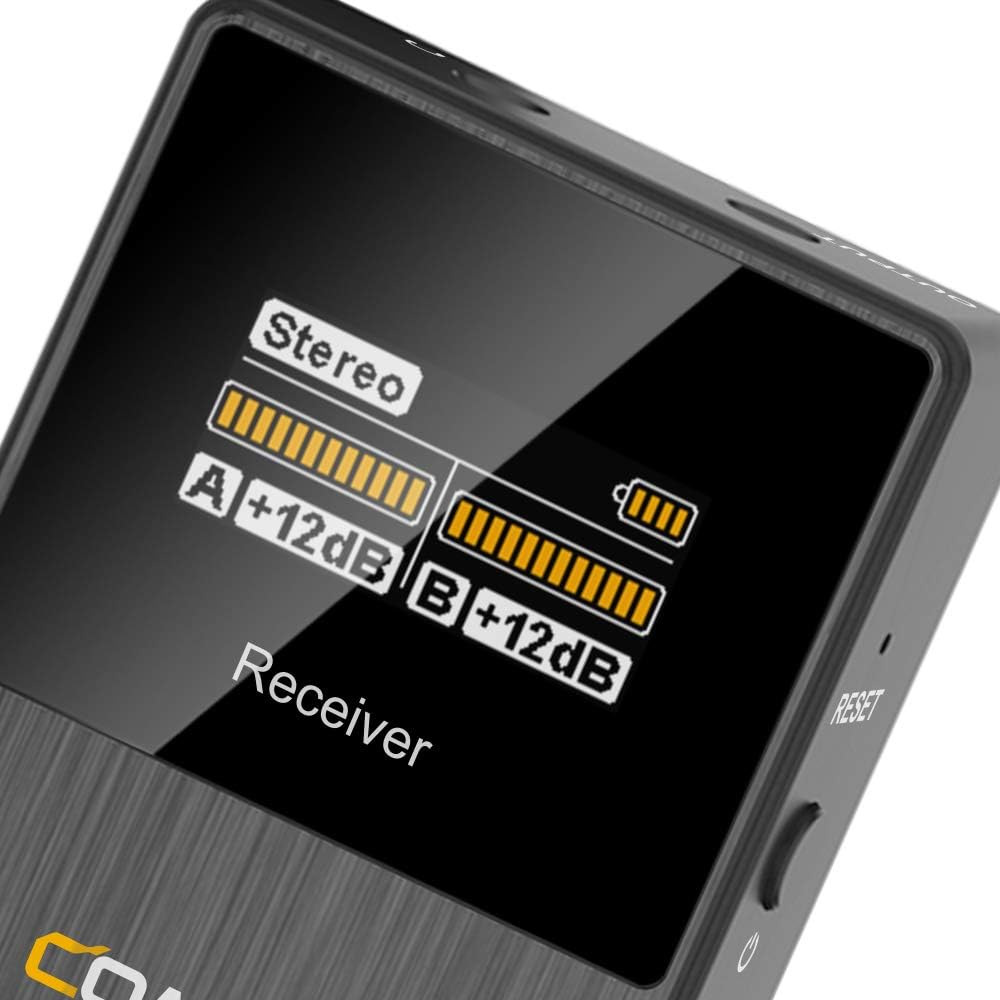
Figure 5.1: Receiver display showing audio levels and mode.
6. Өркүндөтүлгөн функциялар
6.1. Ызы-чууну азайтуу
The BoomX-D2 features a built-in DPS chip for intelligent noise filtering. To activate or deactivate noise cancellation, short press the "Pair/Denoise" button on the transmitter. This helps in achieving clear and clean audio, especially in environments with background noise.

Figure 6.1: Intelligent Noise Reduction functionality.
6.2. MONO/STEREO/Safety Mode Switch
The receiver allows you to switch between different output modes to suit your recording needs:
- Моно режими: Эки өткөргүчтөн келген аудиону бир моно трекке бириктирет.
- Стерео режими: Separates audio from each transmitter into left and right stereo channels.
- Коопсуздук режими: Records a primary audio track and a secondary -6dB safety track. This provides a backup in case the main track clips, offering greater flexibility in post-production.
To switch modes, short press the "Power/M/S" button on the receiver. The display will show the currently selected mode.

Figure 6.2: MONO/STEREO/Safety Mode options.
7. Техникалык шарттар
| Өзгөчөлүк | Деталь |
|---|---|
| Бренд | КОМИКА |
| Модель аты | BoomX-D2 |
| Байланыш технологиясы | 2.4 ГГц |
| Микрофон форма фактору | Lavalier |
| Зымсыз байланыш технологиялары | RF |
| Каналдардын саны | 2 |
| Иштөө диапазону | Up to 650ft (200M) |
| Кечигип калуу | < 20 мс |
| Frequency Response | 80 Гц - 20 КГц |
| Ызы-чуунун катышы | 10 дБ |
| Ызы-чуу деңгээли | 10 дБ |
| Power Source | Батарея менен иштейт (3 литий-полимердик батарейка камтылган) |
| Батареянын иштөө убактысы | 12 саатка чейин |
| Материал | Металл, пластик |
| Түс | Кара |
| Буюмдун салмагы (өткөргүч) | 29 грамм (болжол менен 1.02 унция) |
| Продукциянын өлчөмдөрү (L x W x Y) | 2.44 x 5.71 x 6.5 дюйм |
| Шайкеш түзмөктөр | Видеокамера, камера, персоналдык компьютер, смартфон, планшет |
| Өзгөчөлүктөр | Clip, Mute Function, Noise Reduction, Volume Control |
8. Кыйынчылыктарды
- Үн жок/Төмөнкү үн:
- Ensure all devices (transmitters, receiver, recording device) are powered on.
- Check if transmitters are muted. Unmute by short pressing the Power/Mute button.
- Verify proper cable connection between the receiver and your recording device. Use the correct TRS-TRS or TRS-TRRS cable.
- Adjust the gain levels on the receiver using the A/B adjustment buttons.
- Жаздыруучу түзмөгүңүздөгү үн жөндөөлөрүн текшериңиз.
- Ensure the lavalier microphone is securely plugged into the transmitter, or that the built-in mic is not obstructed.
- Интерференция/Начар үн сапаты:
- Perform manual pairing to re-establish a stable connection.
- Activate the noise reduction feature on the transmitter by short pressing the Pair/Denoise button.
- Ensure there are no major obstructions or strong 2.4Ghz interference sources between the transmitters and receiver.
- Stay within the optimal operating range (up to 650ft/200M).
- Check if the wind muffs are properly installed when using the built-in mic outdoors.
- Түзмөк кубатталбай жатат:
- Ensure the charging cable is fully inserted into the USB-C port.
- Try a different USB power source or USB-A port.
- Confirm you are using the correct 3-in-1 USB C charging cable (orange cable for data/charging, black for charging only).
9. Техникалык тейлөө
- Тазалоо: Use a soft, dry cloth to clean the devices. Do not use harsh chemicals or abrasive materials.
- Сактагыч: Store the system in the provided carry case in a cool, dry place away from direct sunlight and extreme temperatures.
- Батареяга кам көрүү: For long-term storage, charge the devices to approximately 50% every three months to preserve battery health.
- Колдонуу: Avoid dropping the devices or exposing them to water or excessive moisture.
10. Кепилдик жана колдоо
For warranty information, technical support, or service inquiries, please refer to the official COMICA webсайтка кайрылыңыз же жергиликтүү дистрибьютериңиз менен байланышыңыз. Сатып алуу квитанциясын кепилдик дооматтары үчүн сатып алуунун далили катары сактаңыз.
Кошумча жардам алуу үчүн, сиз иш сапары менен болот COMICA Store on Amazon.